Bioreactor
What is a Bioreactor?
A bioreactor is a specialized vessel that provides controlled conditions to support the growth of biological organisms or cells, facilitating processes such as fermentation, cell culture, and biochemical reactions. By regulating variables like temperature, pH, oxygen levels, and nutrients, bioreactors ensure the optimal environment for organisms to produce desired products (Delavar & Wang, 2022). This could be proteins, enzymes, or other biological compounds . In modern biomanufacturing, bioreactors are a central focus of scaling up laboratory processes for commercial production, ensuring reproducibility, efficiency, and safety across multiple biomanufacturing applications.
Bioreactors can come in various forms, from simple stirred tanks to more complex systems designed for specific processes. In the context of synthetic biology, bioreactors can be used to efficiently synthesize biomolecules, enabling precise control over biochemical reactions and metabolic pathways (Delavar & Wang, 2022). With the arduous process of growing bacteria manually, we utilized bioreactors to quickly scale up our operations by automating the growth of TdT-producing E. coli.
How Does this align with our Project & our Vision?
In our nuCloud project, we envision the use of a modular component bioreactor as a core element of our sustainable biomanufacturing strategy. We aim to integrate a bioreactor system that is highly modular, allowing different components to be added or removed as needed to optimize processes for specific synthetic biology applications. This flexibility is crucial as it aligns with our project’s need for adaptability in both liquid-phase synthesis and solid-phase assembly of DNA.
By designing a bioreactor that can efficiently process biological components under controlled conditions, we can support high-throughput biomanufacturing with minimal environmental impact. For instance, the modular design allows us to reduce reagent consumption, customize growth conditions for specific reactions, and automate processes for increased productivity. This means that our system can scale up without compromising sustainability, allowing us to synthesize long strands of DNA and other biomolecules with minimal waste, energy consumption, and carbon footprint.
Our modular component bioreactor embodies the principles of sustainability and scalability, ensuring that every step of our process attempts to minimize resource use and environmental impact. This aligns with our broader vision of creating a sustainable, efficient, and scalable solution for biological data storage and other future applications. Just like with the microfluidic chips, the modular nature of our bioreactor system allows us to tailor the environment to the unique needs of each process, improving yields and reducing waste while enabling precise control over reaction conditions. This approach is central to our commitment to innovative biomanufacturing and environmental responsibility.
In essence, the bioreactor’s modular design supports our vision of building flexible, sustainable, and scalable systems that are not only effective for biomanufacturing but also minimize their ecological footprint. Through this, we move one step closer to biotechnology that can produce impactful solutions with minimal resource consumption and maximized efficiency.
Our Build Process
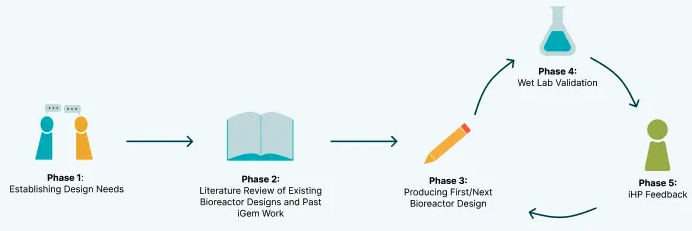
- Phase 1: Establishing Design Needs: This phase involved identifying the specific requirements and functionalities of the bioreactor. The team defined the target applications, desired scale, necessary control parameters (temperature, pH, aeration, etc.), and any other critical features. User needs and feedback, such as the desire for a smaller vessel size, were also gathered and considered. This phase established the foundation for the subsequent design stages.
- Phase 2: Literature Review of Existing Bioreactor Designs and Past iGEM Work: This phase involved researching existing bioreactor designs, both commercially available and from previous iGEM projects. The team explored different approaches to aeration, agitation, temperature control, and other relevant functionalities. This literature review provided valuable insights and inspiration for developing innovative solutions and avoiding potential pitfalls.
- Phase 3: Prototype First/Next Bioreactor Design: This phase involved translating the design needs and research findings into a concrete bioreactor design. The team used CAD software to create detailed models of the bioreactor components, including the vessel, casing, impeller, and any other custom parts. Material selection, component compatibility, and manufacturing feasibility were carefully considered. This iterative process involved multiple design revisions and refinements based on team discussions and feedback.
- Phase 4: Wet Lab Validation: This phase involved constructing and testing the physical prototype in a wet lab setting. The team assembled the bioreactor, connected the necessary hardware and software, and conducted experiments to evaluate its performance. Data were collected on key parameters like temperature, aeration rate, and cell growth. This testing phase was crucial for identifying any design flaws, performance limitations, or unexpected behaviors. The results of wet lab validation informed further design iterations and improvements.
- Phase 5: iHP Feedback (Integrated Human Practices): This phase involved gathering feedback from stakeholders beyond the immediate engineering team. The iHP team provided input on the bioreactor’s usability, safety, and potential societal implications. This feedback was valuable for ensuring that the bioreactor design aligned with broader ethical considerations and user needs. The iHP feedback also informed the development of user manuals, safety protocols, and other relevant documentation.
Mk. 1
Image
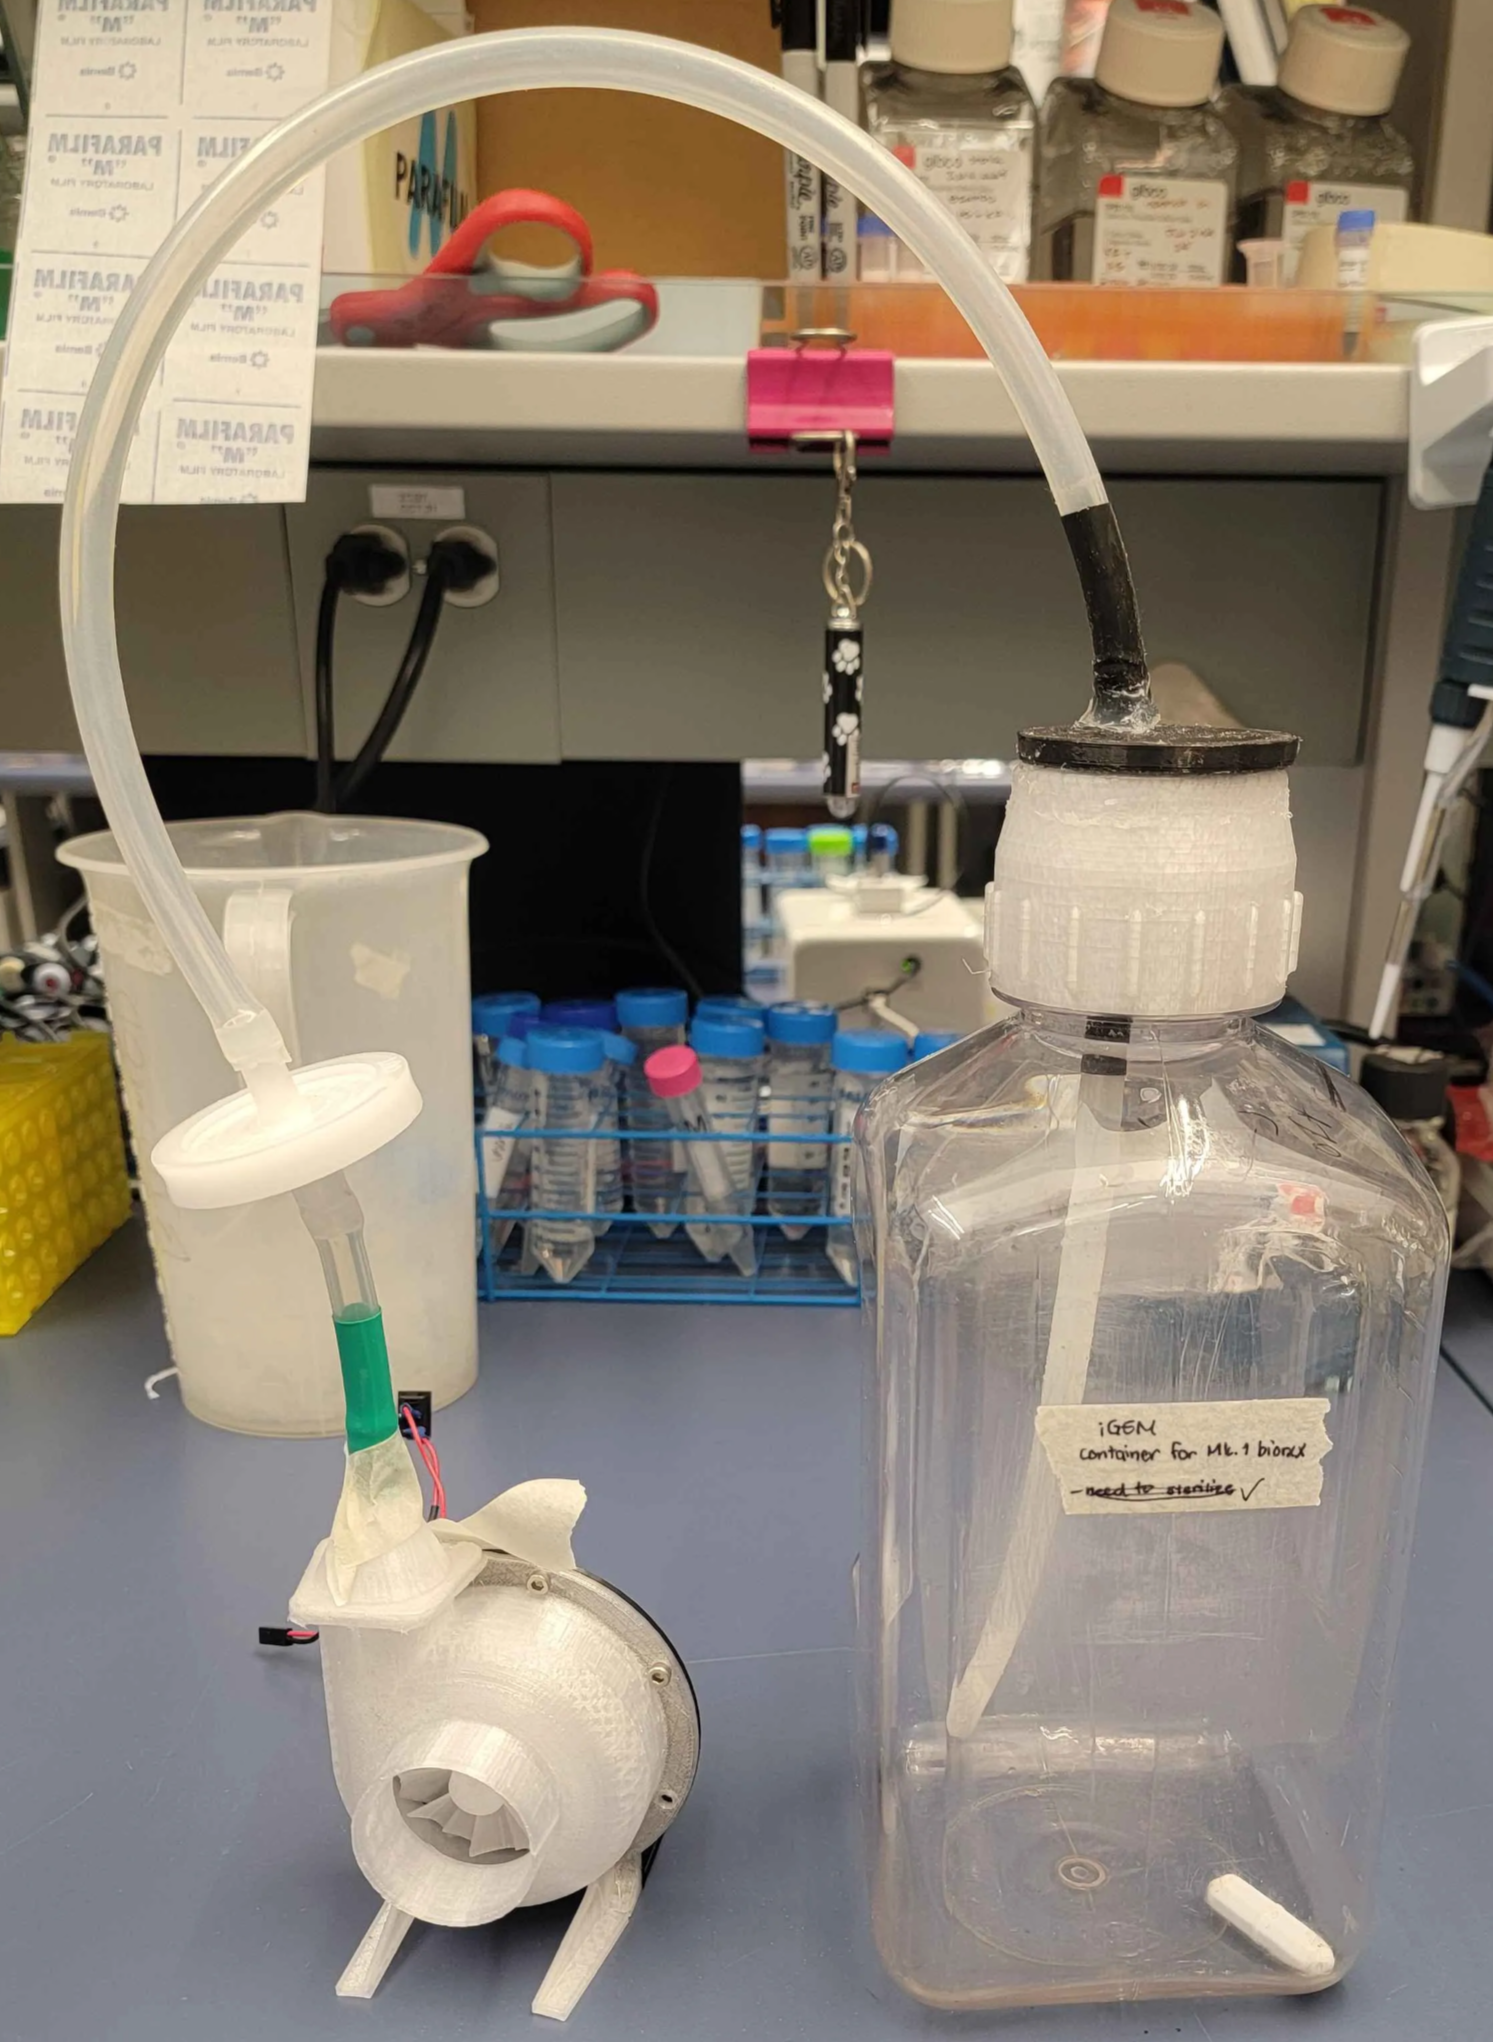
Quick Overview
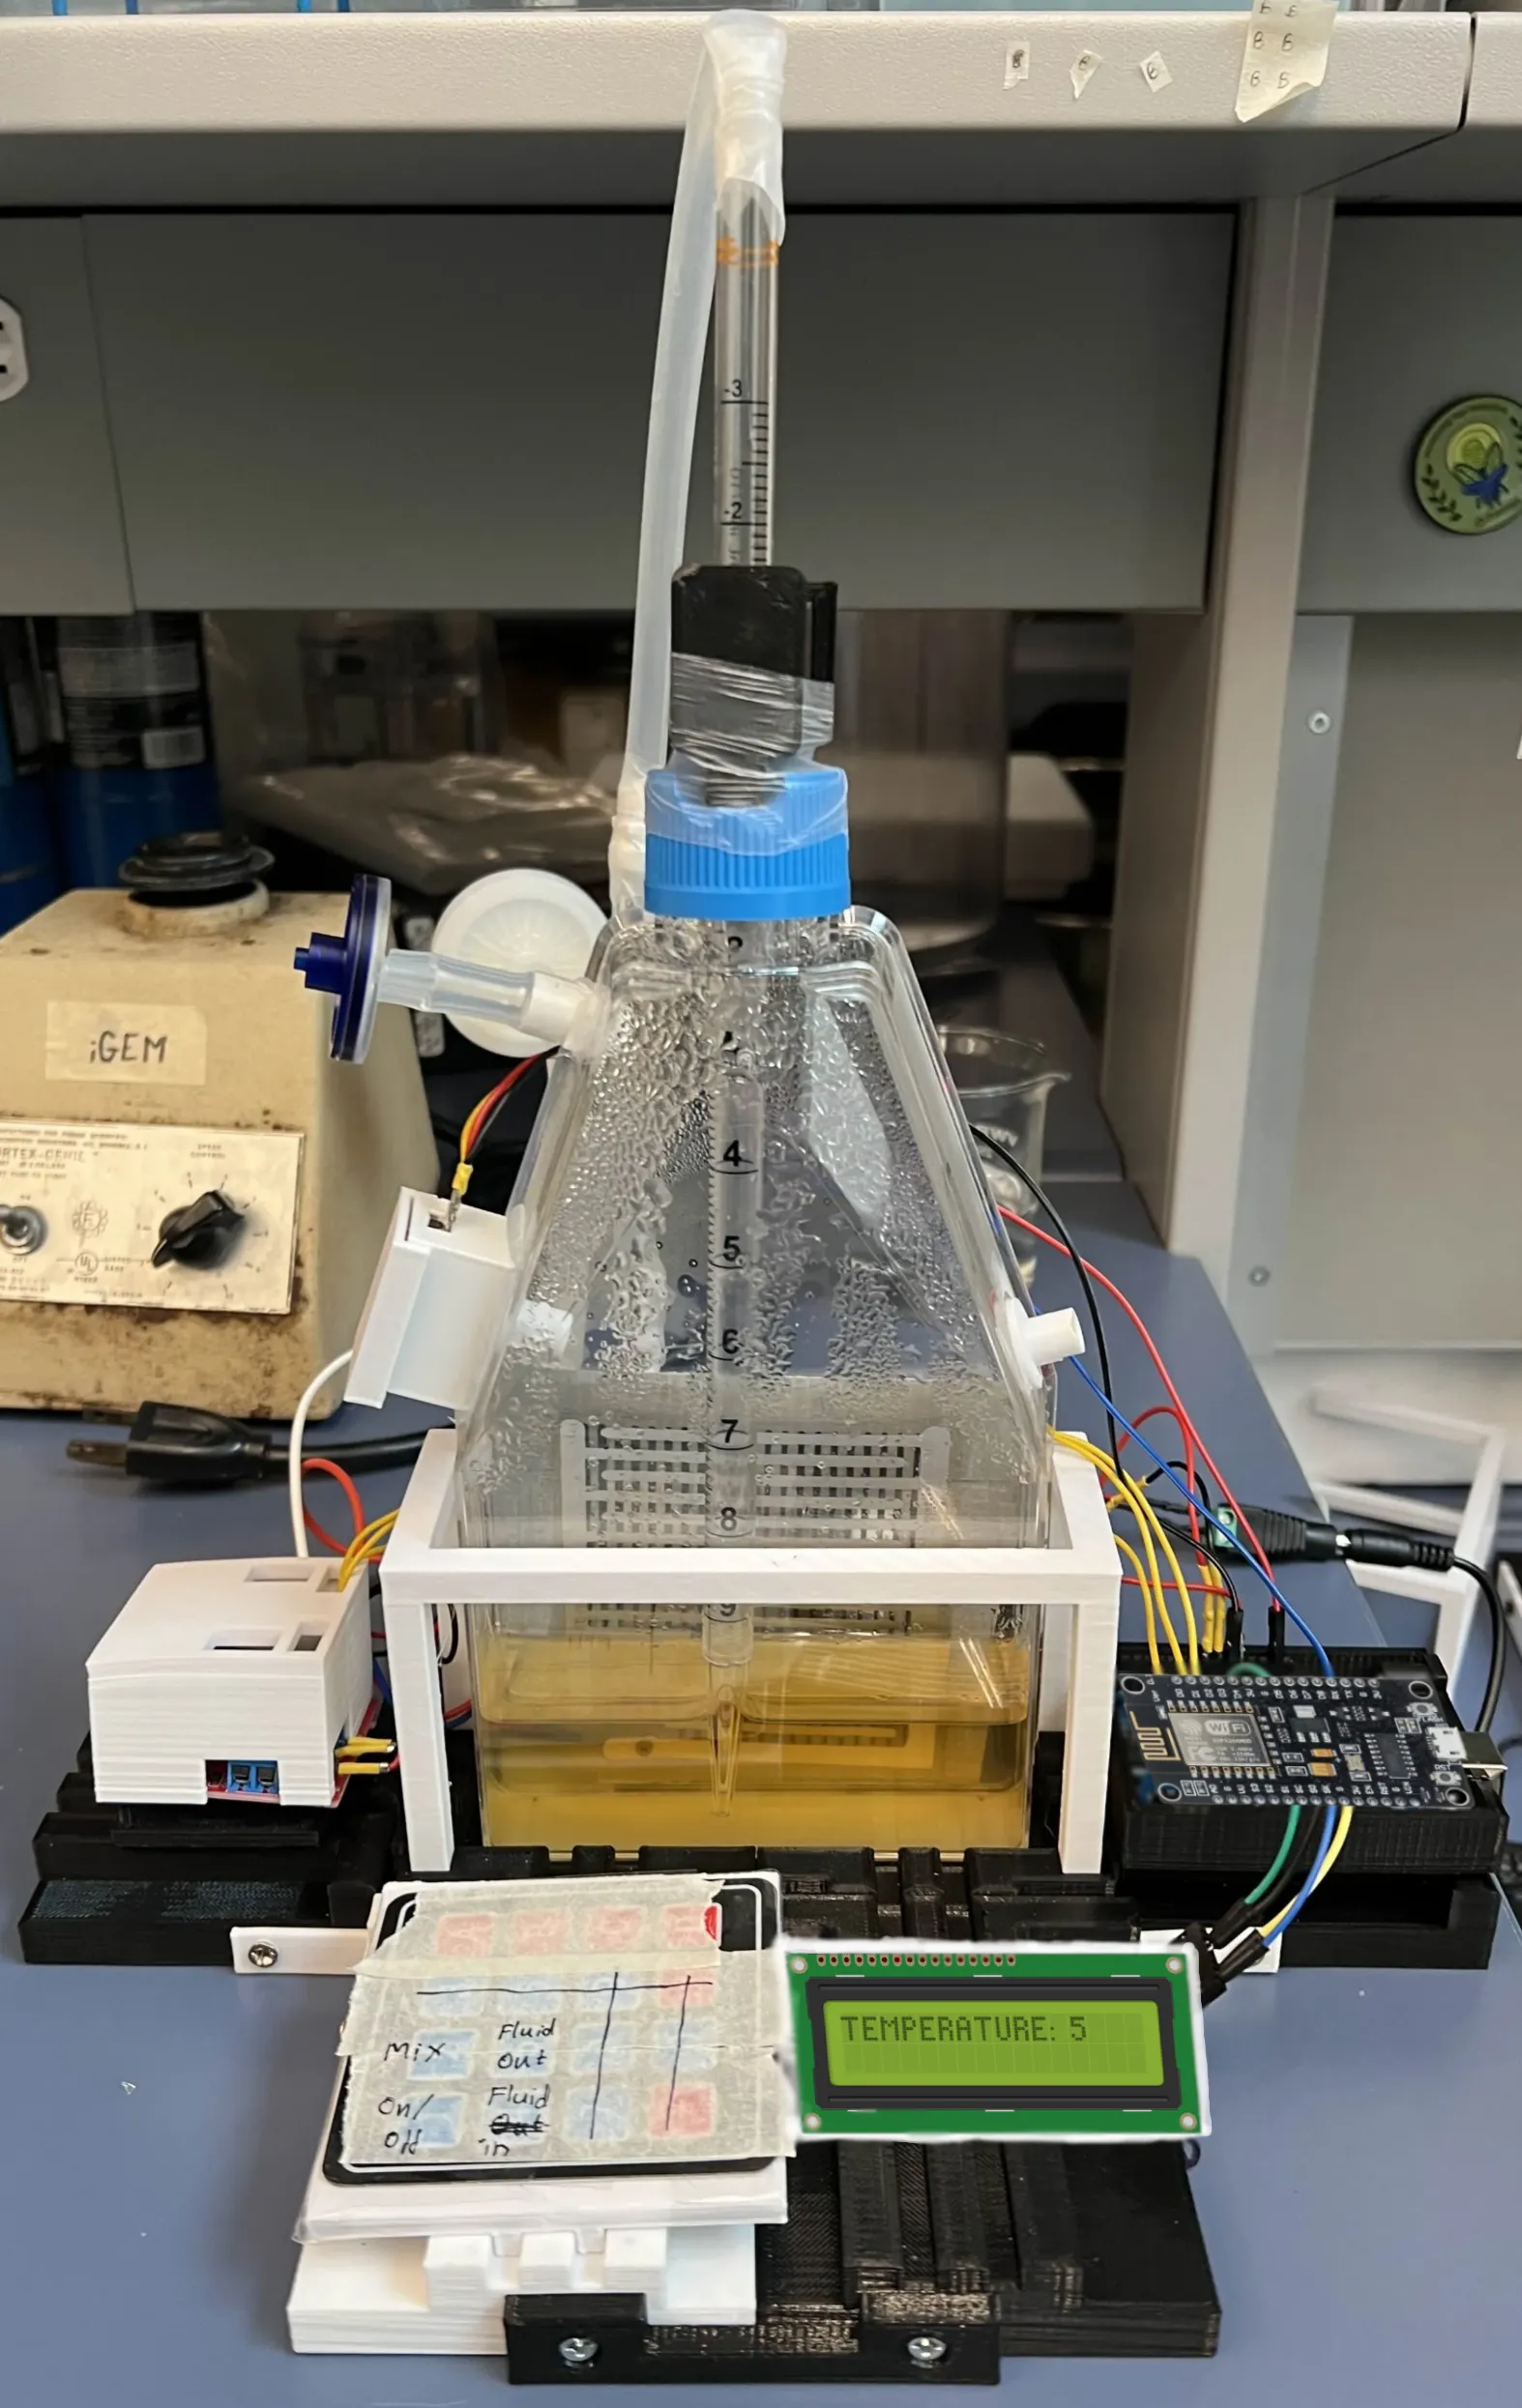
Mark 1 is the first of four iterations undergoing DBTL cycles. It consists of a 2L transparent vessel with a custom cap and a DC motor-powered fan for media aeration. The bioreactor sits on a magnetic stirrer, which activates an external stir bar to provide necessary agitation. Clear, ¼” silicone tubing transfers air from the fan to the vessel, bubbling oxygen into the media. Air filters between tubing sections maintain the bioreactor’s environmental integrity.
Features
Polycarbonate cap with air filters
This cap is equipped with 3 nozzles and 1 larger opening for adding/removing reagents and prevents contamination using a stopper. It screws onto the top of the vessel and the nozzles are compatible with 1/4” tubing.
2L autoclavable vessel
This vessel was sourced from pre-existing laboratory supplies and this 3D model is just a graphical representation what it looks like in real life. The cap fits on top and the entire container is transparent. It is not custom designed or modified.
Aerating DC-motor polycarbonate fan with power switch
This fan is printed entirely from polycarbonate (PC) and intakes air from the large circular opening and sends it to the bioreactor via the barbed opening at the top which goes through an air filter before being bubbled into the vessel. A DC motor sits behind the impeller (not shown) and connects to the circuit from the back.
External magnetic stir bar
This stir bar is just a graphical representation of the actual magnetic stir bar used. The stir bar is widely available in all laboratories and any differences are negligible. It is powered by a magnetic stirrer that the mark 1 bioreactor is placed on.
Build Process
Designing Mk. 1
When conceptualizing our bioreactor, we opted for a safer approach by designing a larger vessel for substantial batches of bacteria and culture. We started with essential features: aeration, agitation, and additional slots for future components. As this was our first iteration, we chose an external magnetic stirrer for agitation—a straightforward solution at the time. Aeration posed a more complex challenge, so we focused on designing a component to produce the desired bubbling effect.
Initially, we considered introducing oxygen below the media fluid height to maintain environmental integrity. However, after evaluating the potential air pressure requirements and the added resistance from the air filter, we decided that feeding oxygen through the vessel’s top opening would be more effective. This approach would also ensure a more even distribution of oxygen throughout the culture. Consequently, we needed to create an airtight connection from the cap to the air filter and from the filter to the impeller fan. The barb technology commonly used in laboratories provided an ideal solution for this requirement. We added three barbs to the cap and one to the impeller fan, and found filters that also featured this connection.
Building Mk. 1
After designing custom models for the cap and impeller fan, we 3D printed them using a polycarbonate (PC) printer with 1.75 mm PC filament. We assembled the cap by applying silicone sealant to the barbs and allowing it to cure. Next, we connected 1/4” polyethylene tubing from the air filters to the cap and also the one segment to the interior of the cap for bubbling.
To assemble the fan, we utilized the pre-existing holes in the fan casing, securing it with screws and nuts. We then sealed the barb part onto the fan casing and attached the impeller to the DC motor’s shaft. Initially, the fan had several design flaws that produced a loud grinding sound when turned on. To address these issues, we used a Dremel tool to sand down individual parts, eliminating the contact points between pieces.
Once all components were assembled and ready for use, we built the circuit for our motor using a battery and a toggle switch in series. For the circuit diagram, see our design history files. Wires were soldered onto the DC motor and toggle switch which connected to our battery via Dupont connectors.
Testing Mk. 1
Bioreactors are often first tested for their ability to contain contents and maintain separation from the external environment. We conducted structural function and integrity tests on our bioreactor through leak and bubble testing.
For the leak test, we filled the vessel with water and observed it while upright, checking for any leakage. We then recorded the initial water level and checked it again after several hours. The level didn’t change significantly, indicating a successful containment test.
For the bubble test, we emptied the vessel, removed all tubing, and sealed all openings in the cap. We then submerged the entire vessel underwater and observed no escaping bubbles, confirming its airtight properties.
To ensure proper bubbling in our bioreactor, we adjusted the current and voltage to the DC motor using a power supply until it produced the desired bubbling rate (2 / sec). However, we realized that these metrics changed depending on the depth of the tubing. We decided to set a standard metric at 100 mL below surface level and found that 9 V and 0.9 A produced the desired bubbling rate. With this test, we were able to establish that a 9V battery would be a sufficient power source for mark 1.
Circuit testing was straightforward due to the simplicity of the circuit. The motor functioned as anticipated and the switch turned it on and off as appropriate.
Lessons Learned from Mk.1 (Internally)
Considering the time we spent using a Dremel tool to sand parts down, it would probably be worth our while in the future to add tolerances and extra space to our parts due to 3D printer error that can cause abrasiveness between moving parts or prints that have fits to them.
It is important to consider the dynamic changes in the bioreactor environment during its active function. This may include fluid pressure, temperature, and pH. For example, if temperature suddenly increases, components cannot be susceptible to heat or they would melt. Also, when adding substances to the bioreactor, we have to consider the internal pressure of the vessel since it will go work against the process.
Learning through iHP Integration & User Feedback
We attempted to gain user feedback on Mk.1 from local collaborators that were external to our team. To begin, we took our bioreactor to the Biomedical Research Facility at UBC with our iHP contact Maggie Chopra, we identified four key areas of progression that future work can target:
-
Noisy and clunky operation:
- The bioreactor produced excessive noise during operation, disturbing lab work
- Mechanical components were not optimized for smooth functioning, leading to a clunky performance
-
Inconsistent bubbling and aeration:
- The aeration system did not provide uniform gas distribution throughout the culture medium
- Bubbling patterns were irregular, potentially affecting oxygen transfer rates and mixing efficiency
-
Exposed circuitry and circuit safety concerns:
- Electronic components were not adequately protected, posing potential safety hazards
- Lack of proper insulation increased the risk of short circuits or electrical malfunctions
-
Multiple disconnected parts:
- The bioreactor design consisted of disconnected separate components, making transport and operation more complex Additionally, we also get feedback from our iGEM Supervisor, Dr. Steven Hallam. Members of his lab saw Mk.1 in action, and were able to give us user feedback and rise concerns for future iterations.
-
Size Limitations:
- The bioreactor was deemed too large for its intended purpose
- Future iterations should focus on miniaturization to improve portability and efficiency
-
Automation Deficiency:
- Lack of automated processes increased manual workload
- Implementation of automated systems could enhance consistency and reduce human error
-
Insufficient Parameter Monitoring:
- Limited feedback on crucial parameters like pH, temperature, and dissolved oxygen
- Integration of real-time monitoring systems recommended for future versions
-
Absence of Parameter Control:
- No mechanisms to adjust and maintain optimal growth conditions
- Future designs should incorporate systems for precise control of key parameters
-
Sterility Concerns:
- Potential risk of contamination during experimental procedures
- Resolved by conducting activities within a biosafety cabinet
- Future designs could incorporate built-in sterility measures
DHF
Mk. 2
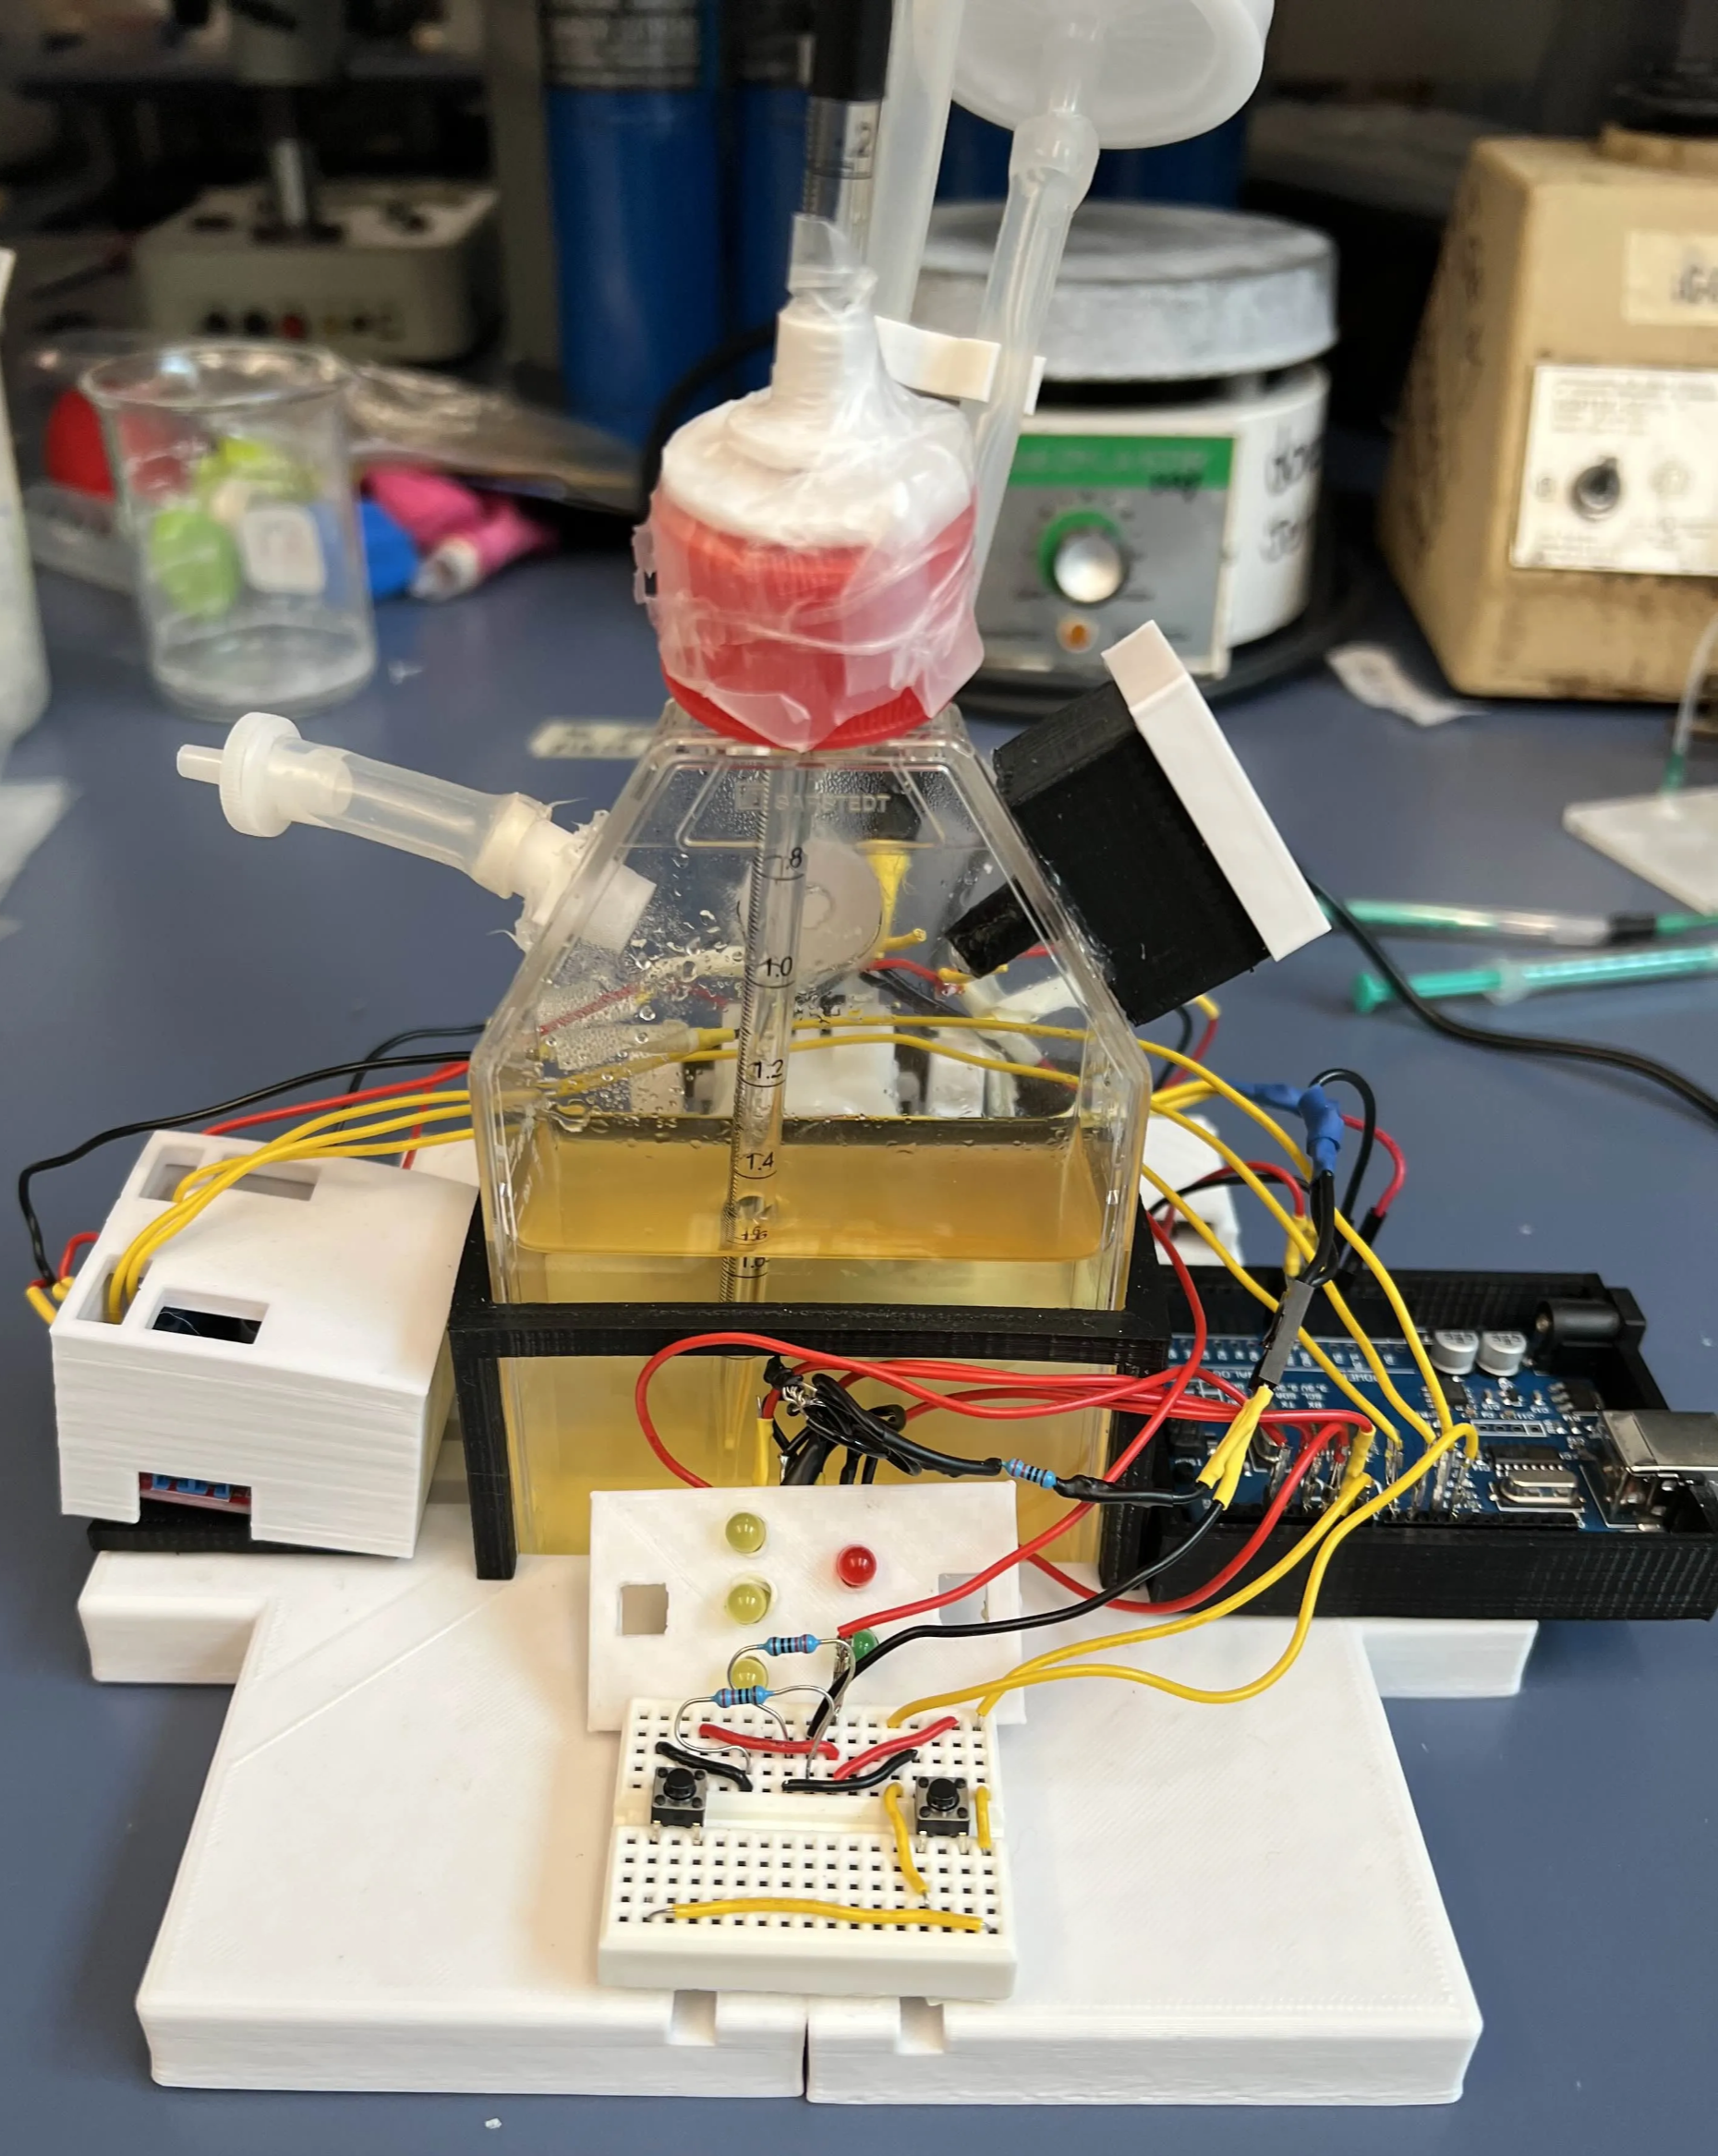 Mark 2 represents a significant advancement over the basic functionality of Mark 1. The most notable change is the integration of a peristaltic pump and change in main vessel. The pump allows for automated and precise fluid handling, a key feature for advanced bioreactor operations. It will be controlled by an arduino and a motor driver. The aeration system is also refined with thin-tipped pipette for precise oxygen delivery. It only uses one pipette for both aeration and agitation, promoting sustainable plastic usage. Furthermore, Mark 2 incorporates a modular sensor, enabling real-time monitoring of crucial parameters such as temperature and humidity. All these new components are managed by a custom-designed Arduino UNO and integrated software, providing a centralized control and monitoring interface. In addition, a control panel was added for external manual control over the bioreactor. Finally, the introduction of quick-connect fittings in the base enhances the modularity of the system, making it easier to adapt and reconfigure for different experimental needs. These improvements transform Mark 2 into a more versatile and controllable bioreactor platform compared to its predecessor.
Features
160 mL Tissue Culture Flask with modified cap
This CAD model showcases our bioreactor vessel with a modified cap designed for enhanced sterility and simplified liquid handling. The key feature is the integration of a single-pipette port, streamlining workflow and minimizing contamination risk during reagent addition and sample collection. This design improves upon previous iterations by optimizing fluid management within the modular bioreactor system.
Temperature (DHT) Sensor
This DHT sensor integrates with our Arduino-controlled system to provide precise and real-time humidity and temperature readings within the bioreactor environment. These data are essential for maintaining optimal culture conditions and ensuring consistent experimental results.
Single pipette for agitation and aeration
This pipette-based system provides a novel approach to aeration and agitation within our bioreactor. By utilizing controlled pipette movements, it gently mixes the culture media and introduces air, ensuring efficient oxygen transfer and uniform nutrient distribution while minimizing shear stress on delicate cells. While it is less efficient, the pump-controlled pipette can quickly swap between functions creating a balance of both aeration and agitation.
Control Panel
This control panel provides a centralized interface for monitoring and managing all aspects of our bioreactor system. It allows users to control aeration, fluid handling, and other critical functions like loading and unloading media and culture. This ensures precise regulation of the culture environment and facilitating automated operation.
Custom Base and Frame
This modular base provides a flexible and adaptable platform for our bioreactor system. Its standardized design allows for easy integration of various components, including pumps, sensors, and actuators, enabling customization and expansion based on specific experimental needs. The frame helps to stabilize the bioreactor vessel.
Base Connector
This part was created specifically for connecting two halves of the base together. Due to size constraints on our 3D printers, bases had to be printed in 2 parts and were conjoined by screws and this base connector part.
Motor Driver Base and Cover
This motor driver base and cover, house and protect the L298N motor driver, which is responsible for precise control of the bioreactor’s motorized components, like the pump. The cover ensures safe operation while allowing access for adjustments, maintenance, and safe wiring.
Pressure Relief Valve
Taking from experiences on Mark 1, internal pressure relief is an important part of being able to inflow and outflow reagents and substances. This provides a passive filtered-air inflow and outflow which could help heat and cool the bioreactor depending on its location.
Double Tubing Holder
This double tubing holder helps to reduce backflow by holding tubing upright and maintaining their positions. It also provided quality-of-life benefits to the users by stopping chaotic tubing from flailing everywhere during bioreactor operation.
Learning through iHP Integration & User Feedback
Once again, we incorporated iHP feedback from two external stakeholders, Ahmed Kabil & Taehyeon Kim from the Kelly McNagny Lab. These are both senior PhD Candidates exploring Immunology & Stem Cell Biology at UBC. They provided valuable insights into the potential applications and limitations of our bioreactors in their immunological research, and made design suggestions that would allow the bioreactors to potentially be used for Mammalian cells.
Their feedback helped us refine our approach and consider new avenues for exploration in the field of immunology, stem cell biology.
- Lack of sterility and controlled environment on cap: The current design doesn’t ensure a completely sterile environment, particularly around the cap area. This could lead to contamination issues, especially for long-term experiments or when working with sensitive cell cultures. Implementing a more robust sealing mechanism or introducing a filtered air exchange system could address this concern.
- Measuring growth curves using biomass: While biomass measurement is a common method, it may not provide the most accurate or detailed growth data for all types of cells or organisms. Exploring alternative methods such as optical density measurements, fluorescence-based techniques, or real-time cell counting could offer more precise and continuous growth monitoring capabilities.
- Chaotic circuit construction: The current electrical setup appears disorganized, which could lead to reliability issues and make troubleshooting difficult. Implementing a more structured wiring approach, using custom PCBs, or integrating modular components could improve the overall robustness and maintainability of the bioreactor’s electrical systems.
Additionally, we also get feedback from our iGEM Supervisor, Dr. Steven Hallam. Members of his lab saw Mk.1 in action, and were able to give us user feedback and rise concerns for future iterations.
- Automated sterilization: Implementing a programmable sterilization process to reduce contamination risk and increase experiment reproducibility.
- Parameter control without computer: Developing a standalone control system with a microcontroller and display for adjusting key parameters directly on the device.
- User interface: Creating an intuitive interface with an LCD display, easy-to-navigate menus, and the ability to save experiment profiles.
DHF
Mk. 3
Image
Features
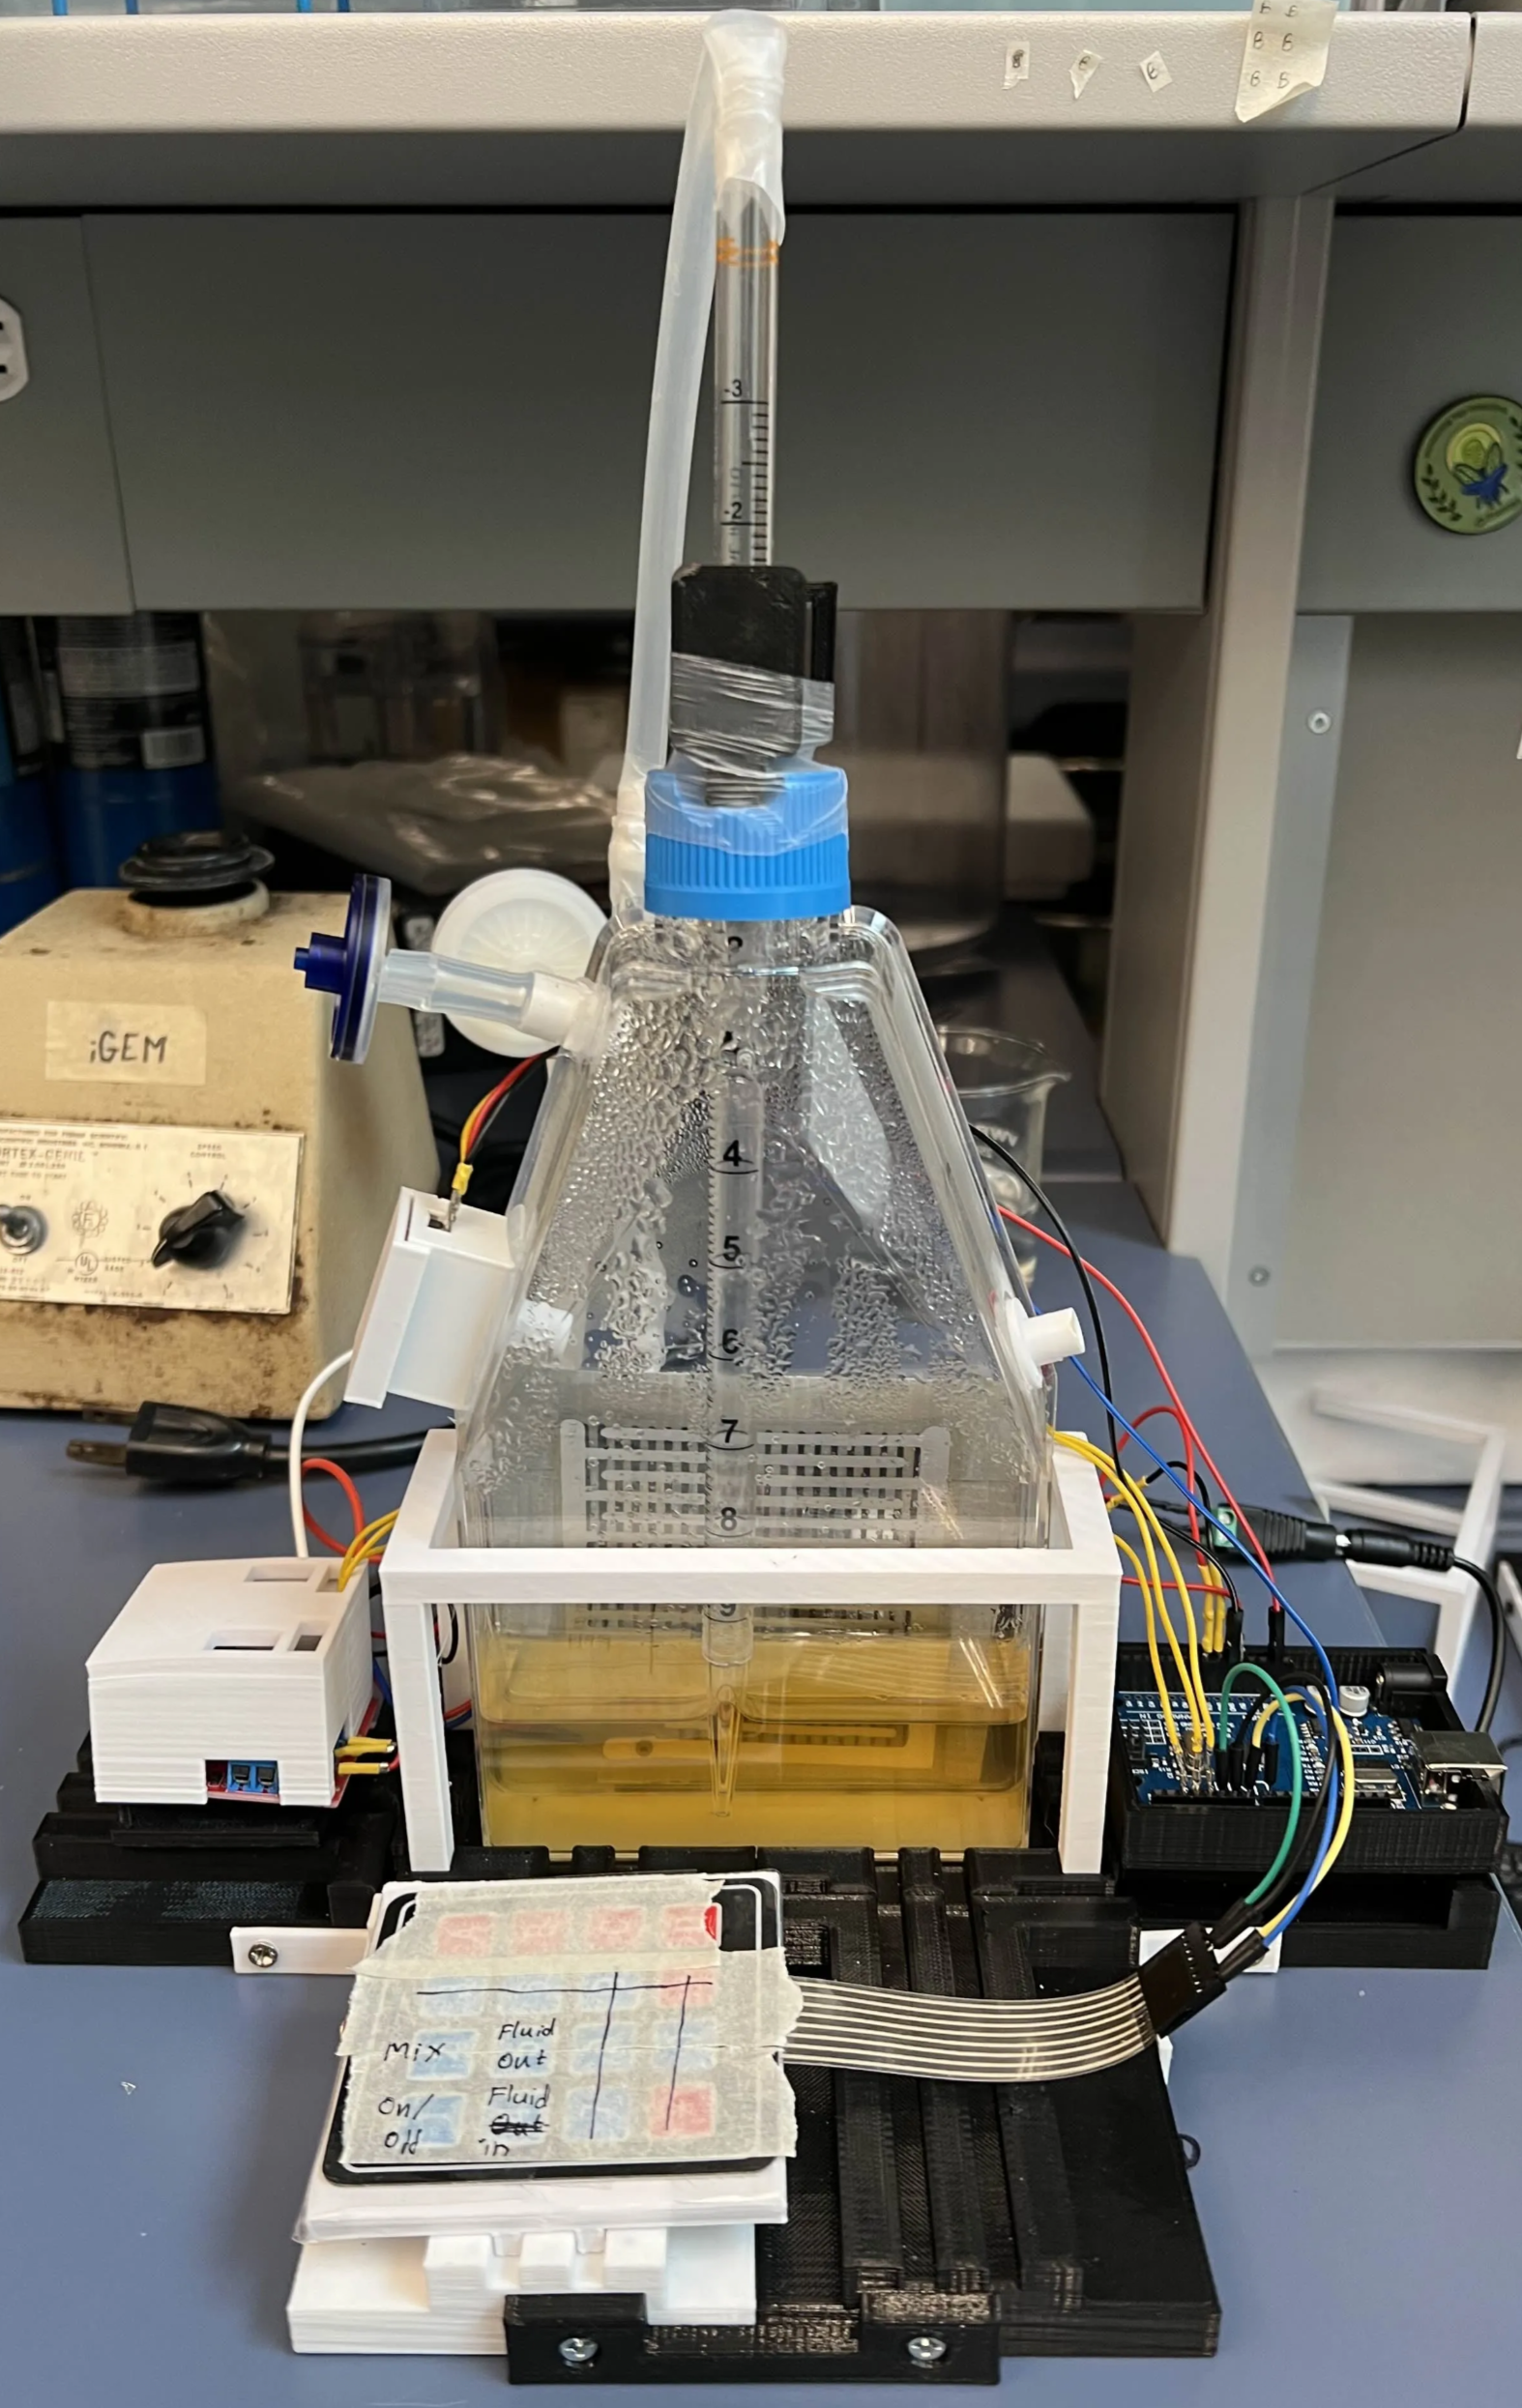
300 mL Tissue Culture Flask with modified cap
This CAD model showcases our bioreactor vessel with a modified cap upscaled from mark 2. The pipette size has also been increased for higher throughput and can now fit the optical density (OD sensors) directly onto itself.
Optical Density (OD) Sensor Case, Cover, LED mount
This OD sensor integrates with our Arduino-controlled system to provide precise and real-time optical density readings within the bioreactor environment to create growth curves. This data is essential for maintaining consistent experimental conditions and results while automating the process and removing the need for direct manual input.
Custom Base and Frame
This modular base is an upscaled version of mark 2’s base to match the size of mark 3’s vessel. Its standardized design has now been expanded and all modular attachments has been standardized across all slots and allows for universal integration of various components, including keypads, LCD displays, and joysticks, enabling customization and expansion based on specific experimental needs. The frame helps to stabilize the bioreactor vessel and has also been upscaled to match the base.
Single pipette for agitation and aeration
Similar to mark 2, this pipette is responsible for the same functions but has increased size and throughput.
Keypad Mount
This keypad provides a tactile interface for inputting commands and controlling the bioreactor system. Similar to the control panel, it allows users to adjust parameters, initiate functions, and navigate menus, offering an alternative input method for managing the bioreactor’s operation. It is also easier to label and increases user-friendliness.
ELEGOO MEGA Base with Breadboard slots
This Elegoo Mega base mount provides a secure and organized platform for the Arduino Mega and associated breadboard. The integrated breadboard slots allow for easy mounting and connection of electronic components, streamlining the prototyping and development process for the bioreactor’s control system.
Learning through iHP Integration & User Feedback
For Mk.4, we incorporated iHP feedback from Thristan Taberna and Laura Gonzalez, who are PhD Candidates at the Zandstra Stem Cell Bioengineering Lab at UBC, and the BC Cance Terry Fox Laboratory, respectively**.** These are both senior PhD Candidates exploring Immunology, Stem Cell Biology & Engineering, and have trained as engineers.
Thristan’s PhD project focuses on exogenously differentiating hematopoietic stem cells into mature T cells, and he is doing this using a specialized bioreactor of his design. Laura, a iGEM alum from Mexico and trained biomedical engineer, is focusing on creating an assay that generates Neutrophil, monocyte B-cells and T-cells from a common hematopoietic progenitor cell. She has extensive experience using bioreactors and 3D cultures to achieve this differentiation process, making her extremely valuable as an iHP contact to help expand the scope of her bioreactor.
Their feedback helped us further refine bioreactor, with a specific stem cell culture.
- Remote Access Capabilities:
- Bluetooth connectivity for short-range control
- Wi-Fi integration for long-distance monitoring and adjustments
- User Interface Enhancements:
- High-resolution LCD screen for real-time data display
- Joystick control to avoid repetitive
- Improved Control System:
- Advanced algorithms for precise parameter regulation
- Customizable alert system for critical condition notifications
Additionally, we also get feedback from our iGEM Supervisor, Dr. Steven Hallam. Members of his lab saw Mk.1 in action, and were able to give us user feedback and rise concerns for future iterations.
- Insufficient space for essential sensors:
- Oxygen and pH sensors require more room for proper integration
- Redesign needed to accommodate these crucial monitoring components
- Material limitations for sterilization:
- Current PLA material not suitable for autoclave sterilization due to low heat resistance
- Recommendation to switch to polycarbonate:
- Higher heat resistance allows for autoclave sterilization
- Improved durability and longevity of the bioreactor
DHF
Mk. 4
Image
Features
Joystick Base
This joystick, much like the keypad and control panel, offers another input method for interacting with the bioreactor system. Its intuitive design allows for precise control and adjustments of parameters, providing an alternative way to navigate menus and execute commands. This is particularly helpful for repeated inputs which are apart of using the LCD screen.
LCD screen Casing
This LCD screen provides a visual display of key bioreactor parameters, similar to the temperature readings printed to the serial monitor. It offers a real-time, at-a-glance view of critical data, enhancing monitoring and control of the bioreactor’s environment. Inside the casing is space for wiring and the wifi module.
ESP8266 Wifi-module Case
The ESP8266 is a Wi-Fi-enabled microcontroller that adds wireless communication capabilities to the bioreactor system. This allows for remote monitoring and control of the bioreactor through a network connection, enabling greater flexibility and accessibility. It will sit inside the LCD display casing.
Learning through iHP Integration & User Feedback
For our final Bioreactor, we got user feedback from Dr. Mike Hughes, a research associate at the School of Biomedical Engineering. His versatile experience in a number of bioengineering, molecular biology, and bioengineering fields provided valuable insights for our project. Dr. Hughes emphasized the importance of scalability and modularity in bioreactor design, which aligned perfectly with our vision for the Mk.4 bioreactor. His feedback helped us refine our approach to ensure that our final design would be both efficient and adaptable to various research needs.
- Adding live feed cameras:
- Enables real-time monitoring of experimental conditions
- Allows researchers to quickly identify and address any issues
- Enhances data collection and analysis capabilities
- Expanding base size and module compartments:
- Increases the capacity for larger-scale experiments
- Provides more flexibility and capacity for different types of modules
- Improves overall stability and functionality of the bioreactor
- Locally stored experimental protocols:
- Streamlines the process of setting up different procedures
- Reduces the risk of errors in protocol implementation
- Allows for easy standardization and replication of experiments
Wet Lab Validation
Preliminary Data: Validating Mk.1 Against Benchtop Liquid Broth Cultivation
To validate our mixing strategies, our team conducted an experiment to validate Mk.1’s utility. The validation experiment had two goals:
- Reactivate overnight culture in LB+Kan and seed the bioreactor and conventional flask
- Take spectrophotometry measurements in triplicate every 20 minutes to generate a growth curve and compare the two culture media.
Materials and Methods:
Refer to bioreactor efficacy experiment.
Results:
- 2 Eppendorf tubes with 1 mL each of Kanamycin stock solution (50 mg/mL) were made.
- Results supported Mk.1 being a better culture method than standard benchtop flask culture.
Below, we present a table with the results of our experiment comparing the growth rates of bacteria in our bioreactor versus a conventional flask culture method. The table below presents the optical density (OD) measurements taken at 600 nm in 20-minute intervals over a 2-hour period for both culturing methods. Each measurement was performed in triplicate to ensure reliability of the data.
| Bioreactor | Flask (control) | |||||||
|---|---|---|---|---|---|---|---|---|
| Time | Replicate 1 | Replicate 2 | Replicate 3 | AVERAGE | Replicate 1 | Replicate 2 | Replicate 3 | AVERAGE |
| 9:05 PM | 0.038 | 0.037 | 0.037 | 0.042 | 0.041 | 0.041 | ||
| 9:25 PM | 0.074 | 0.074 | 0.073 | 0.068 | 0.067 | 0.067 | ||
| 9:45 PM | 0.157 | 0.158 | 0.159 | 0.141 | 0.142 | 0.1415 | ||
| 10:05 PM | 0.401 | 0.399 | 0.398 | 0.346 | 0.340 | 0.343 | ||
| 10:25 PM | 0.718 | 0.720 | 0.718 | 0.596 | 0.593 | 0.600 | ||
| 10:45 PM | 1.194 | 1.199 | 1.196 | 0.897 | 0.893 | 0.890 |
Figure 1. OD Measurements in 20-minute intervals using spectrophotometer at 600 nm for bioreactor & conventional culturing flask method.
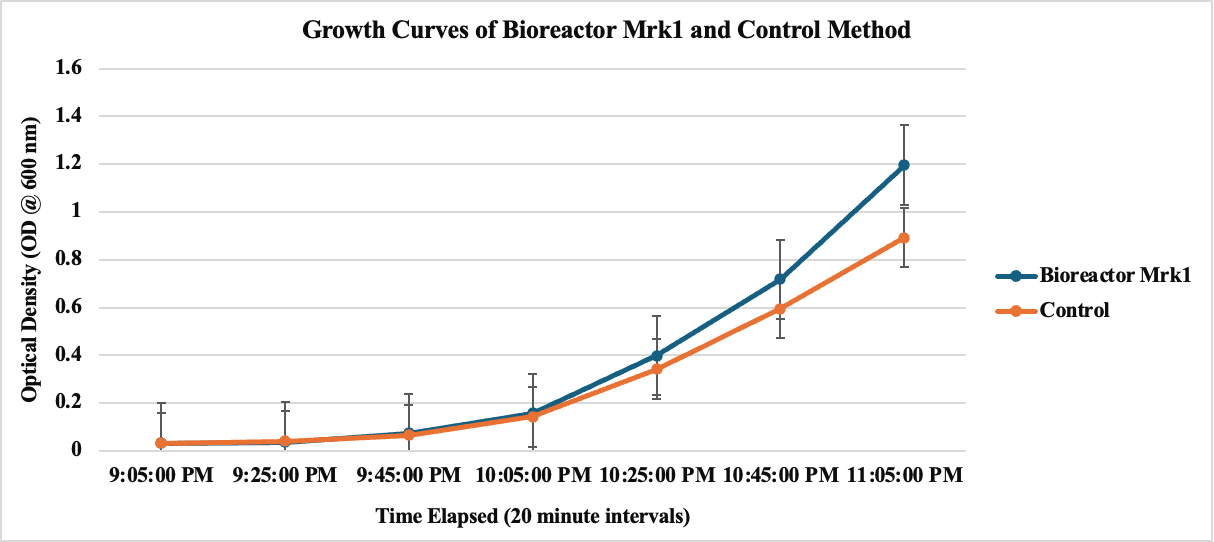
Figure 2. Growth curves of the bioreactor and control culture flask generated. Using spectrophotometer and collecting OD at 600 nm in 20-minute intervals for 2 hours.
The growth curves compare the performance of the bioreactor Mk1 to a control culture flask over a 2-hour period, with optical density (OD) measurements taken every 20 minutes at 600 nm. The bioreactor outperformed the control, culturing more bacteria in the same time frame and volume. Statistical analysis showed a P-value of 0.738, exceeding the significance level, allowing us to reject the null hypothesis of no difference. This indicates a significant difference in bacterial growth between the two methods, likely due to the air added directly into the culture in the bioreactor, along with the use of a magnetic stir bar for enhanced mixing.
These results demonstrate the effectiveness of our bioreactor design in promoting bacterial growth. The improved performance can be attributed to the enhanced aeration and mixing provided by our system. This prelinary data also encouraged us to continue moving forward, we further optimizing the bioreactor’s design to maximize its efficiency and explore its potential applications in various biotechnology processes.
Further Validation: Comparing Mk.2 & Mk.3 Against Benchtop Liquid Broth Cultivation
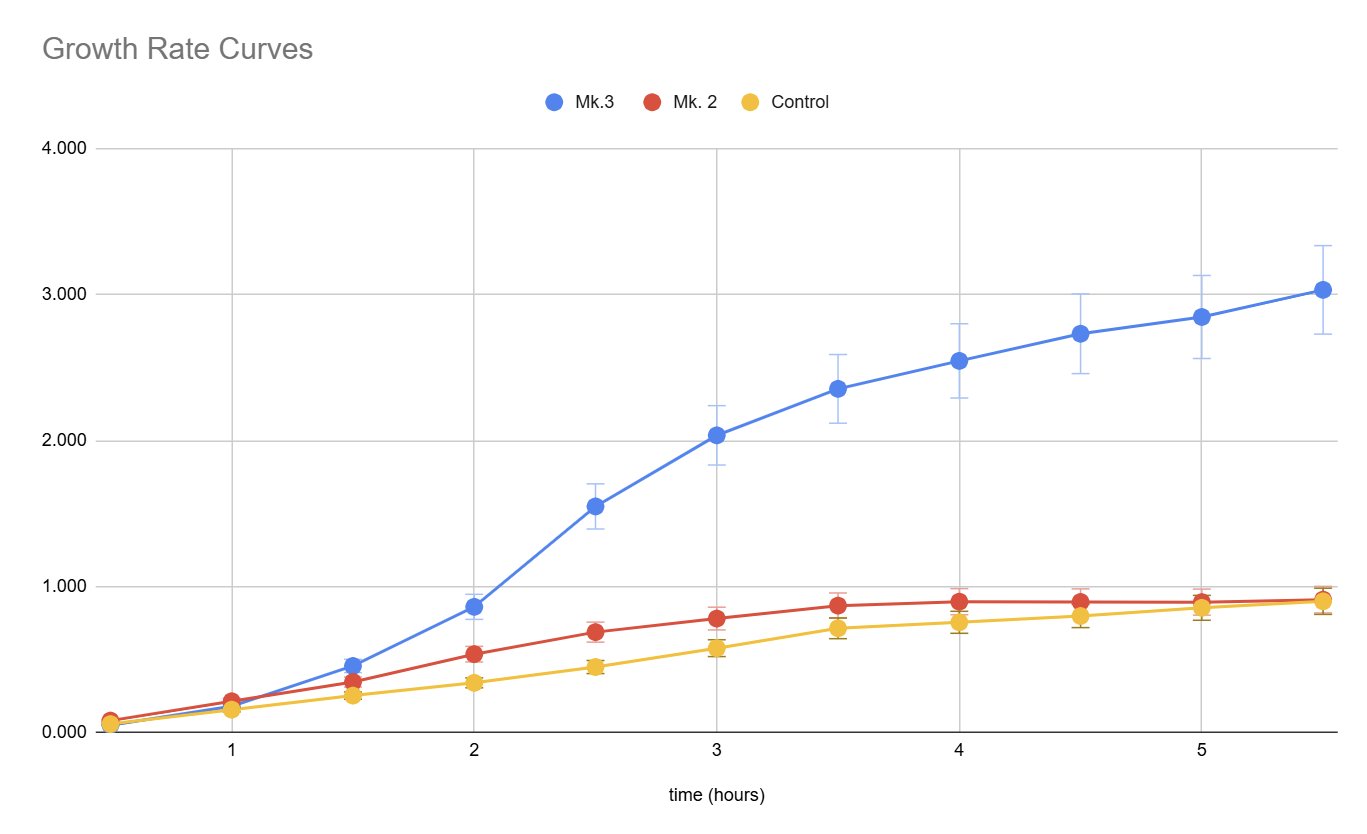
Figure 3. Growth curves of the bioreactors and control culture flask generated. Using spectrophotometer and collecting OD at 600 nm in 20-minute intervals for 2 hours.
| Time (hrs) | Mk.3 | Mk. 2 | Control |
|---|---|---|---|
| 0.5 | 0.049 | 0.080 | 0.056 |
| 1 | 0.178 | 0.212 | 0.155 |
| 1.5 | 0.454 | 0.344 | 0.251 |
| 2 | 0.860 | 0.535 | 0.339 |
| 2.5 | 1.548 | 0.686 | 0.447 |
| 3 | 2.035 | 0.779 | 0.576 |
| 3.5 | 2.354 | 0.868 | 0.713 |
| 4 | 2.546 | 0.895 | 0.754 |
| 4.5 | 2.732 | 0.893 | 0.797 |
| 5 | 2.847 | 0.892 | 0.853 |
| 5.5 | 3.033 | 0.909 | 0.898 |
In a follow-up experiment, we compared the performance of Mk.2, Mk.3, and a control culture flask by measuring the optical density (OD) at 600 nm over a 5.5-hour period. The results demonstrated that Mk.3 outperformed both Mk.2 and the control, with significantly higher bacterial growth, particularly after the 3-hour mark. Mk.2 showed moderate improvement over the control in the initial stages but plateaued earlier, suggesting limitations in its aeration or mixing efficiency.
Mk.3’s superior performance can be attributed to its optimized design, which promotes more efficient aeration and bacterial growth. These findings support Mk.3 as a more effective bioreactor design, and the data will guide further improvements to Mk.2 for enhanced bacterial culture capabilities.
Future Directions
Based on testing findings, we should explore more efficient mixing strategies and further develop our remote control interface.
- Enhanced Remote Control Interface: While Mark 4 attempted to add remote control via Wi-Fi, the interface could be further developed. We plan to develop an app or web interface that could help interact with the bioreactor remotely. This could include features like real-time data visualization, alerts and notifications, and remote control of all bioreactor parameters.
- Advanced Mixing Strategies: Explore alternative mixing mechanisms beyond the single pipette system. Investigate magnetic stirrers, impeller designs, or other methods to improve mixing efficiency and homogeneity within the bioreactor. Consider incorporating variable speed control for the mixing mechanism to optimize performance for different culture types and volumes.
- Automated sterilization: A few of our iHP contacts actually questioned how our bioreactor could self-sterilize to reduce the workload of laboratory technicians and we could have an internal nozzle that covers the interior with ethanol. With additional time, we could develop a mechanism that provides a quick ethanol wash of the interior.
3D Models
Mk. 2 Assembled
Video Tutorials
Bioreactor How-to-Use
Mk. 2 Assembly
Mk. 3 Assembly
Mk. 4 Assembly
References and Citations
Aging and Death in E. coli. (2005). PLoS Biology, 3(2), e58. https://doi.org/10.1371/journal.pbio.0030058
Betts, J. I., & Baganz, F. (2006). Miniature bioreactors: Current practices and future opportunities. Microbial Cell Factories, 5(1), 21. https://doi.org/10.1186/1475-2859-5-21
Delavar, M. A. (n.d.). Bioreactor—An overview | ScienceDirect Topics. Retrieved 1 October 2024, from https://www.sciencedirect.com/topics/immunology-and-microbiology/bioreactor
Product—Sarstedt. (n.d.). Retrieved 21 September 2024, from https://www.sarstedt.com/en/products/laboratory/cell-tissue-culture/cultivation/product/83.3912.502/
