Plasmid Construction
- Pellet bacterial overnight culture by centrifugation at a speed of 21130 rcf and temperature of 25°C.
- Resuspend pelleted bacterial cells in 250 μl Buffer P1 and transfer to a microcentrifuge tube.
- Add 250 μl Buffer P2 and mix thoroughly by inverting the tube 4–6 times until the solution becomes clear.
- Add 350 μl Buffer N3 and mix immediately and thoroughly by inverting the tube 4–6 times.
- Centrifuge for 10 min at a speed of 21130 rcf and temperature of 25°C in a microcentrifuge.
- Apply 800 μl supernatant from step 5 to the QIAprep 2.0 spin column by pipetting.
- Wash the QIAprep 2.0 spin column by adding 0.5 ml Buffer PB.
- Centrifuge for 30–60 s and discard the flow-through.
- Wash the QIAprep 2.0 spin column by adding 0.75 ml Buffer PE.
- Centrifuge for 30–60 s and discard the flow-through.
- Centrifuge for 1 min to remove residual wash buffer (dry spin).
- Place the QIAprep 2.0 column in a clean 1.5 ml microcentrifuge tube. To elute DNA, add 50 μl Buffer EB.
- Let stand for 1 min, and centrifuge for 1 min at 21130 rcf and temperature of 25°C
- Turn on the nanodrop machine and click on the option for synthesis of nucleic acids.
- Lift arm over pedestal and apply 3µl of RNase free water to the pedestal, close the arm, and hit “OK” to initialize.
- Lift arm over pedestal, wipe water off pedestal and arm with a dry kimwipe, apply 3µl of blank solution (can be water or elution buffer).
- Close the arm and click “Blank” to blank the machine.
- When it displays and flat graph and a quantitation near 0, lift arm over pedestal, wipe blank off pedestal and arm with a dry kimwipe, pipette 3µl of sample 1, and gently close arm.
- Hit “Run” to measure the concentration, noting down the final concentration in ng/µl.
- After taking down the concentration, lift the arm over the pedestal, wipe off the first sample with a dry kimwipe.
- Pipette 3µl of sample 2 onto the pedestal, gently close arm, and hit “Run” to measure the concentration.
- Mix the following reactions on ice
- Gently mix the reaction by flicking the tube and do a quick spin
- Transfer PCR tubes to a PCR machine and begin thermocycling.

*Source: NEB Protocol for Q5® High-Fidelity 2X Master Mix
- Measure 70 mL of 1xTAE buffer solution into a flask
- Weigh 0.7 grams of agarose powder and gently dump into the 70 mL of 1xTAE buffer
- Swirl the flask to mix the buffer and powder
- Put the flask in the microwave and heat it for 1 minute
- Take out the flask (with gloves) and gently swirl the flask for 30 seconds
- Heat the flask in the microwave for another minute
- Take the flask out, and pipette in 7 μL of gel red dye into the agarose gel
- Push a gel box into the casting tray, making sure the edges are tight and have no leak, and place a well comb on one end of the gel box
- Pour the agarose buffer solution into the gel box with the combs
- Let this sit in 4°C for 30 minutes to solidify
- Add 2 μL of loading dye (NEB Purple 6x B7024A) to each DNA sample of 10 μL
- Once the agarose is solidified, reposition the gel so that the combs face the negative electrode side
- Pour 1xTAE buffer in the casting tray until the whole gel is covered
- Carefully load the DNA samples (mixed with the loading dye) into each well of the gel, including the 1 kb ladder and the 100 bp ladder
- Connect the lid to the respective electrode outlets and plug in the voltage source
- Run the gel at 120 volts for 45 minutes
- Turn off the voltage source and scan samples
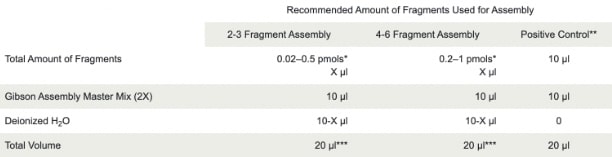
- Set up the following reaction on ice:
- Using the NEBio Calculator, calculate the amount of DNA fragments
- Take out the cells and thaw it
- Warm carb agar plates in 37°C incubator
- Mix 1 - 5 μl of DNA (usually 10 pg - 100 ng) into 20-50 μL of competent cells in a microcentrifuge
- Incubate the competent cell/DNA mixture on ice for 20-30 mins.
- Heat shock each transformation tube by placing the bottom 1/2 to 2/3 of the tube into a 42°C water bath for 30-60 secs
- Put the tubes back on ice for 2 min.
- Add 250-1,000 μl LB to the bacteria and grow in 37°C shaking incubator
- Plate some or all of the transformation onto a 10 cm LB agar plate containing the appropriate antibiotic (carb in this case)
- Incubate plates at 37°C overnight.
- Excise the DNA fragment from the agarose gel with a clean, sharp scalpel.
- Weigh the gel slice in a tube. Add 3 volumes of Buffer QG to 1 volume gel. For >2% agarose gels, add 6 volumes Buffer QG.
- Incubate at 50°C for 10 min. Vortex the tube every 2–3 min to help dissolve gel.
- After the gel slice has dissolved completely, check that the color of the mixture is yellow.
- If the color of the mixture is orange or violet, add 10 μl 3 M sodium acetate, pH 5.0, and mix. The mixture turns yellow.
- Add 1 gel volume isopropanol to the sample and mix.
- Place a QIAquick spin column in a provided 2 ml collection tube or into a vacuum manifold.
- To bind DNA, apply the sample to the QIAquick column and centrifuge for 1 min until all the samples have passed through the column. Discard flow-through and place the QIAquick column back into the same tube.
- Only load samples 800 μL max at a time into the QIAquick column.
- If DNA will subsequently be used for sequencing, in vitro transcription, or microinjection, add 500 μl Buffer QG to the QIAquick column and centrifuge for 1 min or apply vacuum. Discard flow-through and place the QIAquick column back into the same tube.
- To wash, add 750 μl Buffer PE to the QIAquick column and centrifuge for 1 min at max speed. Discard flow-through and place the QIAquick column back into the same tube. Note: If the DNA will be used for salt-sensitive applications (e.g., sequencing, blunt- ended ligation), let the column stand 2–5 min after addition of Buffer PE.
- Centrifuge the QIAquick column in the provided 2 ml collection tube for 1 min to remove residual wash buffer.
- Place the QIAquick column into a clean 1.5 ml microcentrifuge tube.
- To elute DNA, add 50 μl Buffer EB (10 mM Tris·Cl, pH 8.5) or water to the center of the QIAquick membrane and centrifuge the column for 1 min. For increased DNA concentration, add 30 μl Buffer EB to the center of the QIAquick membrane, let the column stand for 1 min, and then centrifuge for 1 min. After the addition of Buffer EB to the QIAquick membrane, increasing the incubation time to up to 4 min can increase the yield of purified DNA.
Cell Culture
- Briefly centrifuge the siRNA tube so that the dried siRNA is at the bottom of the tube
- Resuspend through pipetting up and down the 5 nmol siRNA pellets using 50uL of the nuclease free water for a concentration of 100uM
- Check all containers for leakage or breakage.
- Remove the frozen cells from the dry ice packaging and immediately place the cells at a temperature below, preferably in liquid nitrogen vapor, until ready for use
- Create Stock Solution using DMEM and FBS. Serol (optimem?). Using the fancy pump technique
- Serological Pipette 450 ml of DMEM and 50 ml of FBS into a Vacuum Filtration System to create a stock cell culturing solution.
- Using a multi-channel pipette, transfer x ml of stock solution every well
- Using a serological pipette transfer xml of stock solution and x ml of cells depending on desired final concentration into a sterilized reservoir. Rock the reservoir back and forth to ensure an even mix of solutions.
- Gently utilize a multi-channel pipette to transfer x mL the reservoir solution into x amount of wells depending on the amount of experimental groups desired. Ensure that gentle precaution is taken in order to not cause damage to cells.
- One day before transfection, plate 10,000 cells in 100 µl of growth medium without antibiotics. The cell density should be 30-50% confluent at the time of transfection.
For each well to be transfected, prepare RNAi duplex-Lipofectamine™ RNAiMAX complexes as follows: - Dilute 1.2 pmol RNAi duplex in 50 µl Opti-MEM® I Reduced Serum Medium without serum. Mix gently.
- Mix Lipofectamine™ RNAiMAX gently before use, then dilute 0.2 µl in 50 µl Opti-MEM® I Reduced Serum Medium. Mix gently.
- Add the RNAi duplex-Lipofectamine™ RNAiMAX complexes to each well containing cells. This gives a final volume of 600 µl and a final RNA concentration of 10 nM. Mix gently by rocking the plate back and forth.
- Incubate the cells 24-48 hours at 37°C in a CO2 incubator until you are ready to assay for gene knockdown. Medium may be changed after 4-6 hours, but this is not required
- Prepare Lysis/Binding Solution
- Lyse up to 2 x 10^6 cells in 140 uL prepared Lysis/Binding Solution
- Shake for 1 min on an orbital shaker at the maximum speed for larger volumes identified in step 2. Cells will lyse during this shaking incubation.
- Add 20 uL Bead Mix to each sample; shake for 5 min
- Magnetically capture the RNA Binding Beads and discard the supernatant
- Wash with 150 L Wash Solution 1 for 1 min with shaking
- Wash with 150 L Wash Solution 2, and prepare Diluted TURBOT™ DNase
- Add 50 uL of Diluted TURBO DNase and shake for 10-15 min at room temp
- Add 100 L of RNA Rebinding Solution (isopropanol added) to each sample and shake for 3 min at the maximum speed for larger volumes.
- Magnetically capture the RNA Binding Beads and discard the supernatant
- Wash twice with 150 L Wash Solution 2 each time
- Dry the beads by shaking for 2 min
- Elute the RNA in 50 uL of Elution Buffer
- Thaw all reagents on ice.
- Vortex assays briefly to mix, then centrifuge to collect.
- Mix thawed samples by gentle inversion or flicking 3–5 times, then briefly centrifuge to collect.
- Ensure that there are no gel lumps remaining. Repeat steps 2 and 3, if necessary, to ensure a homogenous solution.
- Calculate the total volume required for each reaction component:
- Working on ice, prepare a bulk RT-qPCR reaction mixture.
- Mix only the master mix, assay, and water that you calculated in the previous step. Exclude the sample.
- Invert the mixture at least 10 times to mix the components thoroughly.
- Centrifuge the mixture briefly to collect the contents.
- Aliquot the appropriate volume of RT-qPCR reaction mix into each well of an optical reaction plate. The volume of reaction mix to add to each well is (50 µL – the volume of the sample)
- Add a sample to each well in the optical reaction plate that contains the RT-qPCR reaction mix.
- Cover the reaction plate with an optical adhesive cover, invert the plate 3–5 times, making sure that the contents of the wells are moving back and forth between the seal and the bottom of the wells to ensure proper mixing, then centrifuge at 150 × g for 1 minute to spin down the contents and eliminate air bubbles.
- Ensure that all calibration plates are securely wrapped in reflective foil to prevent light exposure and minimize any potential light pollution during processing.
- Allow plates to thaw at room temperature for approximately 30 minutes, or until completely thawed and no visible ice remains.
- Using a cell plate centrifuge, centrifuge the plates at 1500 RPM for 1 minute. Ensure that the centrifugation is consistent across all plates to avoid discrepancies during the qPCR calibration process.
- After centrifugation, immediately transfer the plates to the qPCR machine and initiate the specified calibration mode according to the qPCR machine utilized.
- ROI/Background Calibration
- Dye Calibration
