Add 20 LB capsules to 400 mL of Milli-Q water to create a 2×LB solution.
Weigh 16 g of glucose and dissolve in 400 mL of Milli-Q water to make a 4% glucose solution.
Measure 400 mL of Milli-Q water to prepare sterile water.
Autoclave the 2×LB solution, glucose solution, and Milli-Q water.
Add 15 μL of 2×LB to the colony from the plate and vortex to suspend well.
Add 30 μL of 1000× Ampicillin solution and mix by tapping.
Add 0.375 mL of sterile water to Tube No.2.
Add 1.125 mL of the 4% glucose solution to Tube No.2.
Do not add any glucose to Tube No.6 (0% glucose).
Add 1.5 mL of sterile water to Tubes No.3–7.
Add 1.5 mL of the 4% glucose solution to Tubes No.1, 3, and 7.
Take 1.5 mL from Tube No.3 and add it to Tube No.4.
Take 1.5 mL from Tube No.4 and add it to Tube No.5.
Discard 1.5 mL from Tube No.5.
Take 1.5 mL from Tube No.7 and add it to Tube No.8.
Add 1.5 mL of the 2×LB with cells to Tubes No.1–6.
Add 1 μL of non-transformed competent cells to Tube No.7.
Add 1.5 mL of 2×LB medium to Tube No.8.
Incubate all tubes at 37°C overnight with shaking.
Results
During the recovery incubation at 37°C for 60 minutes, the cell count appeared to be low (subjective observation).
Discussion
Next time we will try the cultivation on a larger scale (40 mL).
Friday, 240823
Objectives
Cultivation of
pGEM-phaCReAB
and preparation of media for future glucose gradient experiments with
pGEM-phaCReAB
.
Methods
1. pGEM-phaCReAB Cultivation
Procedure
Add 20 mL of LB medium to a 50 mL tube.
Inoculate the medium with pGEM-phaCReAB and incubate at 37°C for 4 days (until 240826).
Store the culture at 4°C.
2. Media Preparation
Procedure
Add 20 mL of 2x LB medium to each of the 8 tubes.
Label and prepare the tubes according to the following table:
Tube No.
Final Glucose Concentration
4% Glucose Solution
Sterilized Water
No. 1
2.0%
20 mL
0 mL
No. 2
1.5%
15 mL
5 mL
No. 3
1.0%
10 mL
10 mL
No. 4
0.5%
5 mL
15 mL
No. 5
0.25%
2.5 mL
17.5 mL
No. 6
0%
0 mL
20 mL
No. 7
1.0%
10 mL
10 mL
No. 8
1.0%
10 mL
10 mL
Store the media at 4°C.
Wednesday, 240904
Objectives
Cultivation bacterial colonies obtained from Dr. Taguchi’s plate under varying glucose concentrations, with a comparison using LB medium and DH5α (as a negative control) at an average glucose concentration of 1%.
Methods
1. Inoculation
Tube numbers and corresponding contents:
Tube No.1: 2% Glucose
Tube No.2: 1.5% Glucose
Tube No.3: 1% Glucose
Tube No.4: 0.5% Glucose
Tube No.5: 0.25% Glucose
Tube No.6: 0% Glucose
Tube No.7: 1% Glucose (with DH5α competent cells)
Tube No.8: 1% Glucose (LB medium only, negative control)
Procedure
Add 40 μL of ampicillin to each of tubes No.1–No.8 (final concentration of ampicillin = 50 μg/mL).
Add 1 mL of bacterial culture to each of tubes No.1–No.6.
Add 1 mL of DH5α competent cells to tube No.7.
Add 1 mL of LB medium to tube No.8.
Incubate all tubes at 37°C with shaking at 155 rpm for two days.
Results
The experiment failed because the 40 mL cultures did not grow when using 50 mL tubes in the shaking incubator. Additionally, DH5α failed to grow due to the presence of ampicillin.
Discussion
Next time, the experiment will be performed with 20 mL volumes.
Friday, 240906
Objectives
Media preparation for the next cultivation
Turbidity measurement of the cultures prepared on 240904.
DH5α (control) culture for stock.
Methods
1. Media Preparation
Procedure:
Add 20 mL of 2x LB to each of 8 labeled 50 mL tubes.
Label and prepare the solutions as follows:
Tube No.
Final Glu Conc.
4% Glu
Sterilized Water
No. 1
2.0%
20 mL
0 mL
No. 2
1.5%
15 mL
5 mL
No. 3
1.0%
10 mL
10 mL
No. 4
0.5%
5 mL
15 mL
No. 5
0.25%
2.5 mL
17.5 mL
No. 6
0%
0 mL
20 mL
No. 7
1.0%
10 mL
10 mL
No. 8
1.0%
10 mL
10 mL
2. Turbidity Measurement
Procedure:
Use LB + Glucose solution as a blank and add 1 mL to a cuvette, then set the reference (SetRef).
Measure the optical density (OD) at 600 nm for Tube No.1 by adding 1 mL of culture to the cuvette.
Wash the cuvette with ethanol and repeat the measurement for all tubes up to No. 8.
3. DH5α Culture
Procedure:
Add 20 mL of LB and DH5α competent cells to a 50 mL tube.
Incubate with shaking at 37°C for three days (until 240909).
Results
Turbidity Measurement Results:
Turbidity measurement after 48 hours (240906):
Culture Condition
OD 600
0% Glucose pGEM-phaCReAB
1.839
0.25% Glucose pGEM-phaCReAB
1.160
0.5% Glucose pGEM-phaCReAB
1.143
1.0% Glucose pGEM-phaCReAB
1.078
1.5% Glucose pGEM-phaCReAB
1.096
2.0% Glucose pGEM-phaCReAB
1.107
1.0% Glucose DH5α
0.000
1.0% Glucose Control
-0.004
Note: There was no growth in the 1.0% Glucose DH5α culture due to the addition of Ampicillin.
DH5α Culture
The DH5α culture did not show significant growth. Further incubation or adjustments may be needed.
Monday, 240909
Objectives
Inoculation and culture of pGEM-phaCReAB in LB medium (20 mL) with varying glucose concentrations.
Methods
1. Inoculation
The following tubes correspond to the glucose concentrations:
Tube No.1: 2% Glucose.
Tube No.2: 1.5% Glucose.
Tube No.3: 1% Glucose.
Tube No.4: 0.5% Glucose.
Tube No.5: 0.25% Glucose.
Tube No.6: 0% Glucose.
Tube No.7: 1% Glucose for normal E. coli (DH5α competent cells).
Tube No.8: 1% Glucose in LB only (no bacteria).
Procedure:
Add 10 μL of Ampicillin to each of Tubes No.1 through No.6 (for a total of 12 tubes, final Amp concentration = 50 μg/mL).
Add 0.5 mL of culture broth to each of Tubes No.1 through No.6.
Add 0.5 mL of DH5α competent cells to Tube No.7.
Incubate all tubes with shaking at 155 rpm at 38°C for two days.
Tuesday, 240910
Objectives
Measuring turbidity at different glucose concentrations in pGEM-phaCReAB cultures (240909) after 24 hours
Methods
1. Turbidity Measurement
Procedure:
Add 1 mL of LB medium as a blank to the cuvette and set the reference (SetRef).
Add 1 mL from Tube No. 1 to the cuvette and measure the turbidity at OD 600.
Clean the cuvette and continue measuring turbidity for Tubes No. 2 through No. 7.
Results
24-hour Turbidity Measurements:
Culture Condition
OD 600
0% Glucose pGEM-phaCReAB
1.323
0.25% Glucose pGEM-phaCReAB
1.308
0.5% Glucose pGEM-phaCReAB
1.348
1.0% Glucose pGEM-phaCReAB
1.175
1.5% Glucose pGEM-phaCReAB
1.222
2.0% Glucose pGEM-phaCReAB
1.219
1.0% Glucose DH5α
2.108
1.0% Glucose
-
Wednesday, 240911
Objectives
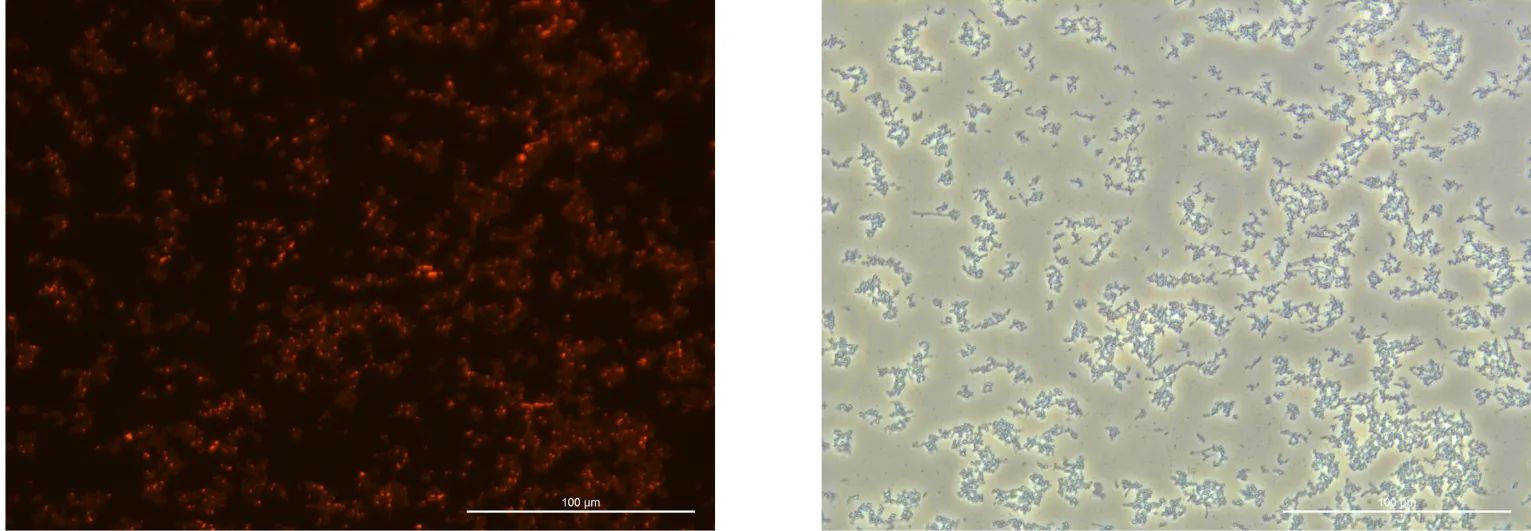
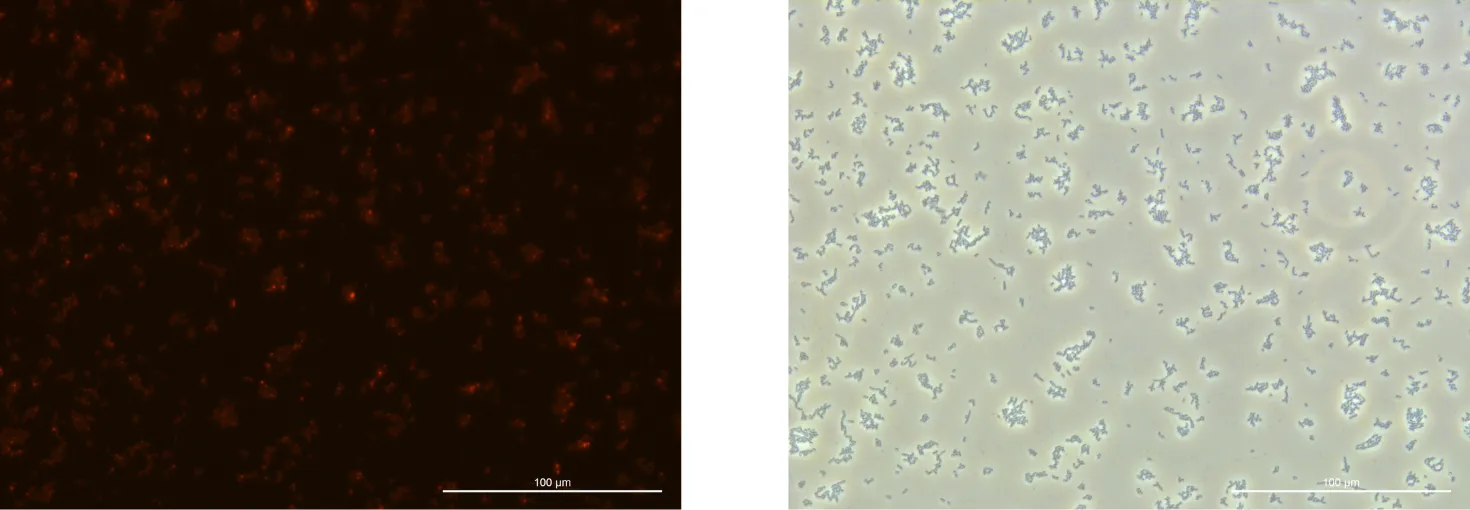
Measuring and observing turbidity and PHB production in pGEM-phaCReAB cultures (240909) at different glucose concentrations after 48 hours (including 48-hour turbidity measurement, fluorescence microscopy observation, and ultracentrifugation).
Pre-culture of pGEM-phaCReAB strains for future use.
Methods
1. Turbidity Measurement
Procedure:
Add 1 mL of LB medium (Tube No. 8) as a blank to the cuvette and set the reference (SetRef).
Add 1 mL from Tube No. 1 to the cuvette and measure turbidity at OD 600.
Clean the cuvette and continue measuring turbidity for Tubes No. 2 through No. 7.
2. Fluorescence Microscopy Observation
Procedure:
Place 10 μL of No. 1 on two slides and 10 μL of No. 7 on one slide.
Add 0.5 μL of Nile red stain to one slide of No. 1 and to the No. 7 slide.
Let the slides sit for 15 minutes.
Extract 9 μL from each and add a coverslip for observation.
3. Ultracentrifugation
3.1 Sterilization
Procedure:
Centrifuge 16 samples at 3,500 rpm for 10 minutes at 4°C.
Sterilize the samples using a 0.22 μm filter and collect in 50 mL tubes.
3.2 Ultracentrifugation
Procedure:
Add 13.5 mL of samples from Tubes No. 1–4 x2 into ultracentrifuge tubes, filling them to approximately 5 mm from the top.
Balance the tubes carefully, load them into the rotor, and set the ultracentrifuge:
Enter settings: 410,000 rpm, 60 min, 4°C.
Use Max acceleration and deceleration.
After centrifugation, discard the supernatant and store the pellet.
Repeat for Tubes No. 5–8.
4. Pre-culture
Procedure:
Add 10 mL LB medium and 0.5 mL of cell suspension to a 50 mL tube.
Incubate overnight at 37°C with shaking.
Results
48-hour Turbidity Measurements:
Culture Condition
OD 600
0% Glucose pGEM-phaCReAB
1.955
0.25% Glucose pGEM-phaCReAB
1.404
0.5% Glucose pGEM-phaCReAB
1.264
1.0% Glucose pGEM-phaCReAB
1.194
1.5% Glucose pGEM-phaCReAB
1.244
2.0% Glucose pGEM-phaCReAB
1.177
1.0% Glucose DH5α
2.421
1.0% Glucose (LB only)
-
Fluorescence Microscopy:
The fluorescence intensity observed was weaker than anticipated.
Ultracentrifugation:
No visible pellet believed to be microvesicles.
Discussion
Due to unsatisfactory results, set the culture medium to 15 mL for the next experiment.
Friday, 240913
Objectives
Inoculation and culture of pGEM-phaCReAB in LB medium (15 mL) with varying glucose concentrations.
Methods
1. Inoculation
The corresponding tube numbers and their contents:
Tube No. 1: 4% Glucose
Tube No. 2: 2% Glucose
Tube No. 3: 1.5% Glucose
Tube No. 4: 1% Glucose
Tube No. 5: 0.5% Glucose
Tube No. 6: 0.25% Glucose
Tube No. 7: 0% Glucose
Tube No. 8: 2% Glucose (DH5α competent cells, as control)
Procedure:
Add 7.5 μL of ampicillin to tubes No. 1–7 (14 tubes total, final ampicillin concentration = 50 μg/mL).
Add 0.5 mL of pre-cultured cells to each tube No. 1–7 (2 sets).
Add 0.5 mL of DH5α competent cells to both tubes No. 8.
Incubate all tubes at 38°C with shaking at 155 rpm until 240917.
Tuesday, 240917
Objectives
Preparing pre-cultures from the samples sent by a professor from Kobe University and inoculating it into 12 mL LB medium with varying glucose concentration.
Conducting fluorescent microscopy observation and ultracentrifugation on the 240913 cultures.
Methods
1. Pre-culture
Procedure
Add 10 mL of LB medium and 0.4 mL of bacterial solution to a 50 mL tube.
Add 6 μL of ampicillin to tubes No. 1–4 (total 8 tubes, final ampicillin concentration = 50 μg/mL).
Add 0.5 mL of pre-culture solution to each of tubes No. 1–4 (2 tubes per condition).
Add 0.5 mL of DH5α competent cells to the two tubes labeled No. 5.
Shake at 38°C and 155 rpm for 24 hours.
3. Fluorescence Microscopy Observation
Procedure
Add 10 μL of each sample (6 samples in total) onto separate slide glasses.
Add 0.5 μL of Nile red dye to all samples except the negative control.
Incubate the slides for 15 minutes.
Take 9 μL from each slide.
Cover with a coverslip and observe under the fluorescence microscope.
4. Ultracentrifugation
4.1 Sterilization
Procedure
Centrifuge 16 samples at 3500 rpm for 15 minutes at 4°C.
Sterilize by filtering the supernatant using a 0.22 μm filter and collect in 50 mL tubes.
4.2 Ultracentrifugation (Planned for 240918)
Results
Fluorescence Microscopy:
Result of Glu2% (Total 2 samples)
Result of Glu4% (Total 2 samples)
Negative Control Result
Discussion
The fluorescence observed was weak, similar to previous results. Future experiments will proceed using the strains provided by the professor from Kobe University to optimize and improve outcomes.
Wednesday, 240918
Objectives
Performing ultracentrifugation (continuation from 240917) and collect PHB samples grown under varying glucose concentrations.
Sample collection of 24-hour post-culture (240917).
Methods
1. Ultracentrifugation (Continuation from 240917)
Procedure
Add samples No. 1 to 4 × 2 (13.5 mL each) into ultracentrifuge tubes, filling each tube approximately 5 mm from the top.
Carefully balance the tubes and place them in the rotor:
Close the centrifuge door after placing the rotor.
Set the conditions (vacuum).
Press “Enter” ➡ “Start” (immediately after pressing Enter).
The speed may take time to increase after pressing “Vacuum” and “Start,” so wait for stabilization.
Set the acceleration and deceleration to maximum.
Perform ultracentrifugation at 410,000 rpm for 60 min at 4℃.
Remove and store the supernatant after ultracentrifugation.
2. Turbidity Measurement
2.1 Sample Collection
Procedure
Collect 1 mL of each of the five samples into Eppendorf tubes.
Store the collected samples at 4℃ for further analysis.
Discussion
The results of the ultracentrifugation from 240913 were, as expected from the fluorescence results, unsuccessful.
Thursday, 240919
Objectives
Measuring and observing turbidity and PHB production in pGEM-phaCReAB cultures (240917) at different glucose concentrations after 24 hours (including 24-hour turbidity measurement and fluorescence microscopy observation)
Sample collection of 48-hour post-culture (240917) for fluorescence microscopy observation the next day.
Methods
1. Turbidity Measurement
Procedure
Use LB medium as a blank by adding 1 mL to a cuvette and setting the reference (SetRef).
Take 1 mL from Tube No. 1 and add it to the cuvette, then measure turbidity at OD 600.
Wash the cuvette with ethanol, then repeat the measurement for Tubes No. 2 through No. 5.
2. Fluorescence Microscopy Observation
2.1 Sample Collection
Procedure
Collect 1 mL from each of the five samples in Eppendorf tubes.
Store at 4°C.
2.2 Fluorescence Microscopy Observation
Procedure
Add 10 μL of each sample to a slide glass.
Add 0.5 μL of Nile red to each sample except for the negative control.
Let it sit for 15 minutes.
Take 9 μL of the stained sample and place a coverslip on top.
Observe the samples under the fluorescence microscope.
Results
OD600 Measurement:
Culture Condition
OD 600
0% Glucose pGEM-phaCReAB
1.712
1.0% Glucose pGEM-phaCReAB
2.184
2.0% Glucose pGEM-phaCReAB
1.823
4.0% Glucose pGEM-phaCReAB
2.135
1.0% Glucose DH5α
1.664
1.0% Glucose
-
Fluorescence Microscopy:
Result of Glu2%
Result of Glu4%
Discussion
The fluorescence results have improved compared to previous experiments, but are still lower than expected. To address this, adjusting the culture volume will be considered. A decision will be made after reviewing the 48-hour fluorescence results.
Friday, 240920
Objectives
Measuring and observing turbidity and PHB production in pGEM-phaCReAB cultures (240917) at different glucose concentrations after 48 hours (including 48-hour turbidity measurement ,fluorescence microscopy observation and ultracentrifugation)
Methods
1. Turbidity Measurement
Procedure:
Add 1 mL of LB medium into a cuvette as a blank and set the reference.
Measure the turbidity (OD 600) by adding 1 mL of each sample from Tube No.1 into the cuvette.
Clean the cuvette with ethanol and repeat the process for Tubes No.2 through No.5.
2. Fluorescence Microscopy Observation
Procedure:
Add 10 μL of each sample to the slide glass.
Add 0.5 μL of Nile Red to each sample.
Incubate for 15 minutes.
Take 9 μL of the sample, place a cover glass on top, and observe under the fluorescence microscope.
3. Ultracentrifugation
1. Sterilization Process
Procedure:
Centrifuge the 16 total samples at 3,500 rpm for 15 minutes at 4℃.
Sterilize the samples by passing them through a 0.22 μm filter and collect them in 50 mL tubes.
2. Ultracentrifugation
Procedure:
Add 13.5 mL of samples No. 1-3 into ultracentrifuge tubes and secure the caps.
Balance the tubes and place them in the rotor.
Perform ultracentrifugation at 410,000 rpm for 60 minutes at 4℃.
Ultracentrifuge the remaining samples, No. 4-5, under the same conditions.
Remove the supernatant and store it at 4℃.
Results
OD600 :
Culture Condition
OD 600
0% Glucose pGEM-phaCReAB
1.782
1.0% Glucose pGEM-phaCReAB
2.229
2.0% Glucose pGEM-phaCReAB
1.823
4.0% Glucose pGEM-phaCReAB
2.217
2.0% Glucose DH5α
1.716
1.0% Glucose
-
Fluorescence Microscopy:
Ultracentrifugation :
Discussion
Based on the previous results, as well as the current fluorescence and ultracentrifugation data, it has become clear that small-volume cultures are preferable. Next time, the culture will be conducted using 3 mL of medium.
Tuesday, 240924
Objectives
Inoculation and culture of pGEM-phaCReAB in LB medium (3 mL culture volume in 10 mL test tubes) with 4 different glucose concentrations.
Methods
1. Pre-culture
Procedure
Add 10 mL LB, 30 μL Ampicillin (50 mg/mL), and 0.4 mL cell suspension to a 10 mL test tube.
Incubate with shaking at 38°C for 6 hours.
2. Inoculation
Tube numbers and contents:
Tube No. 1: 4% Glucose
Tube No. 2: 2% Glucose
Tube No. 3: 1% Glucose
Tube No. 4: 0% Glucose
Procedure
Add 1.5 μL of Ampicillin to each of the test tubes (4 tubes, final Ampicillin concentration = 50 μg/mL).
Add 0.3 mL of pre-culture to each of the tubes (No. 1-4).
Incubate with shaking at 38°C and 155 rpm.
Wednesday, 240925
Objectives
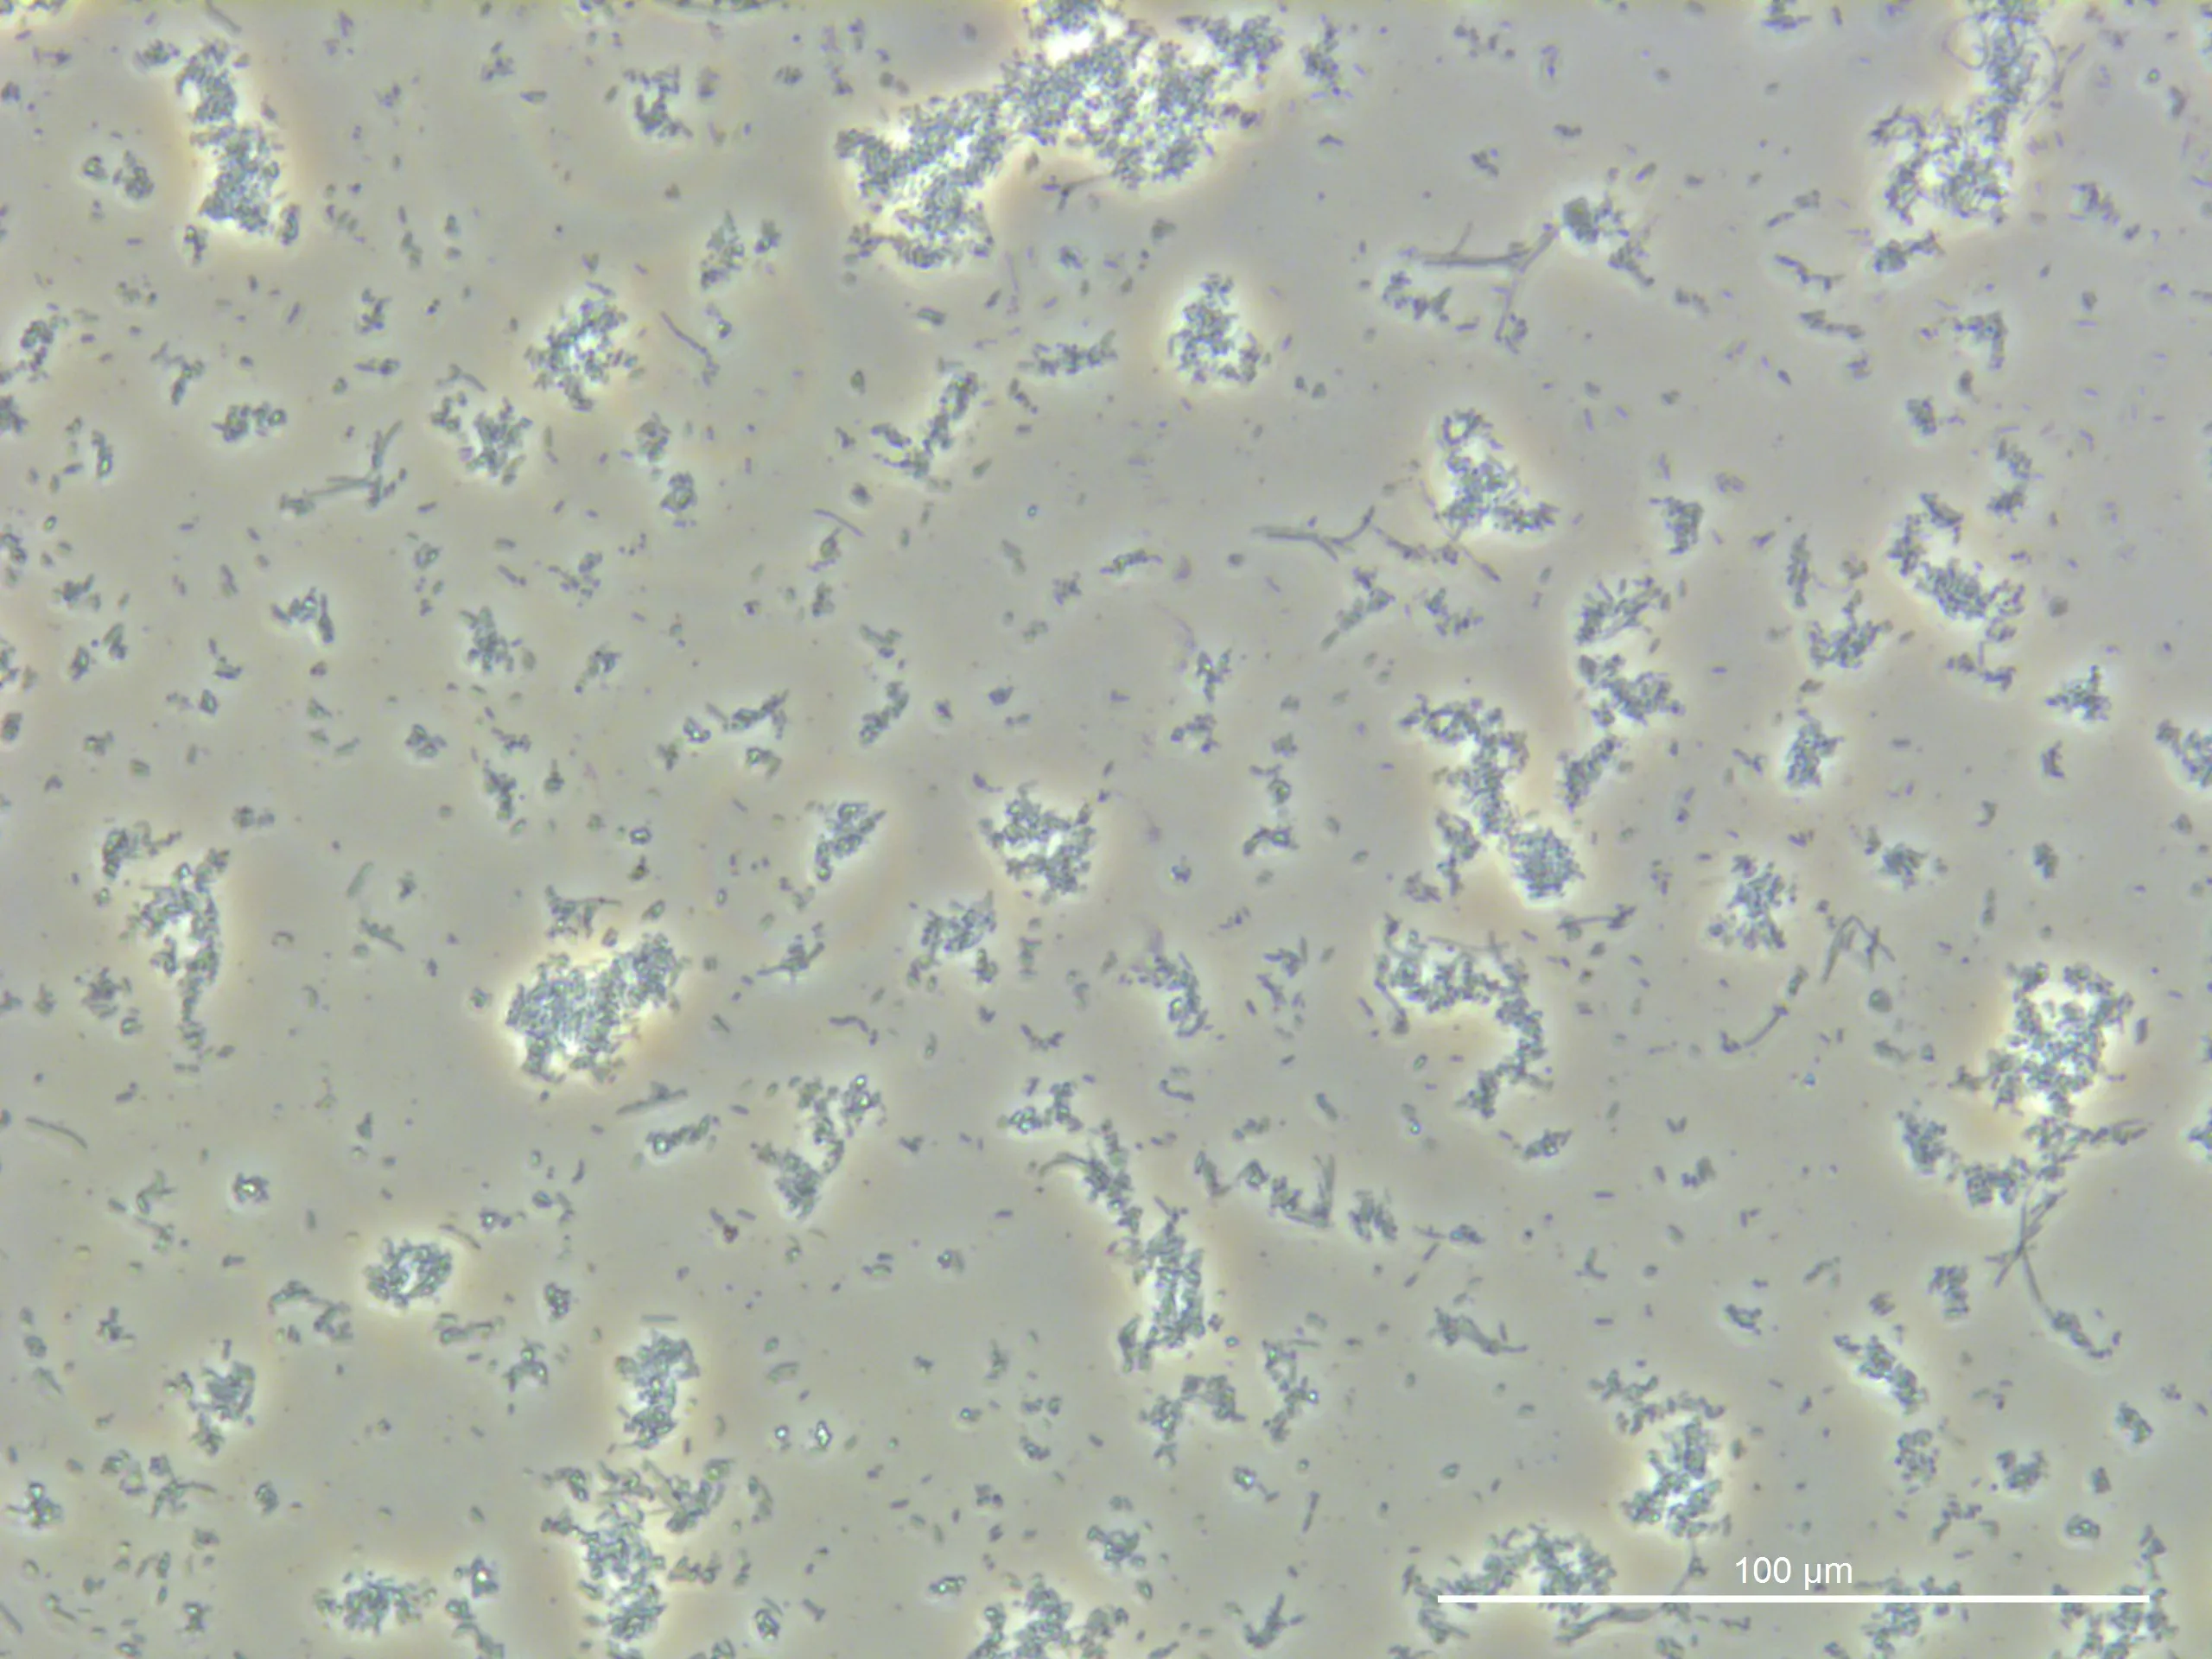
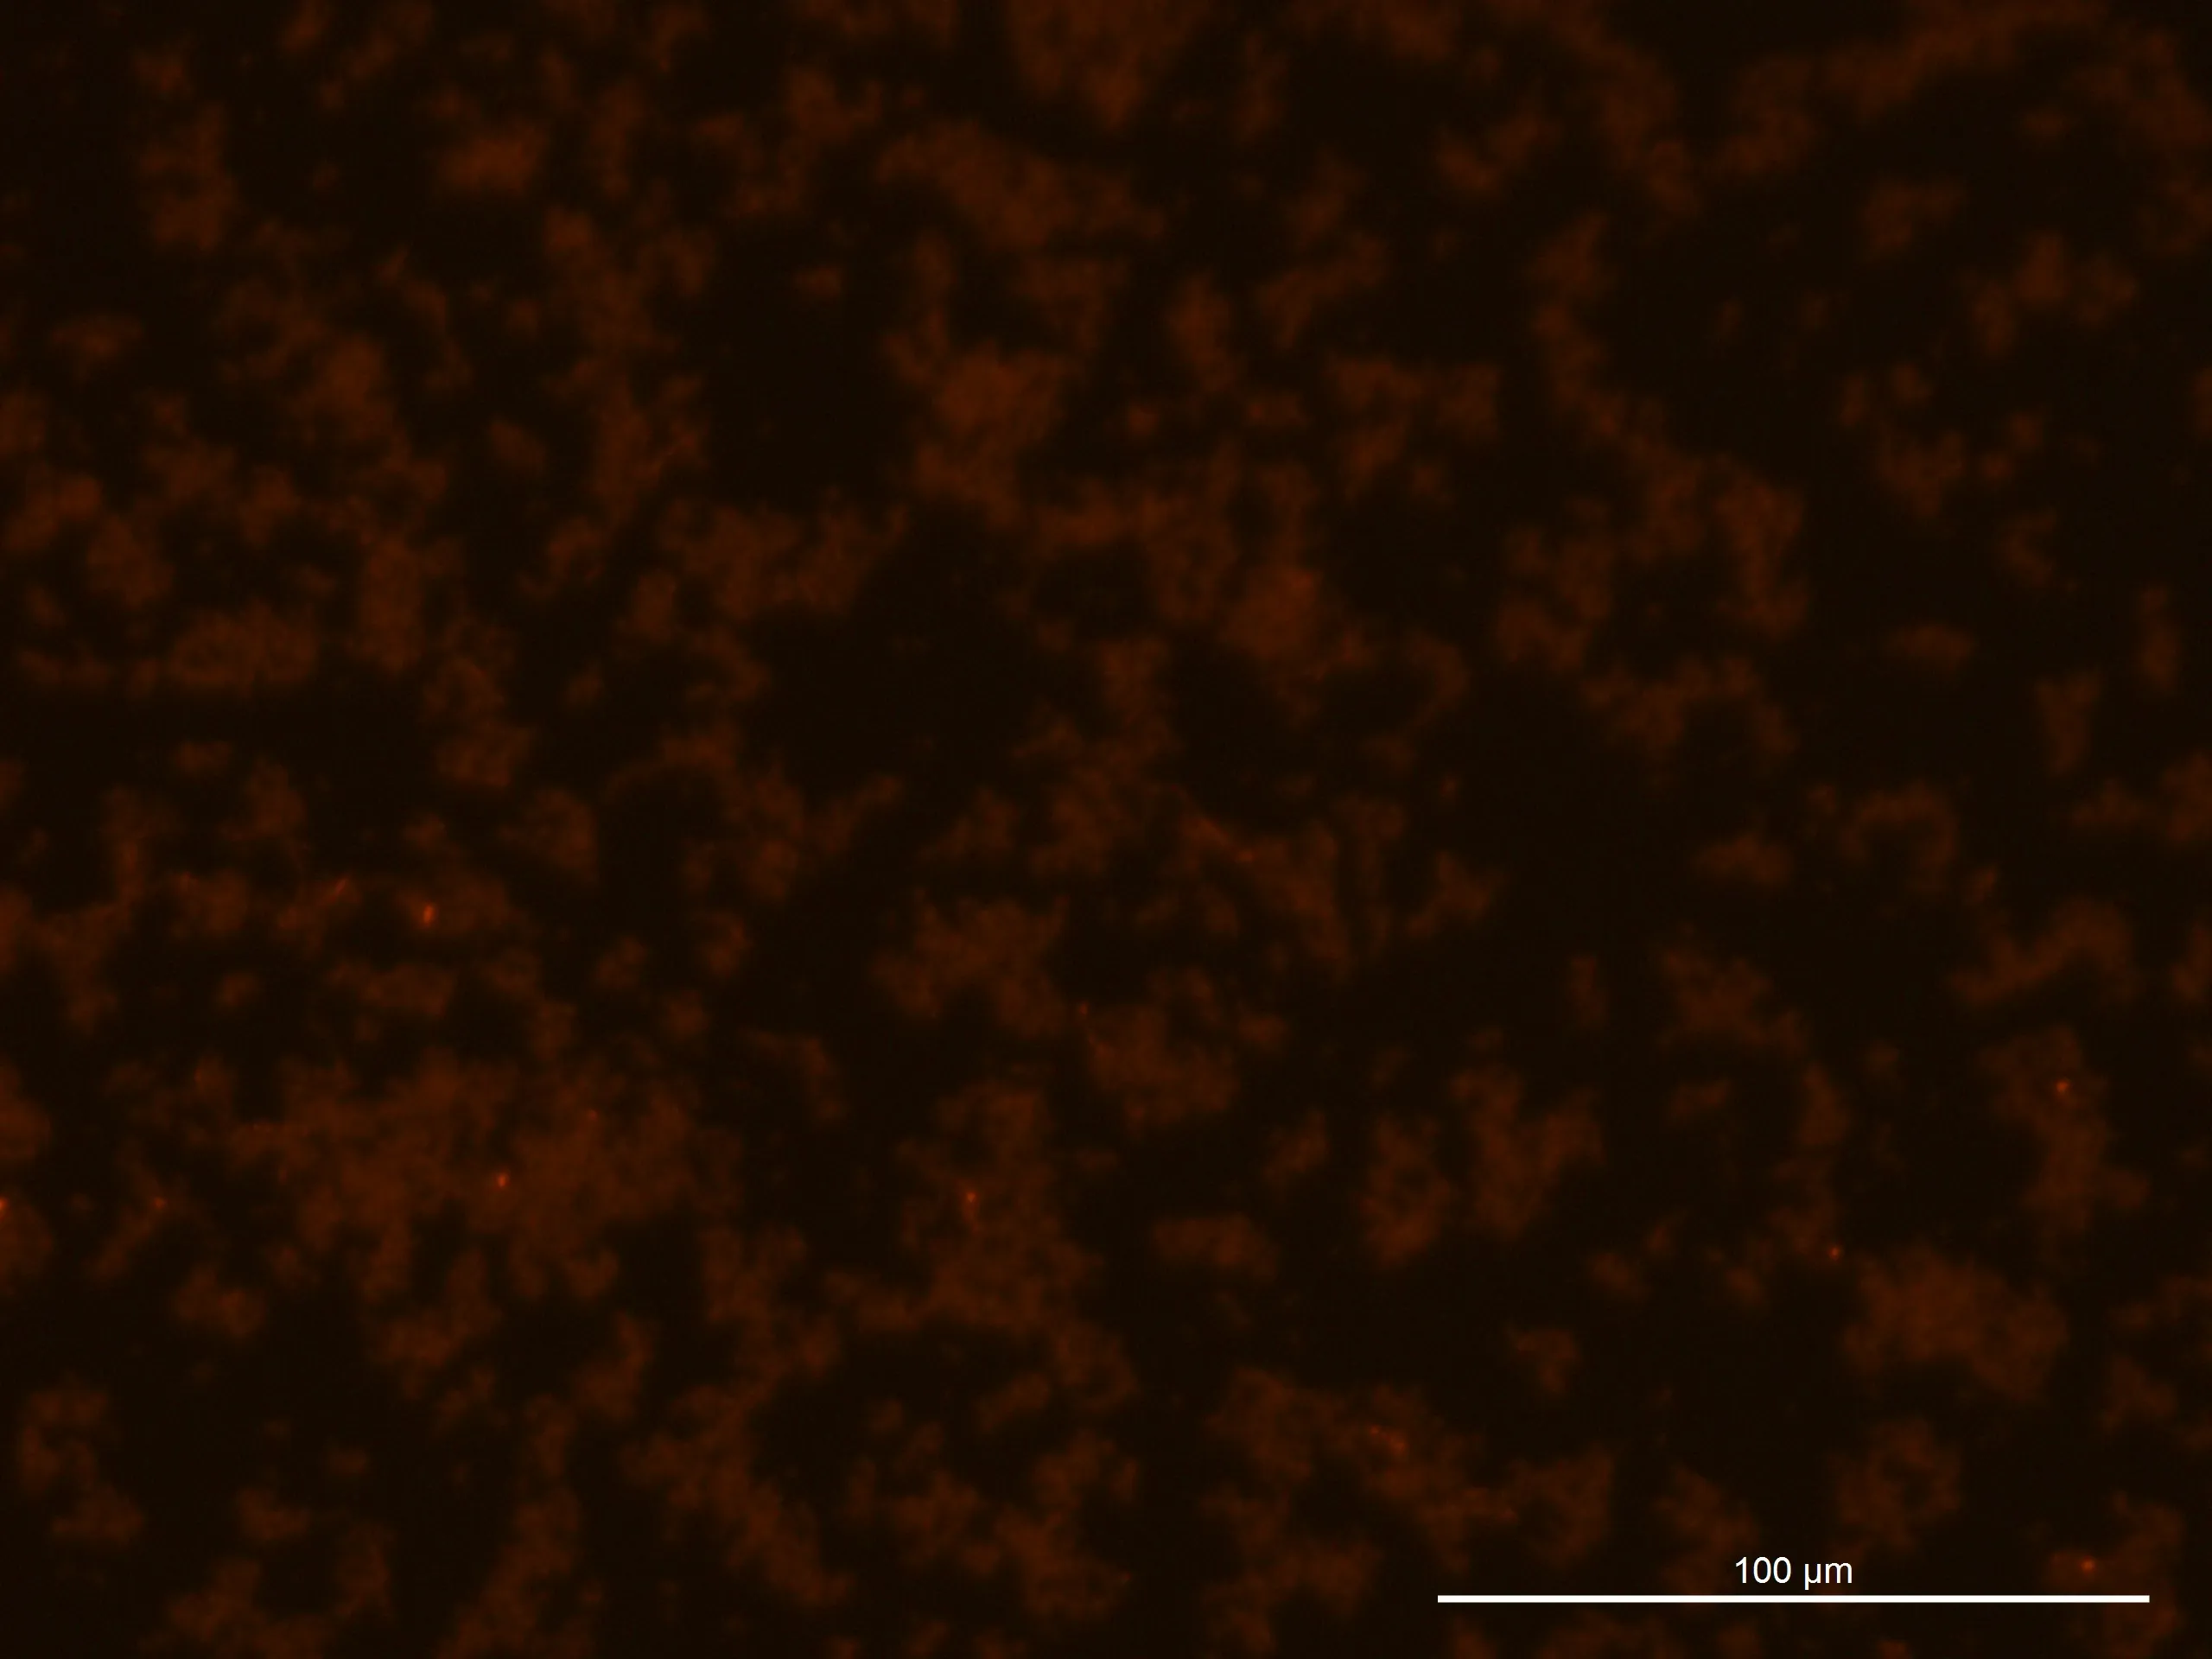
Observing PHB production in pGEM-phaCReAB cultures (240924) at different glucose concentrations after 24 hours with fluorescence microscopy observation.
Inoculation and culture of pGEM-phaCReAB in LB medium (8 mL culture volume in 50 mL tubes) with 4 different glucose concentrations .
Methods
1. Fluorescence Microscopy Observation
Procedure
Add 10 μL of each sample to its respective glass slide.
Add 0.5 μL of Nile Red stain to each sample.
Let the slides sit for 15 minutes.
Pipette out 9 μL from each slide.
Place coverslips on the slides and observe under the microscope.
2. Inoculation
Tube numbers and contents:
Tube No. 1: 4% Glucose
Tube No. 2: 2% Glucose
Tube No. 3: 1% Glucose
Tube No. 4: 0% Glucose
Procedure
Add 4 μL of Ampicillin to each of the four test tubes (final Ampicillin concentration = 50 μg/mL).
Add 3 mL of the corresponding samples from 240924 to each tube (No. 1-4).
Incubate with shaking at 38°C and 155 rpm.
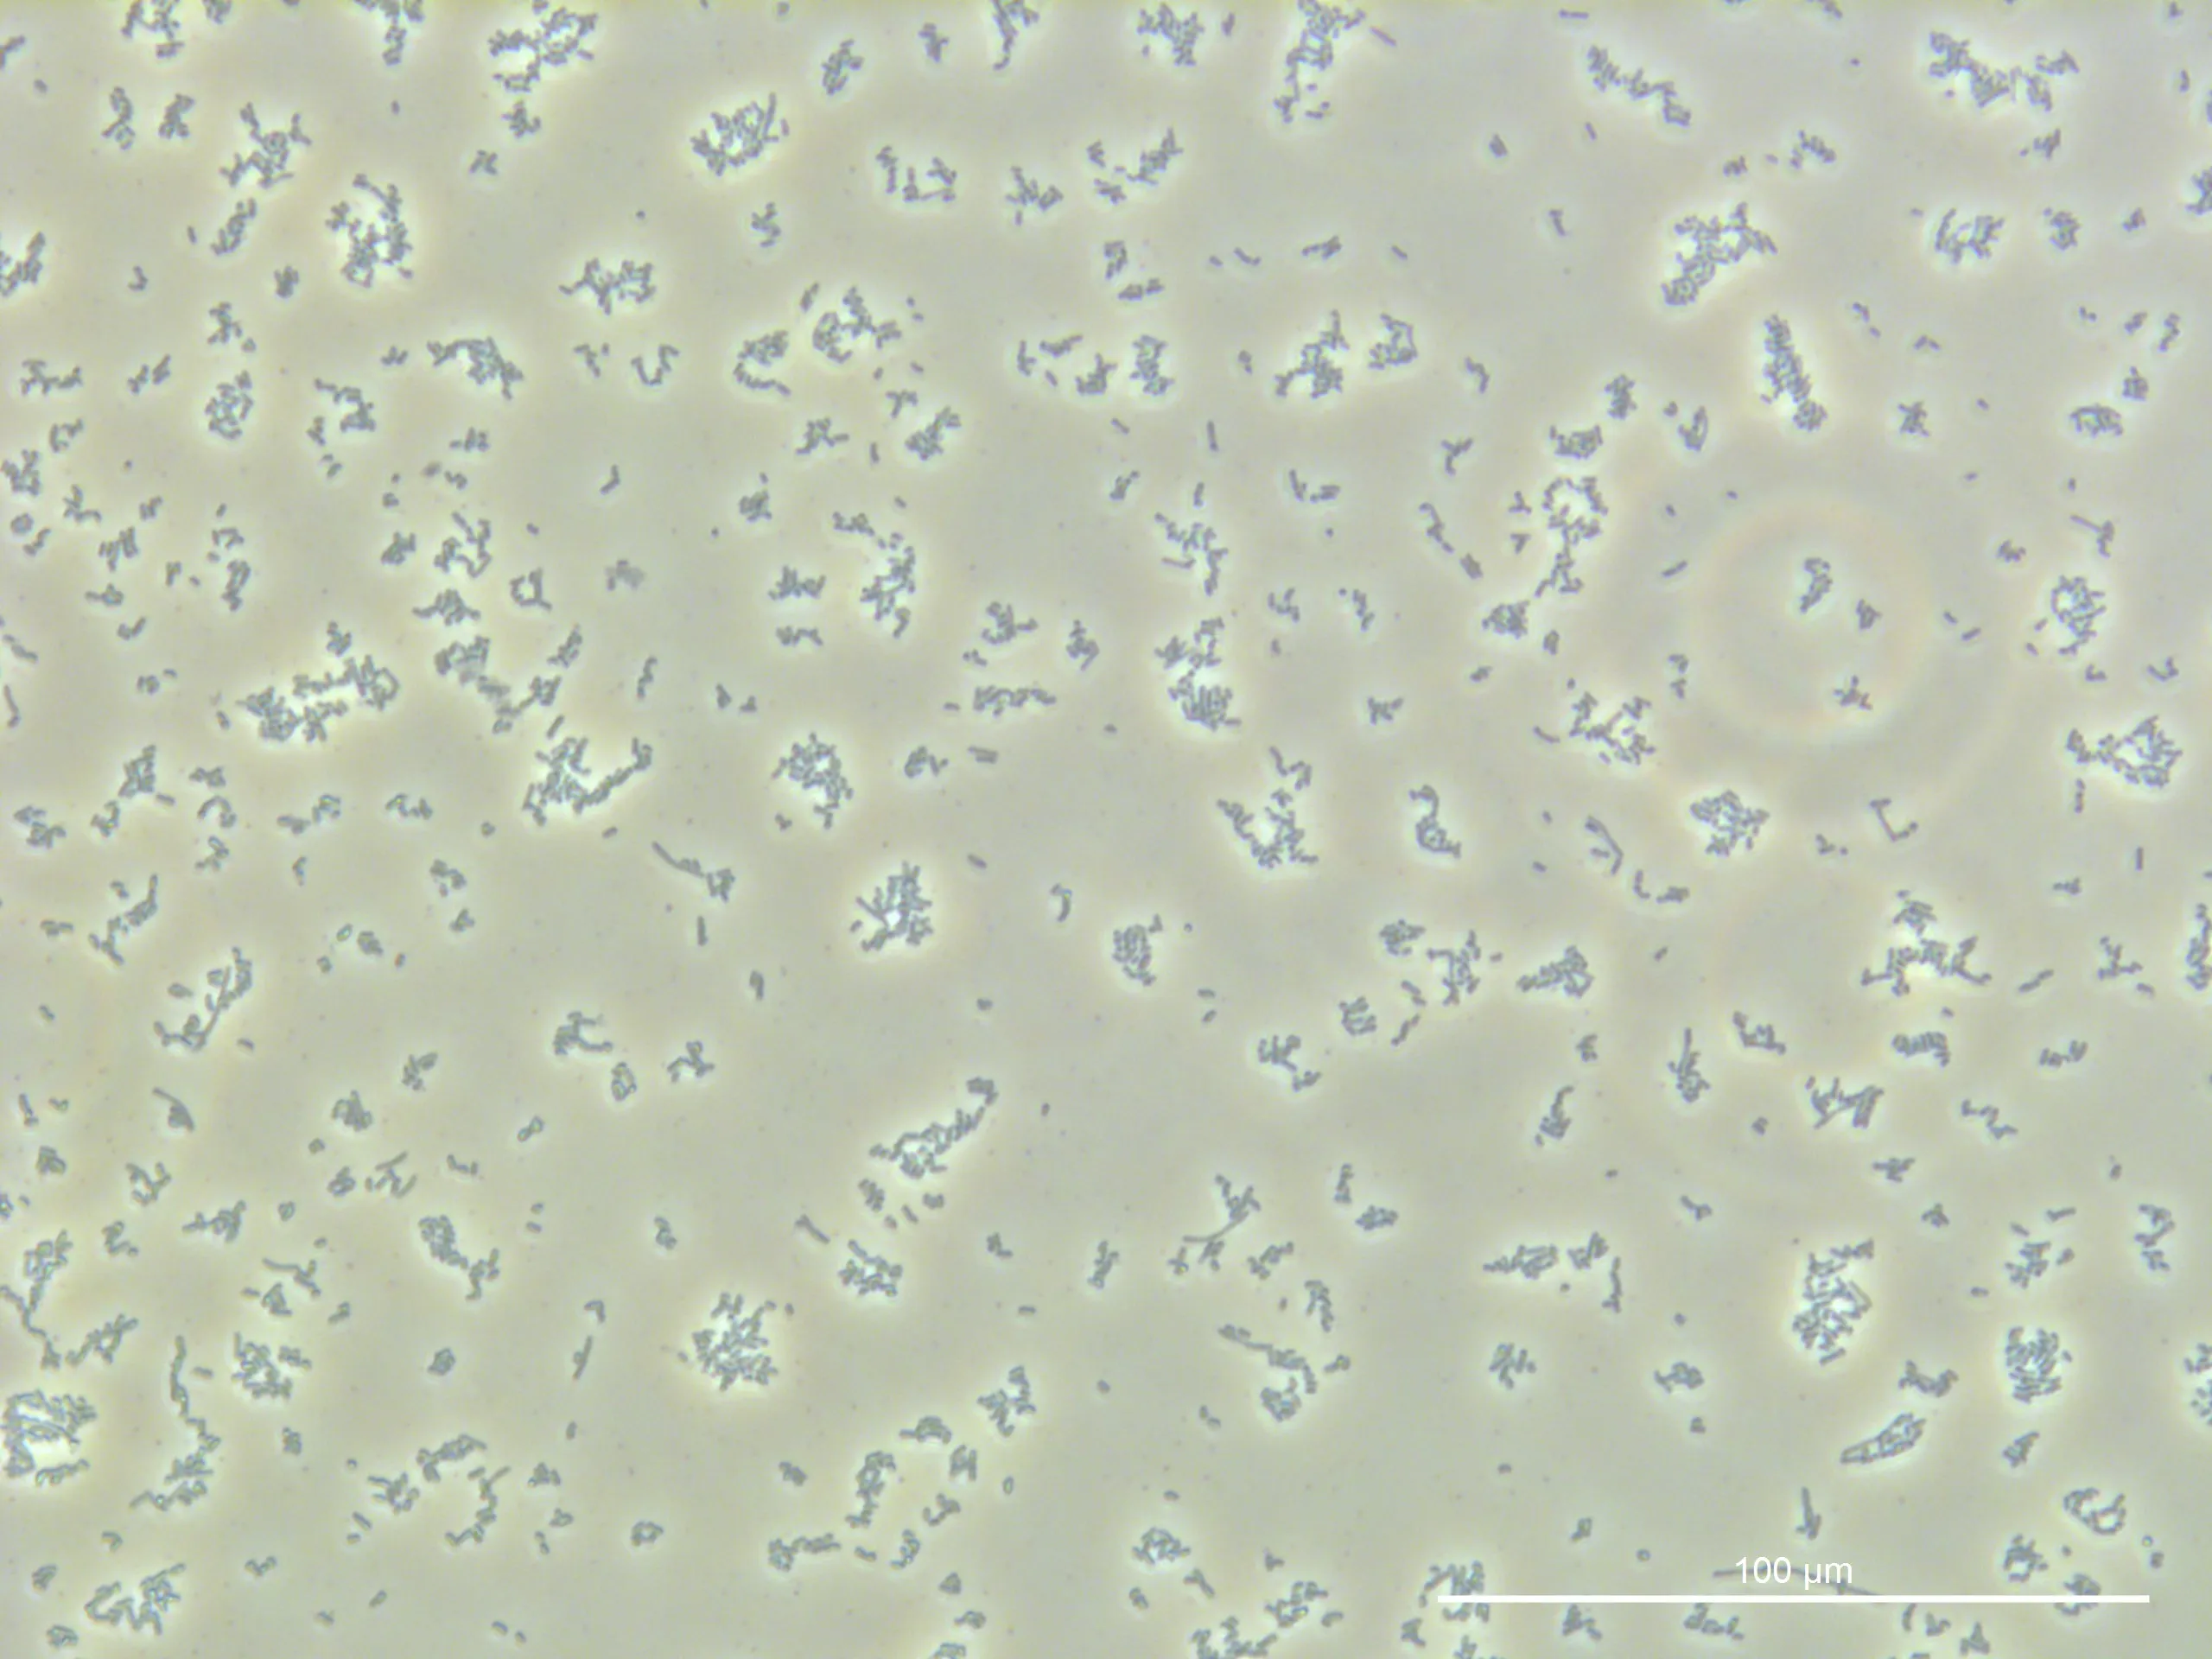
Results
Fluorescence Microscopy Observation:
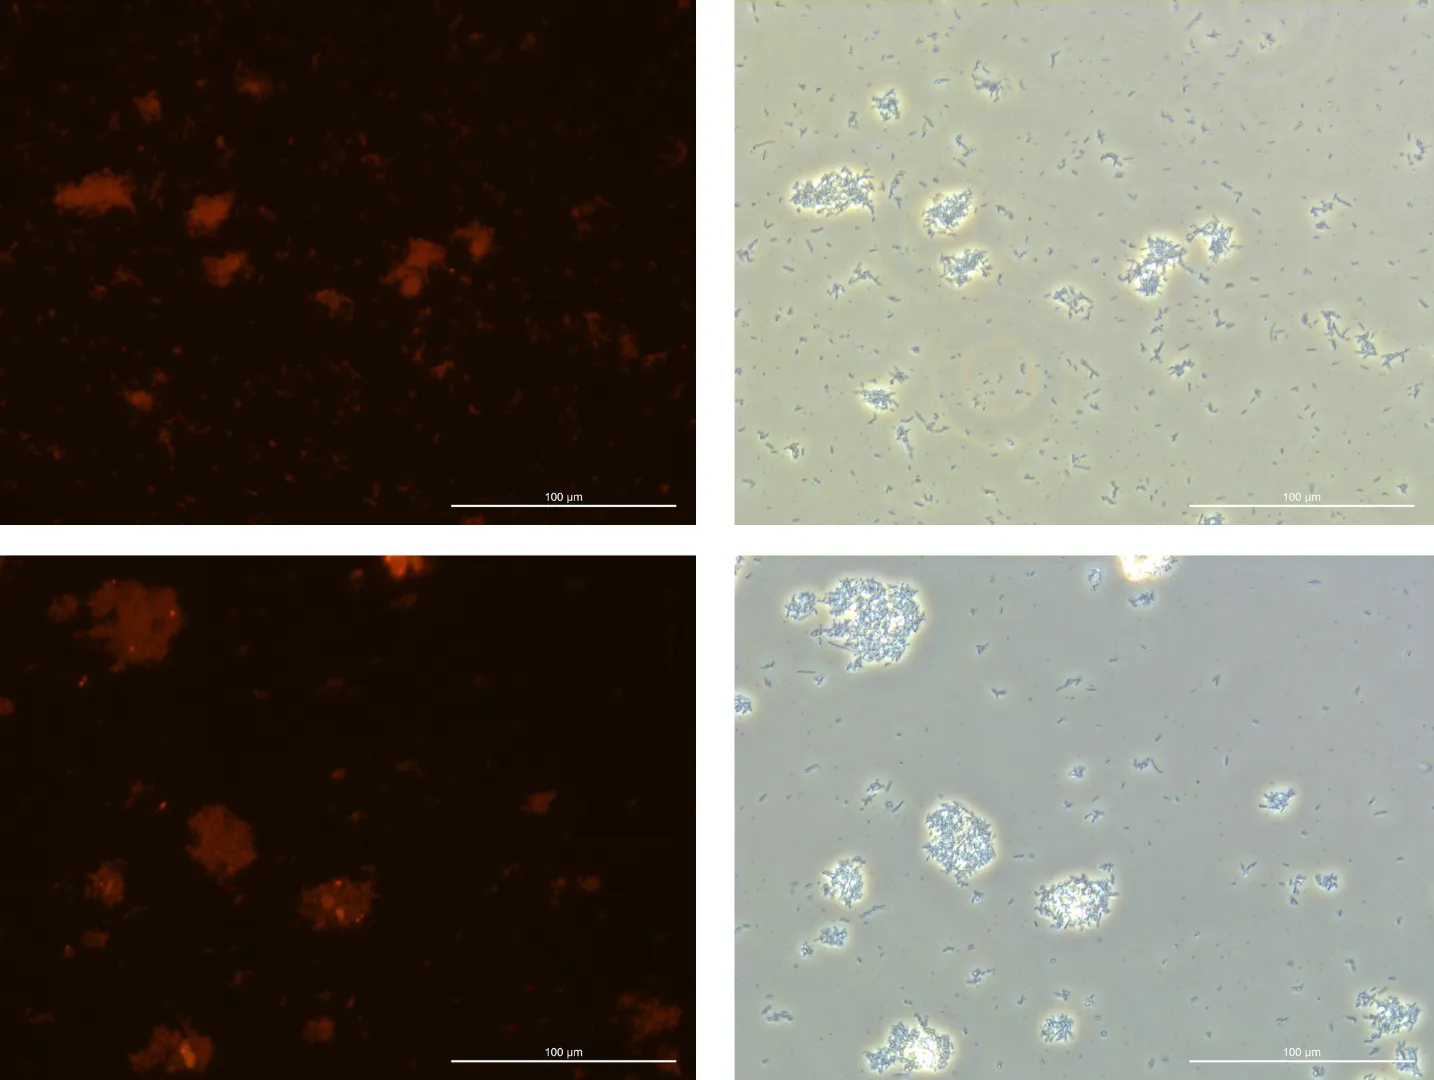
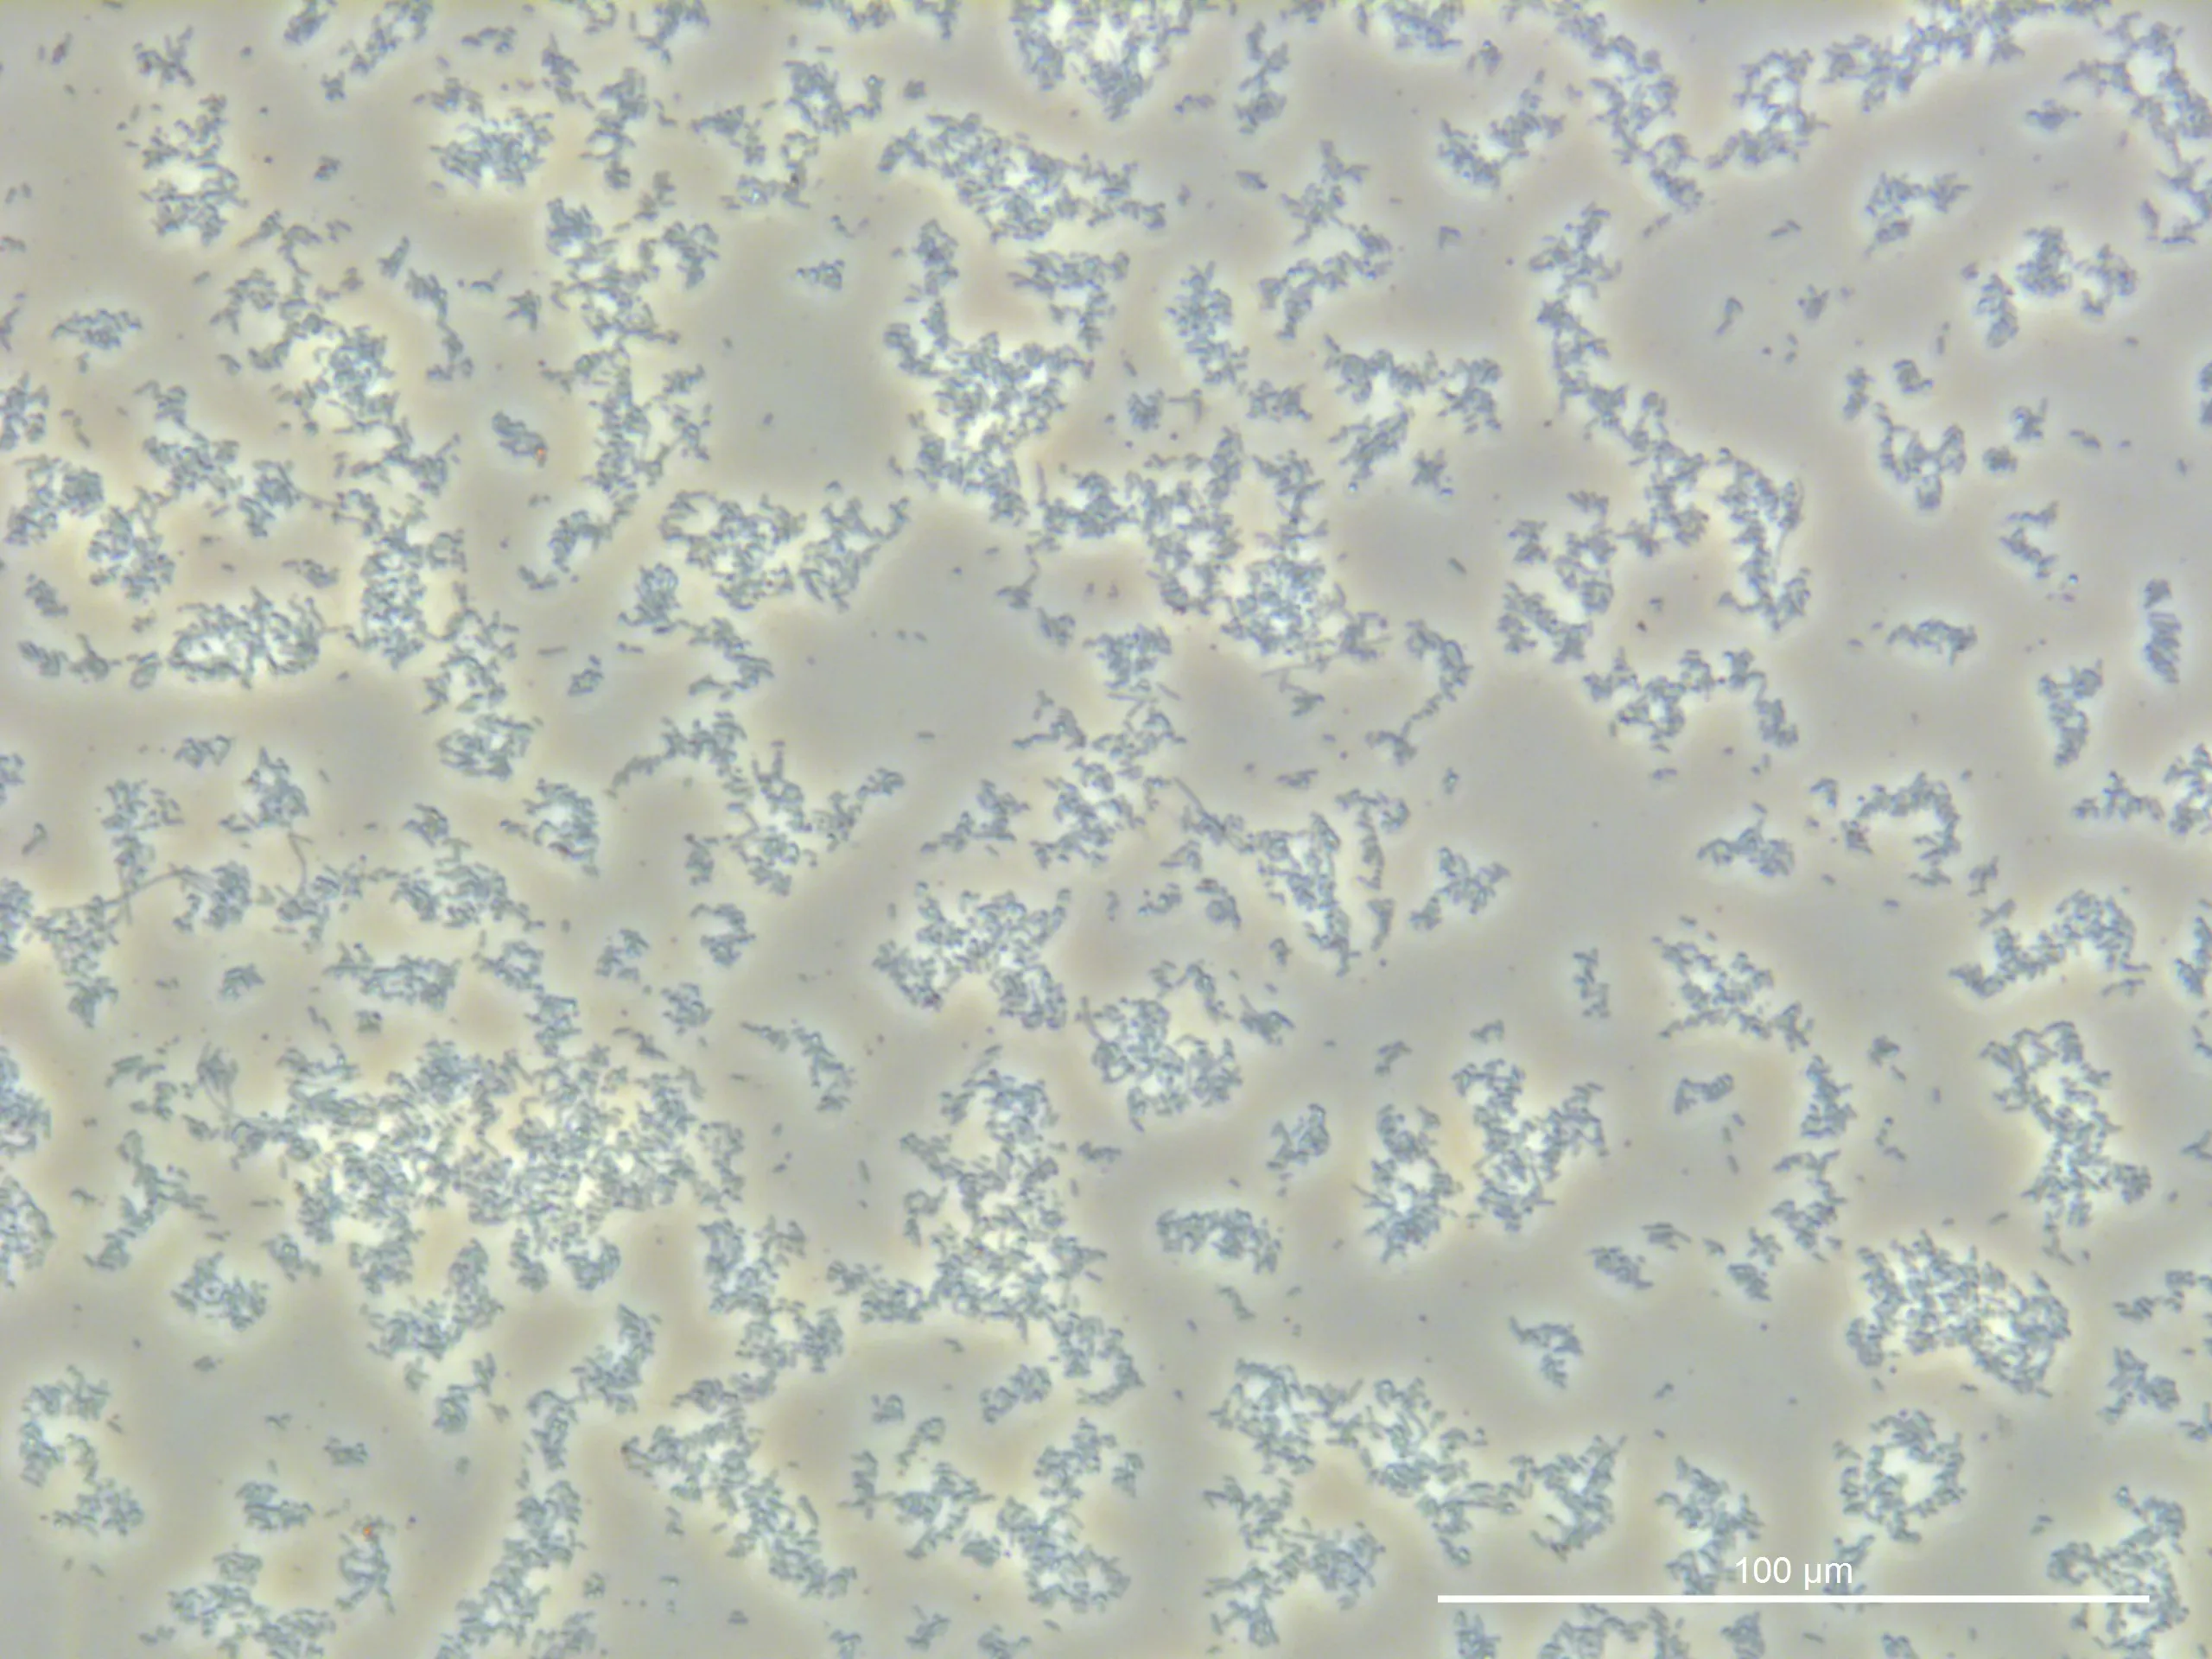
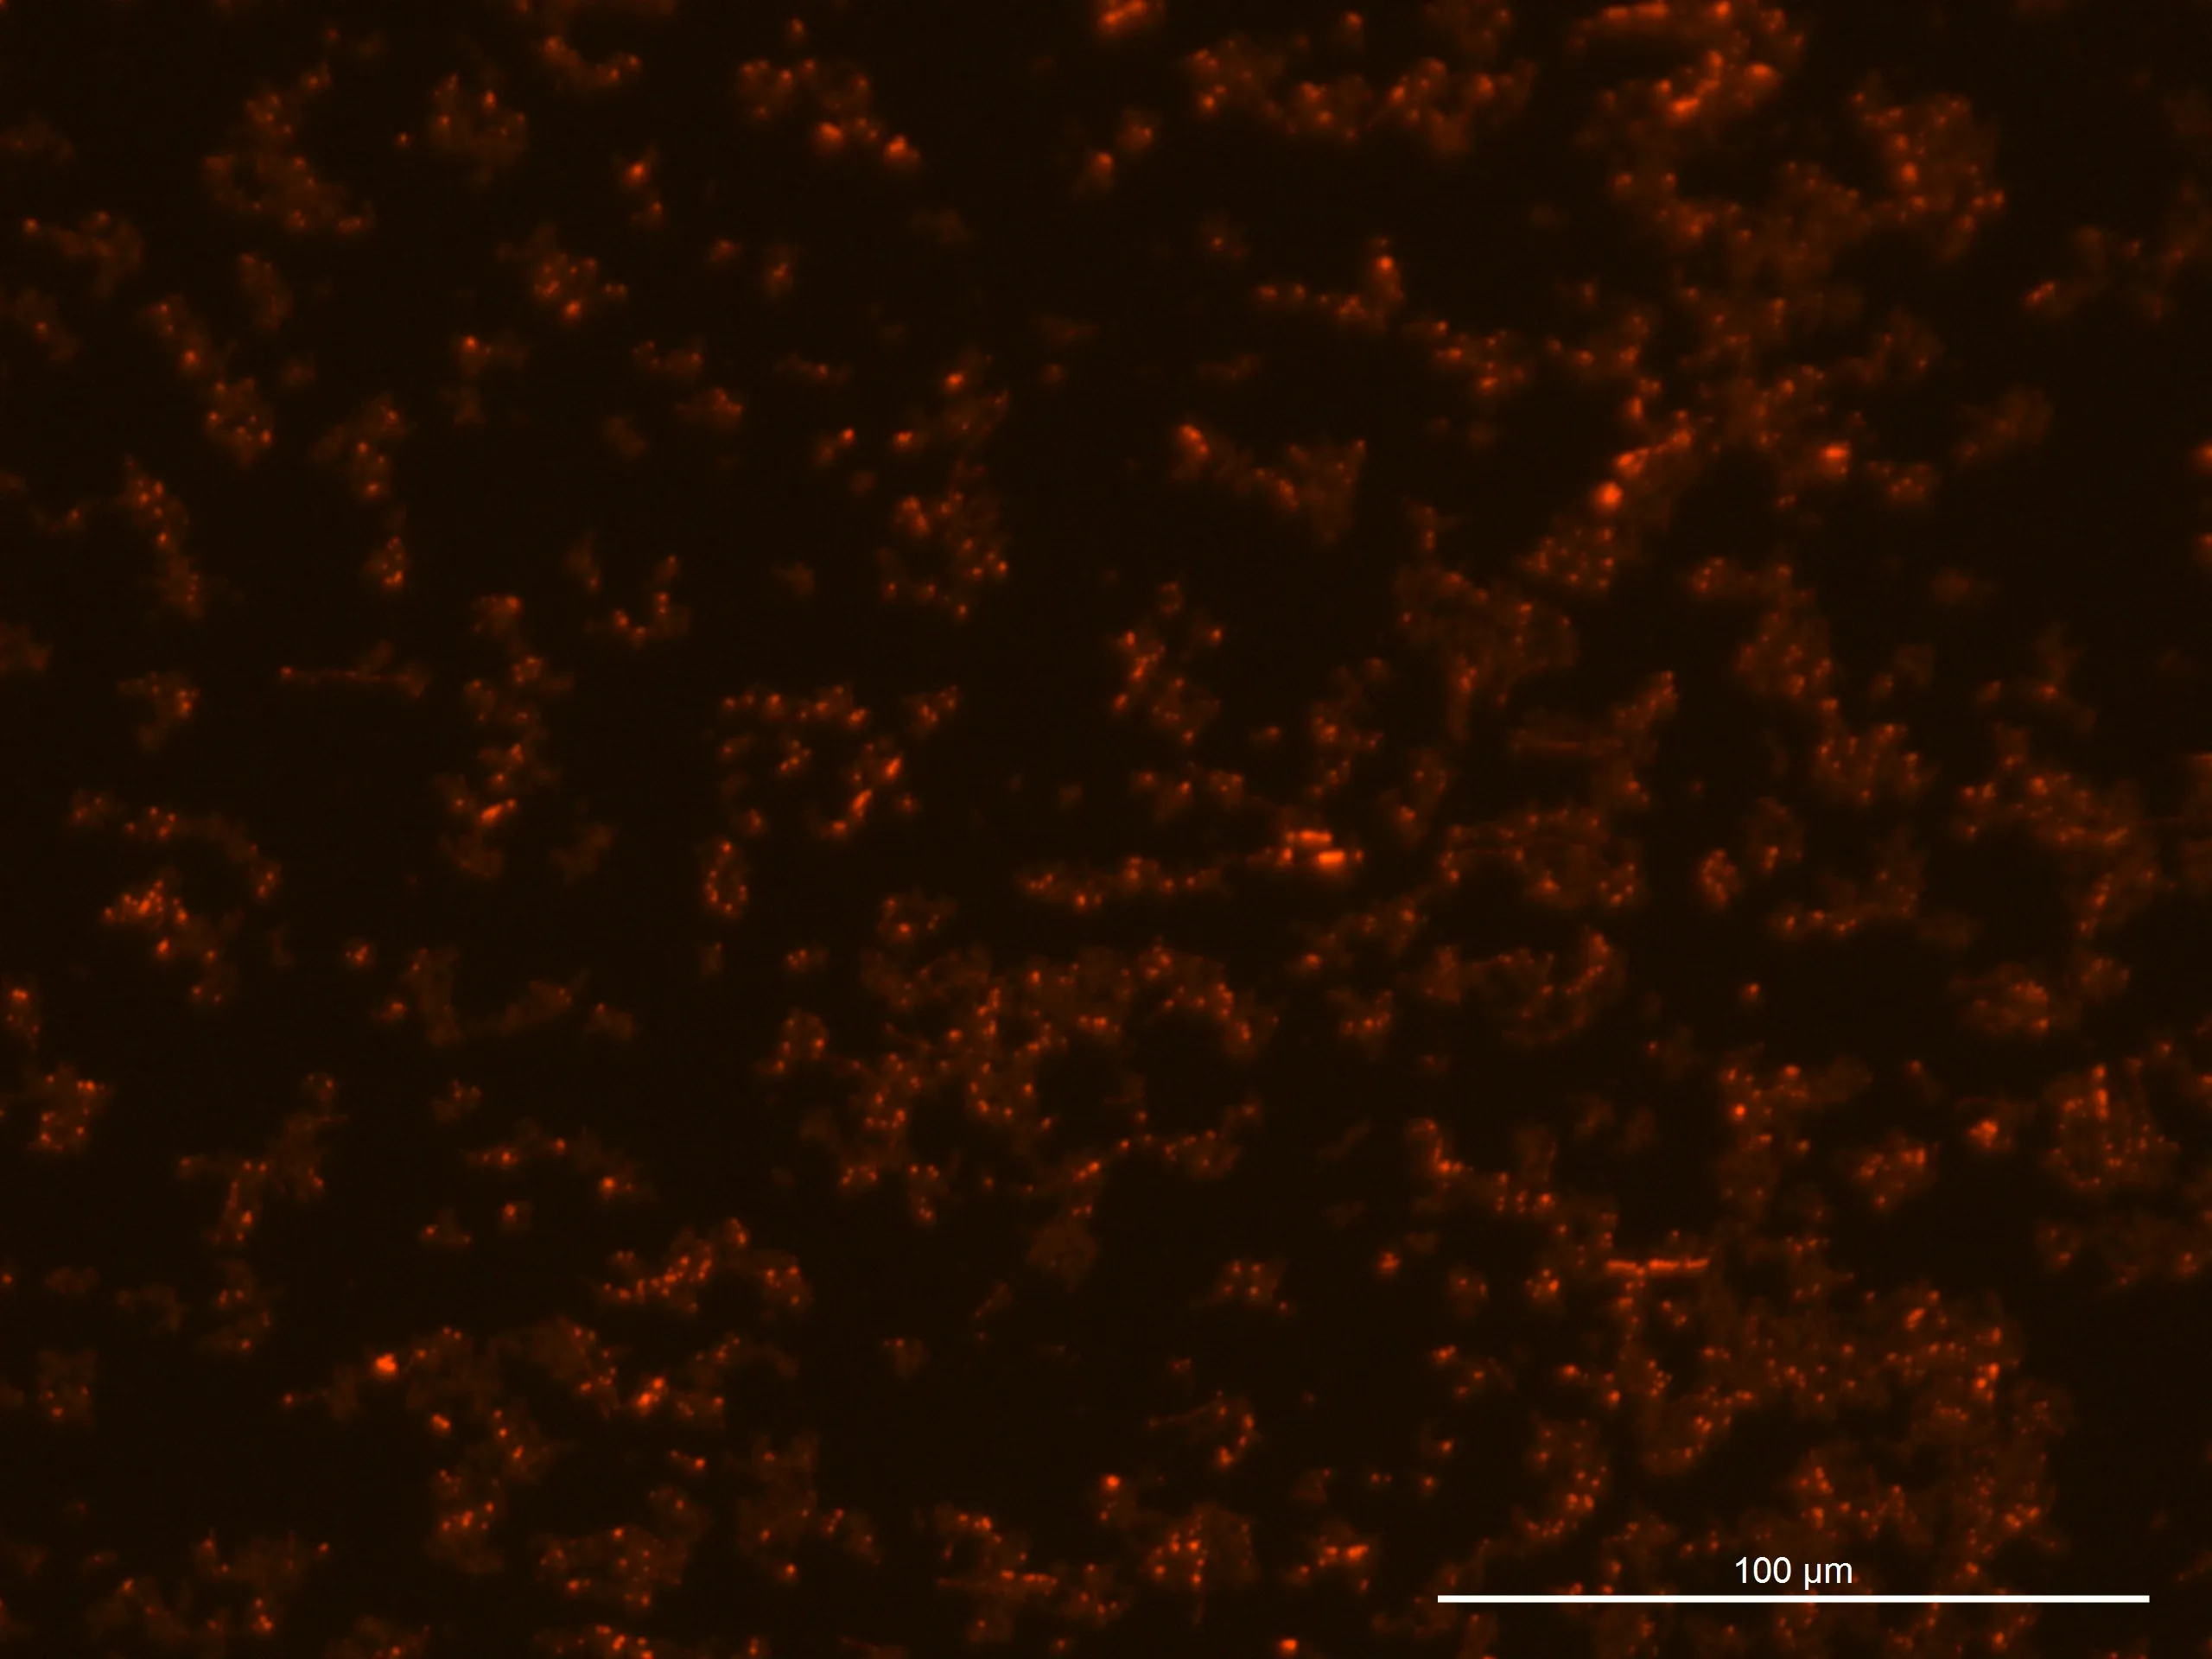
Glucose 0% 24h Culture:
240925, Glucose 0%, fluorescence 10%
240925, Glucose 0%, TL-PH
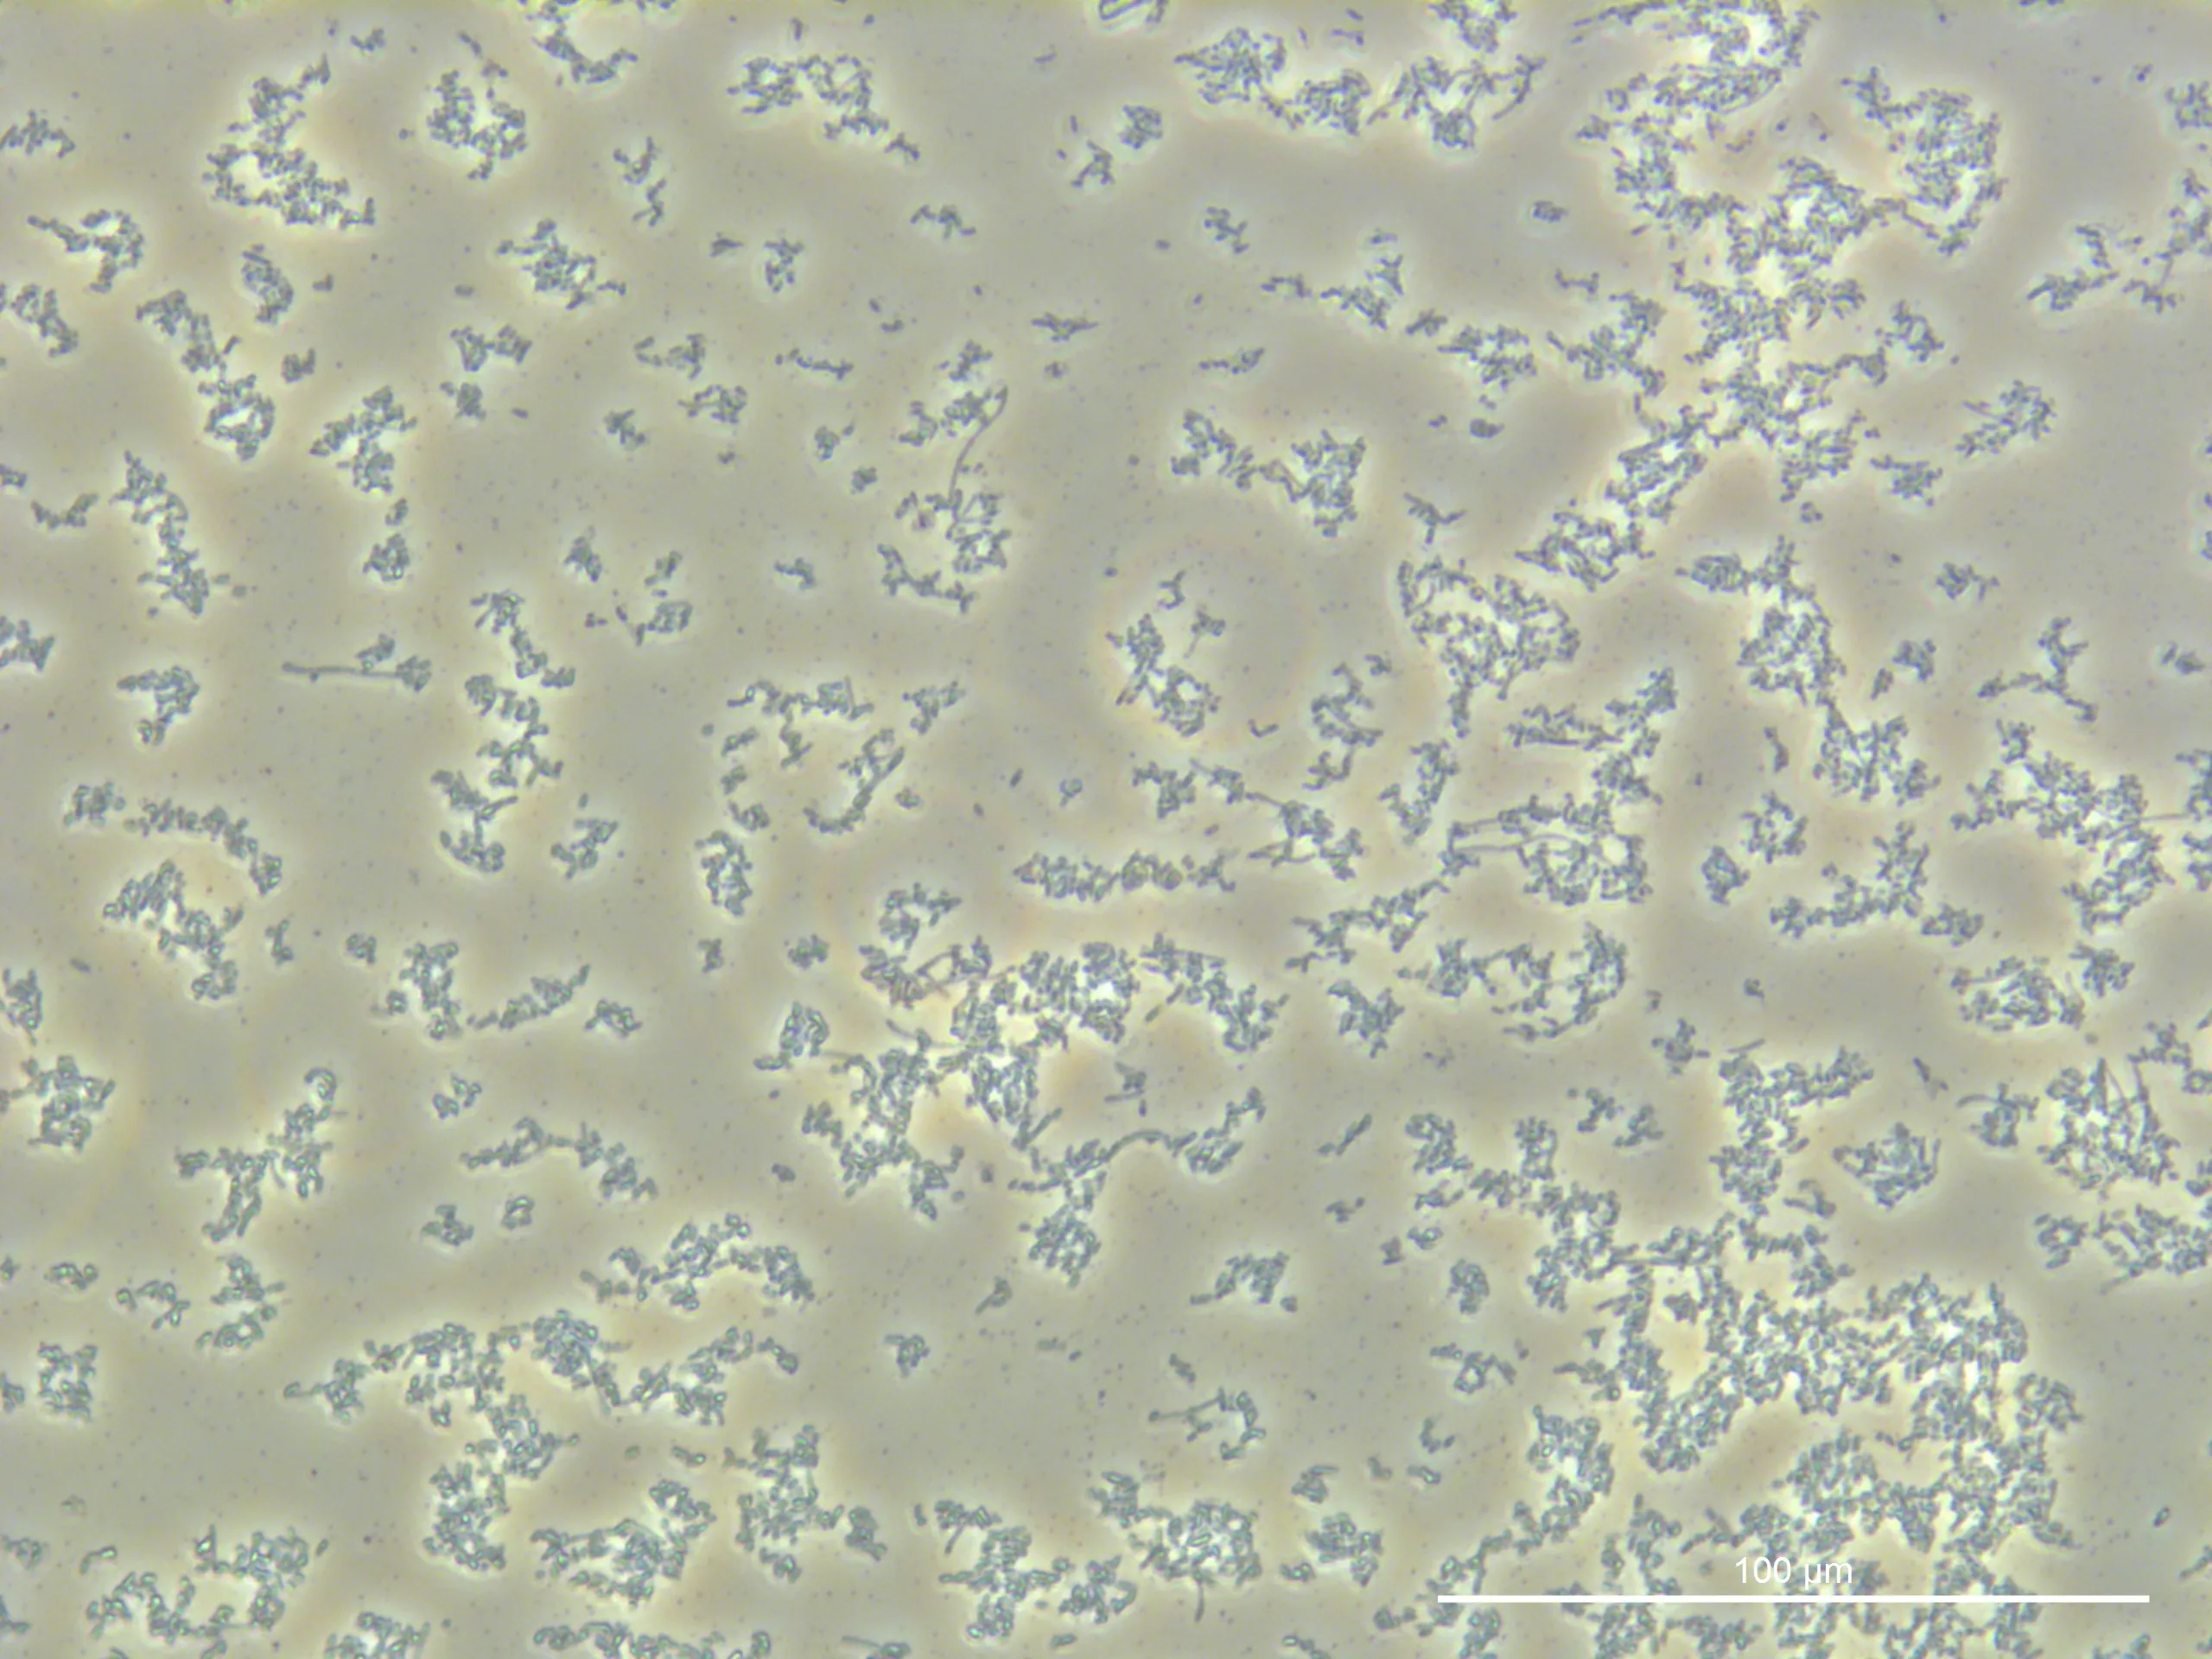
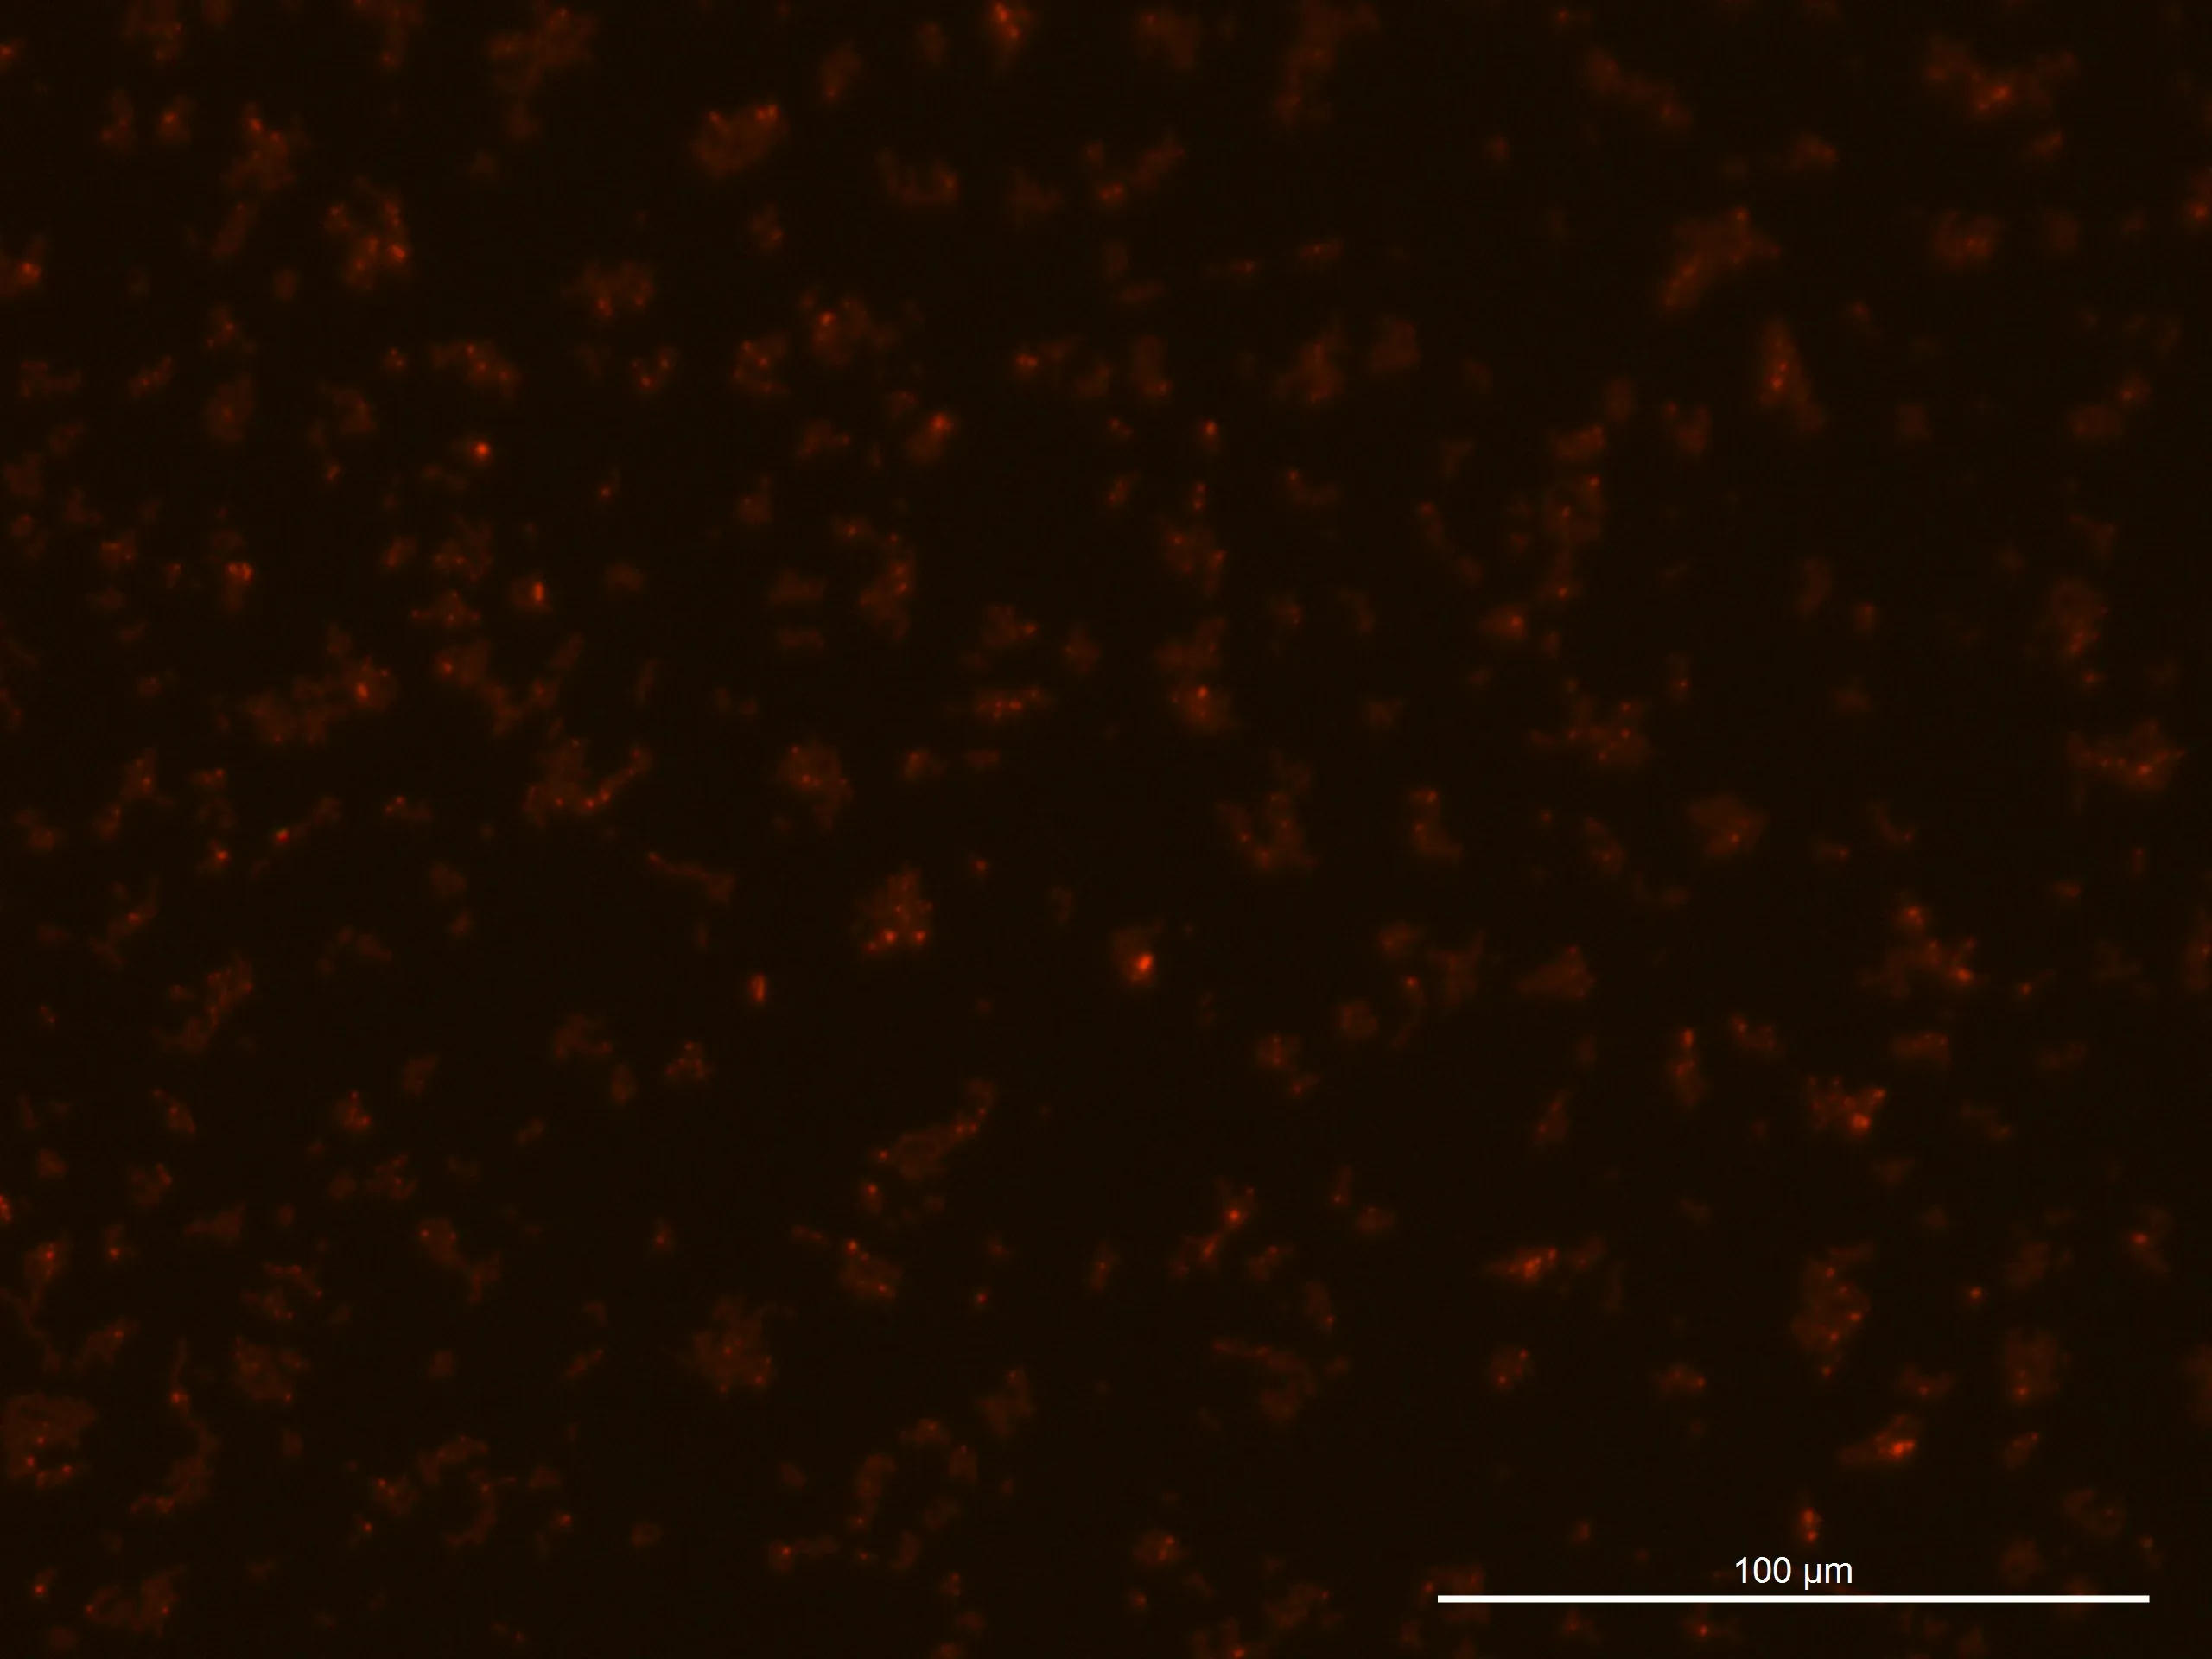
Glucose 1% 24h Culture:
240925, Glucose 1%, fluorescence 10%
240925, Glucose 1%, TL-PH
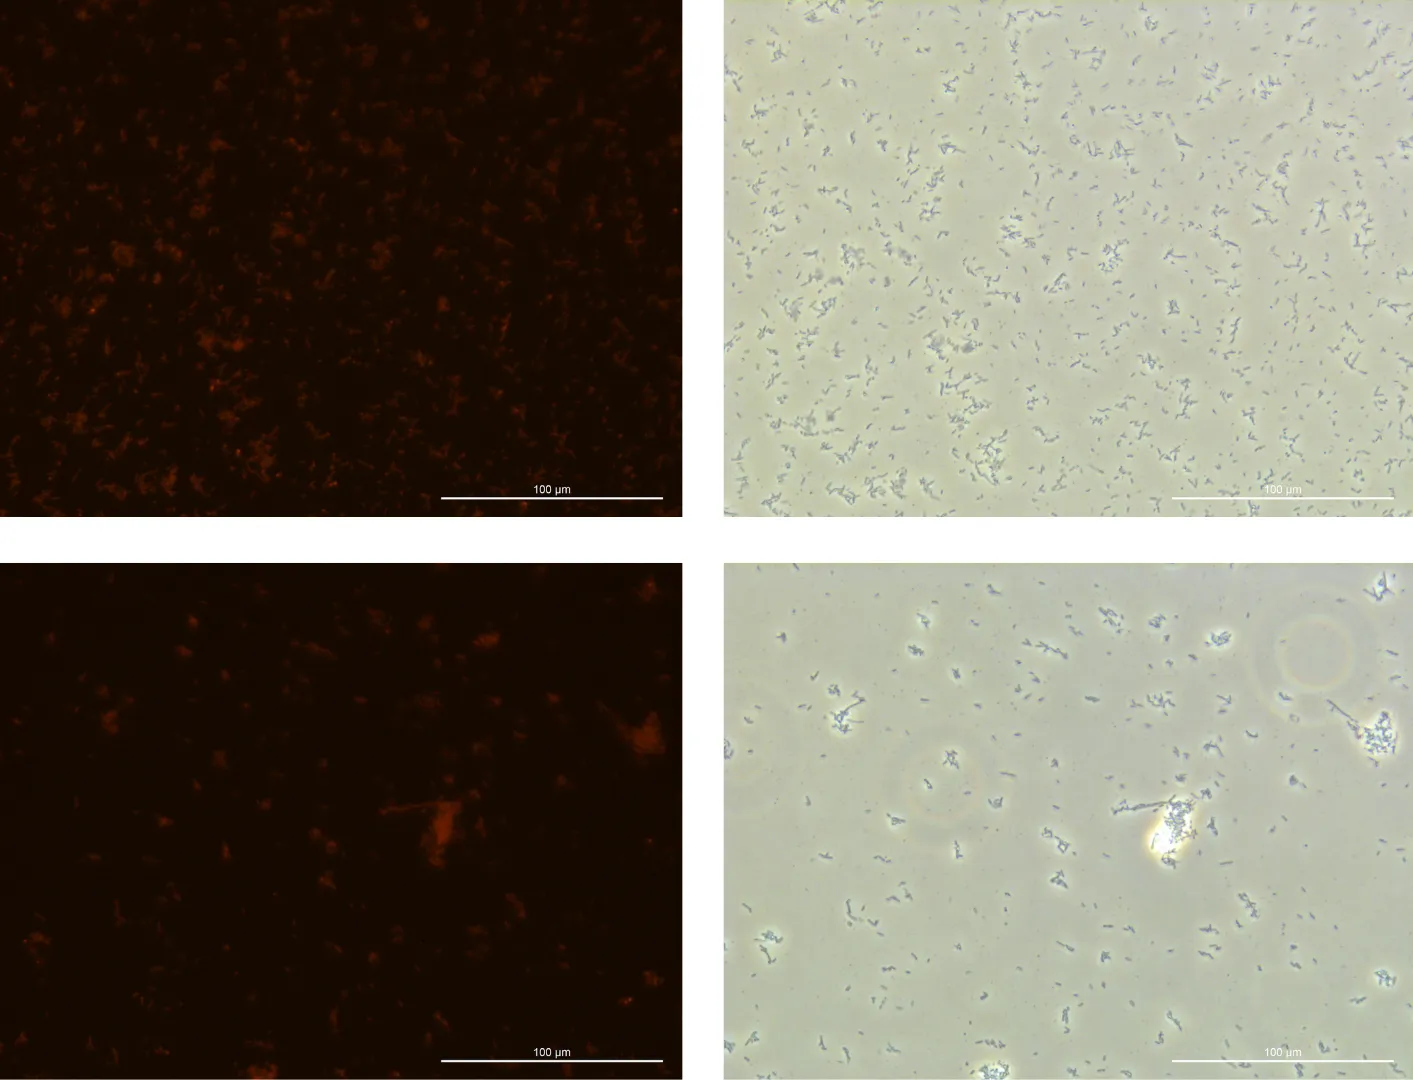
Glucose 2% 24h Culture:
240919, Glucose 2%, fluorescence 10%
240919, Glucose 2%, TL-PH
Glucose 4% 24h Culture:
240919, Glucose 4%, fluorescence 10%
240919, Glucose 4%, TL-PH
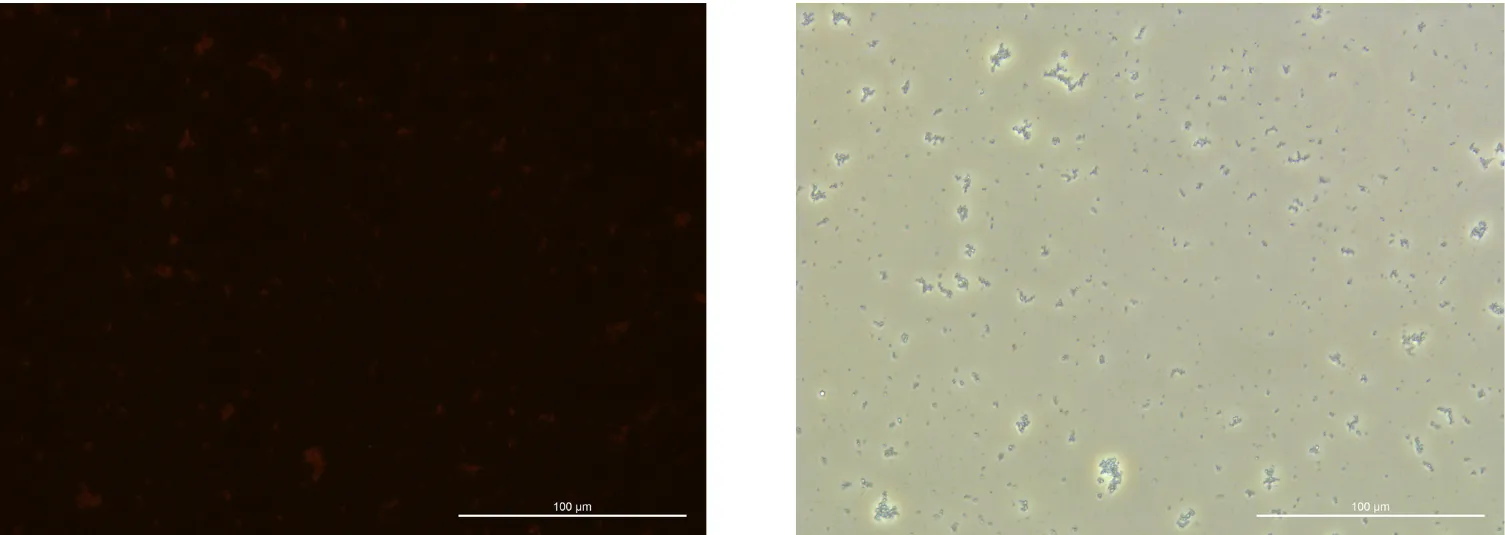
Discussion
Due to insufficient shaking in the 10 mL test tubes with 3 mL of culture medium, we decided to switch to using 8 mL of culture medium in 50 mL tubes for future experiments.
Overall Objectives & Numbering Guide
(A) Construction of Surface Display Proteins
[0] Scaffolding proteins (INP written as
I
and ompA written as
O
)
Surface Displayed Protein Number
Surface Displayed Protein
INP
ompA
[1]
Mgfp5
〇
〇
[2]
Glucanase
〇
〇
[3]
Chitinase C
〇
[4]
GH19 Chitinase
[5]
Mgfp5_Glucanase
〇
〇
[6]
Mgfp5_Chitinase C
〇
[7]
Mgfp5_GH19 Chitinase
〇
〇
[8]
Glucanase_Chitinase C
〇
[9]
Glucanase_GH19 Chitinase
〇
[10]
Mgfp5_Glucanase_Chitinase C
Want to construct
Want to construct
[11]
Mgfp5_Glucanase_GH19 Chitinase
Note:
Scaffolding proteins are transformed into pTf-16
Surface display proteins are transfored into pBluescript II SK(-)(pBluescript)
(B) Construction of shRNA
(C) Additional Plasmids (3 types)
Monday, 240708
Objectives
Construction of plasmid.
Note: Since pTf16 was not delivered, only pBluescript was cloned.
Methods
1. PCR
Procedure:
Prepare the diluted primer solution.
Prepare the Master Mix.
Add 22.5 μL of Master Mix, each diluted primer solution, and each DNA template to two PCR tubes.
Perform PCR under the following conditions and confirm the results by electrophoresis.
98°C for 2 min
98°C for 10 sec, 60°C for 30 sec, 72°C for 3 min (30 cycles)
Hold at 4°C
2. Gel Electrophoresis
Procedure:
Prepare the agarose gel for electrophoresis.
Load 3 μL of each sample and 2 μL of molecular weight marker (1 kb plus ladder) into the wells of the gel.
Run electrophoresis for approximately 15 min and observe the bands.
Reload the gel with 20 μL of each sample and 2 μL of molecular weight marker.
Run electrophoresis again and observe the bands.
Excise the desired bands and proceed to gel purification (step 3).
3. Gel Purification
Procedure:
Place the excised gel slices into an Eppendorf tube.
Add 400 μL of Dissolve Buffer to dissolve the gel.
Heat the mixture at 37 °C until the gel is fully dissolved.
Transfer the solution to a spin column and centrifuge at 13,000 rpm for 1 minute at 4 °C. Discard the flow-through.
Add 200 μL of DNA Wash Buffer to the column and centrifuge at 13,000 rpm for 1 minute at 4 °C. Discard the flow-through.
Centrifuge the column again at 13,000 rpm for 1 minute at 4 °C to remove residual wash buffer.
Place the column into a clean 1.5 mL tube.
Add 20 μL of DNA Elution Buffer to the column and centrifuge at 13,000 rpm for 1 minute at 4 °C to elute the DNA.
4. In-Fusion Assembly
Procedure:
Reaction 1:
In an Eppendorf tube, combine:
1 μL DNA (GGA)
1 μL Backbone (pBluescript)
6 μL mili-Q water
2 μL 5× In-Fusion Premix
Incubate at 50 °C for 15 min.
Reaction 2 (Control):
In another Eppendorf tube, combine:
1 μL Backbone (pBluescript)
7 μL mili-Q water
2 μL 5× In-Fusion Premix
Incubate at 50 °C for 15 min.
5. Transformation
5.1 Preparation of Media
Procedure:
Add mili-Q water to three Erlenmeyer flasks:
Flask 1: 500 mL
Flask 2: 100 mL
Flask 3: 50 mL
Add LB powder to each flask at a concentration of 25 g/L.
Add agar to each flask at a ratio of 1 g per 100 mL.
Autoclave the media at 121 °C for 15 min.
5.2 Preparation of LB Agar Plates
Procedure:
Add 0.25 mL of ampicillin stock solution to 500 mL of LB medium to achieve a final concentration of 50 μg/mL.
Pour approximately 30–35 mL of the LB agar into each Petri dish.
Allow the plates to solidify at room temperature.
5.3 Transformation Procedure
Procedure:
Gently mix 10 μL of the In-Fusion reaction product with 50 μL of competent cells in an Eppendorf tube.
Incubate the mixture on ice for 20 min.
Spread the entire mixture onto an LB Amp agar plate.
Incubate the plate overnight at 37 °C.
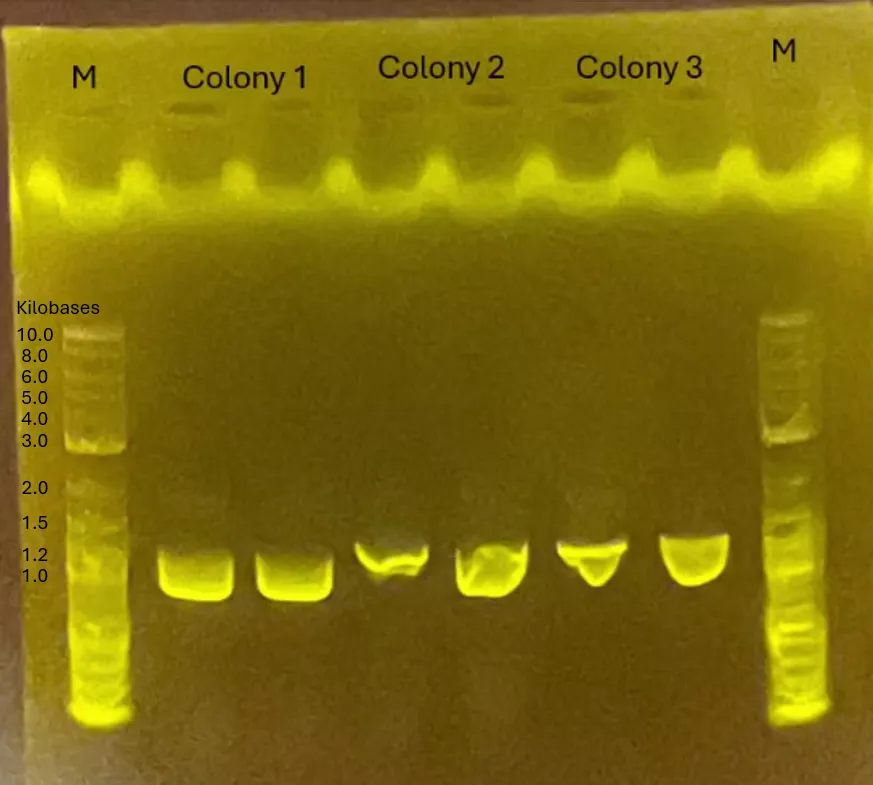
Results
Gel Electrophoresis results:
Figure 1.
Discussions
pBl and GGA confirmed → proceeded to Gel Purification → In-Fusion Assembly → Transformation
Tuesday, 240709
Objectives
Band confirmation of purified pBI and GGA Site by Gel Electrophoresis
Methods
1. Gel Electrophoresis
Procedure:
Prepare the agarose gel for electrophoresis.
Prepare
Sample 1
by mixing 3 μL of purified pBluescript, 2 μL of mili-Q water, and 1 μL of 6× dye.
Prepare
Sample 2
by mixing 3 μL of purified GGA site, 2 μL of mili-Q water, and 1 μL of 6× dye.
Load 6 μL of Sample 1, 6 μL of Sample 2, and 3 μL of molecular weight marker into separate wells of the agarose gel.
Run electrophoresis for approximately 20 min and verify the bands.
Store the samples as stock.
Results
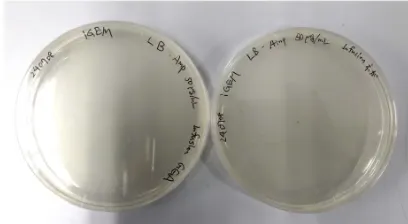
Result of Transformation conducted on 240708
Figure 2.
No colonies were obtained → Retrying the transformation (pBl, pGEM-phaCReAB, C, NC)
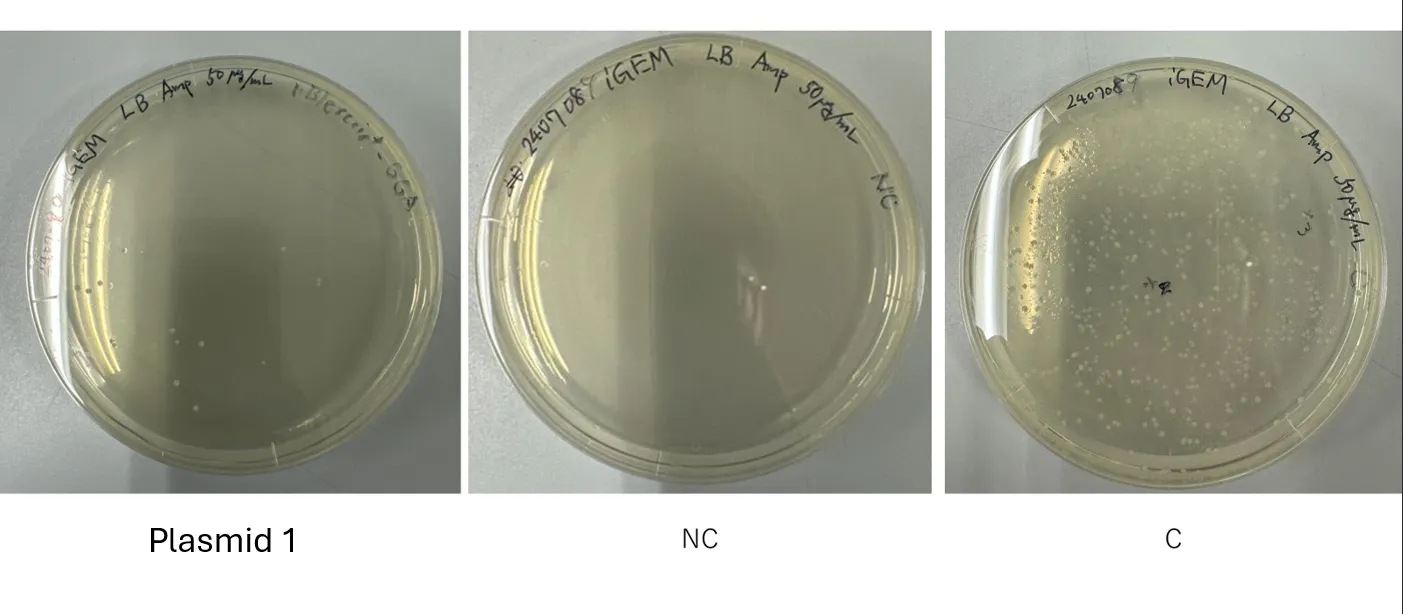
Figure 3.
No colonies observed in Plasmid 1 plate →
pBluescrippt-GGA plasmid
transformation (conducted on 240708) failed. → In-Fusion Assembly Retry
Additional Experiment
1. In-Fusion Assembly and Transformation (Retry due to no colonies observed)
Procedure:
Prepare the DNA and Backbone mixture with the reagents listed above.
For the control reaction, use only the backbone and premix as specified.
Incubate all reaction mixtures at 50°C for 15 min.
Mix the
In-Fusion reaction products
with 50 μL of DH5α competent cells.
Place on ice for 20 min.
Perform heat shock at 42°C for 1 minute, then add 400 μL of SOC.
Incubate at 37°C for 1 hour at 200 rpm.
Plate the cells onto LB Amp plates and incubate overnight at 37°C.
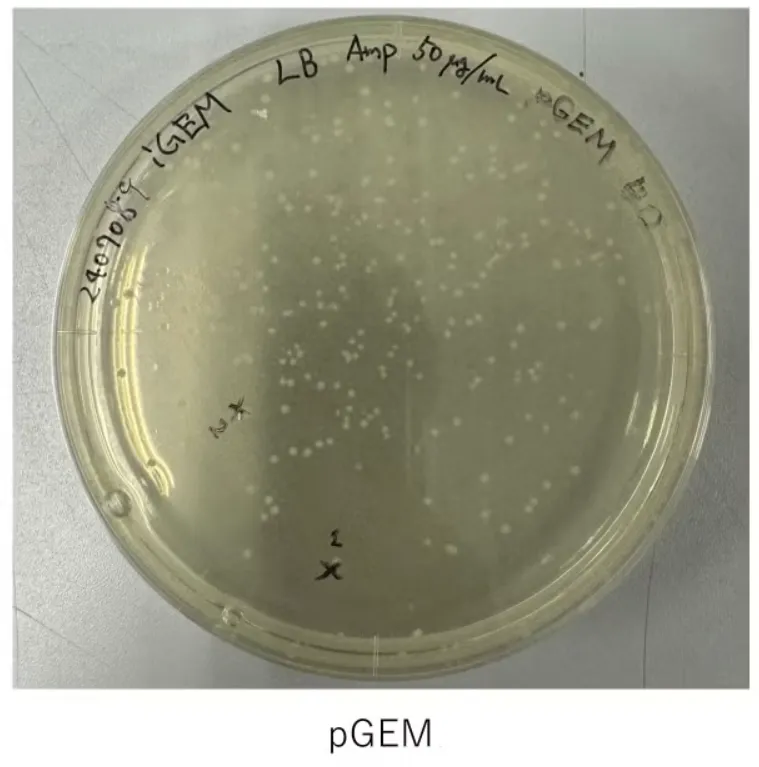
Note: The plasmid (pGEM-phaCReAB) received from Dr. Taguchi during the transformation was also processed simultaneously.
In addition to the negative control, a positive control provided with the kit was also tested.
Discussion
Potential causes of the first In-Fusion assembly failure include insufficient assembly reaction time or low DNA concentration.
→ Assembly time: increased from 15 min to 50 min.
→ From now on, adjust the following solution for the reaction:
DNA: 1 μL
Backbone: 1 μL
mili-Q water: 2 μL
5× In-Fusion Premix: 1 μL
Total: 5 μL
Wednesday, 240710
Objectives
Colony PCR and Large-Scale Culture of Transformed Colonies (Second try of In-Fusion Assembly and Transformation) (A)
PCR to Add GGA Sites to Each DNA Fragment for Surface Display Proteins (A)
Methods
1. Colony PCR (A)
1.1. Colony Pick-up
Procedure
Add 20 μL LB medium to 4 PCR tubes.
Pick 4 colonies from the plate and transfer to each tube.
1.2. Primer Dilution Preparation
Procedure
In an Eppendorf tube, add 72 μL mili-Q water, 4 μL forward primer, and 4 μL reverse primer.
1.3. Master Mix Preparation (for 4 tubes)
Procedure
Mix 40 μL mili-Q water with 50 μL EmeraldAmp in an Eppendorf tube.
1.4. PCR
Procedure
Add 22.5 μL Master Mix, 1.5 μL Primer Dilution, and colony solution to each PCR tube.
Perform PCR:
98°C for 2 min
98°C for 10 sec, 60°C for 30 sec, 72°C for 3 min (30 cycles)
Hold at 4°C
Run gel electrophoresis to verify bands.
2. Large-Scale Culture (A)
Procedure
Add 2 mL LB and 2 μL ampicillin (100 μg/mL LB Amp) to a conical tube.
Add colonies [3] and [4].
Incubate overnight at 37°C.
3. Fragment Preparation (A)
No.
Name
Gene
Primer
Size
1
GG1_Chitinase C_GG4
Chitinase C
Fwd1, Rev4
987bp
2
GG1_GH19 Chitinase_GG4
GH19 Chitinase
Fwd1, Rev4
1128bp
3
GG1_Glucanase_GG4
Glucanase
Fwd1, Rev4
1479bp
4
GG1_Mgfp5_GG4
Mgfp5
Fwd1, Rev4
336bp
5
GG2_Glucanase_GG4
Glucanase
Fwd2, Rev4
1479bp
6
GG2_Chitinase C_GG4
Chitinase C
Fwd2, Rev4
987bp
7
GG2_GH19 Chitinase_GG4
GH19 Chitinase
Fwd2, Rev4
1128bp
8
GG1_Chitinase C_GG2
Chitinase C
Fwd1, Rev2
987bp
9
GG1_GH19 Chitinase_GG2
GH19 Chitinase
Fwd1, Rev2
1128bp
3.1. Primer Dilution Preparation
Procedure
Add Mili-Q, forward primer, and reverse primer to an Eppendorf tube as per the table below:
Primer 1
Fwd 1
Fwd 2
Fwd 1
Primer 2
Rev 4
Rev 4
Rev 2
Required
x4
x3
x2
Mili-Q
72 μL
54 μL
36 μL
Fwd
4 μL
3 μL
2 μL
Rev
4 μL
3 μL
2 μL
3.2. Master Mix Preparation
Procedure
Mix 110 μL Mili-Q and 137.5 μL EmeraldAmp in an Eppendorf tube.
3.3. PCR
Procedure
Add 22.5 μL Master Mix, 1.5 μL Primer Dilution, and 1 μL DNA to each PCR tube.
Perform PCR:
98°C for 2 min
98°C for 10 sec, 60°C for 30 sec, 72°C for 3 min (30 cycles)
Hold at 4°C
Perform gel electrophoresis to verify bands.
3.4. PCR Product Purification
Procedure
Add 100 μL Binding Buffer to 9 Eppendorf tubes to dissolve the gel.
Add each PCR product (1–9) to the tubes.
Transfer to a column, centrifuge at 3,000 rpm for 1 minute at 4°C, and discard flow-through.
Add 200 μL DNA Wash Buffer, centrifuge at 3,000 rpm for 1 minute at 4°C, discard flow-through.
Repeat centrifugation step.
Set the column in a clean 1.5 mL tube.
Add 10 μL DNA Elution Buffer and centrifuge at 3,000 rpm for 1 minute at 4°C.
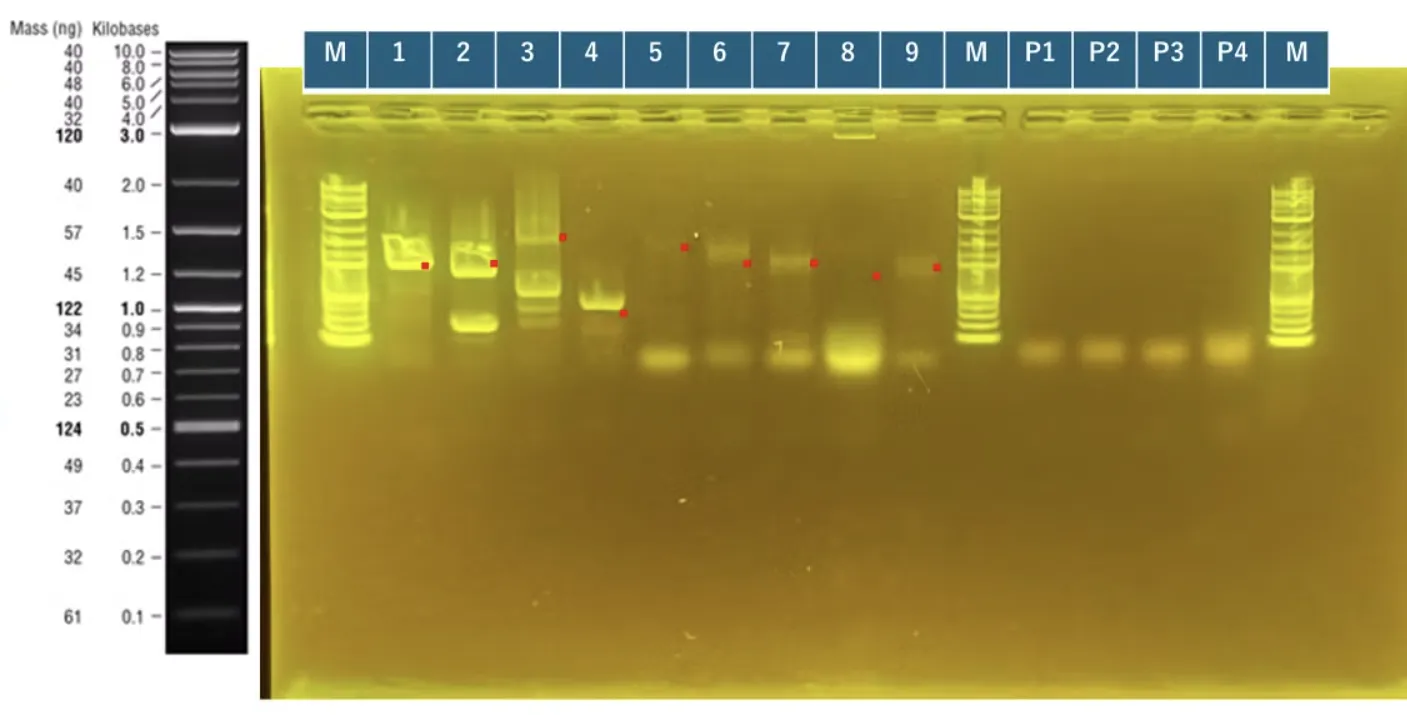
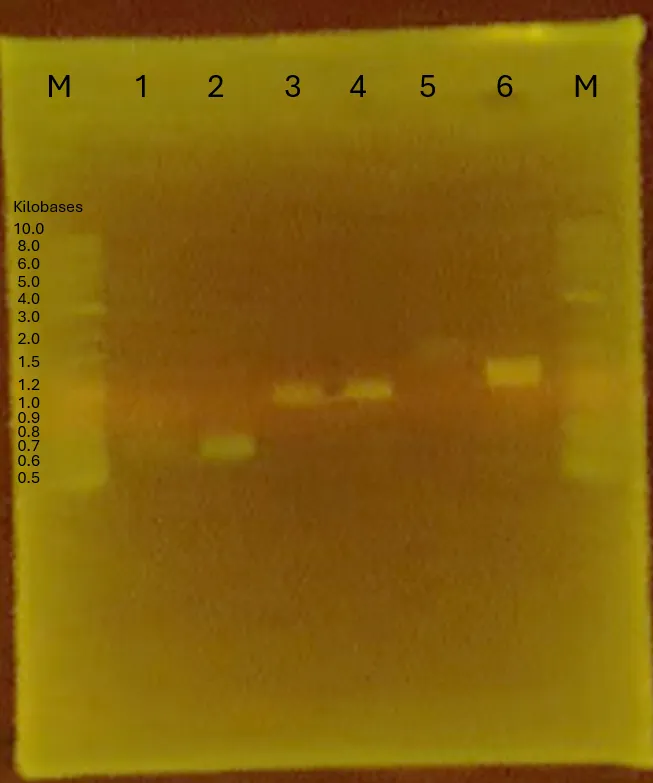
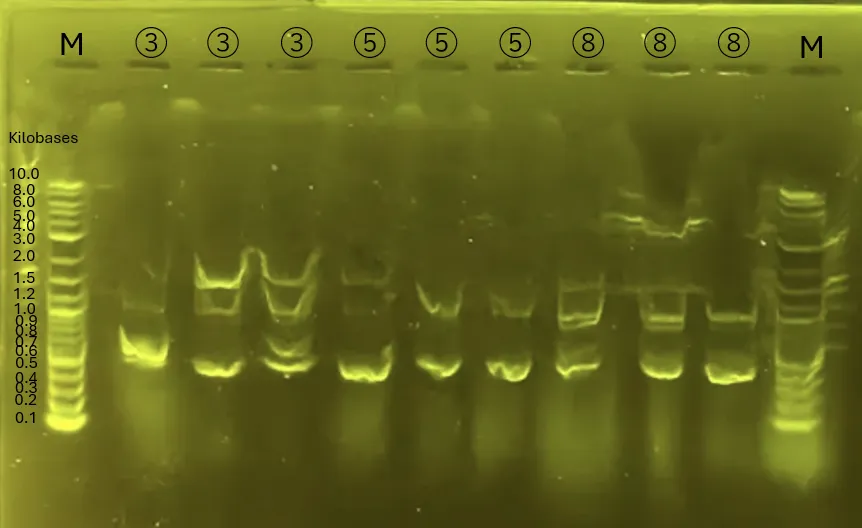
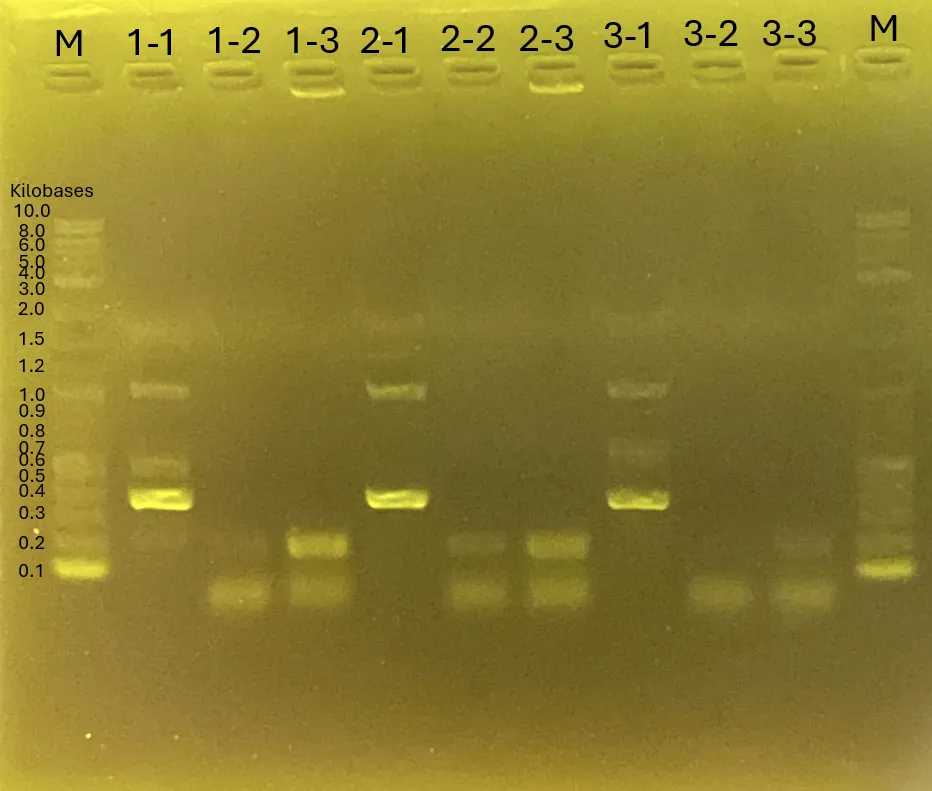
Results
The plasmid(pGEM-phaCReAB) received from Dr. Taguchi has been successfully transformed (conducted on 240708) into competent cells (will be used later on).
Figure 4.
Fragment adjustments were completed up to the confirmation gel post-PCR (failed).
Figure 5.
Discussion
Bands for samples 3, 7, and 9 showed poor resolution. All other sample sizes appear accurate but fragment adjustment will be conducted again for credibility
pBluescrippt
-
GGA plasmid has been successfully transformed by the second attempts of In-Fusion Assembly & Transformation on 240709 → Large-scale Culture.
Tuesday, 240711
Objectives
Plasmid extraction from pBl-GGA after large-scale culture (A)
Retry of PCR to add GGA sites to each DNA fragment of the surface display proteins (due to poor band quality on 240710) (A)
Methods
1. Plasmid Extraction (A)
1.1 Culture Preparation
Procedure
Collect 1 mL of culture (from samples [3] and [4]) into an Eppendorf tube, centrifuge at 12,000 g for 30 sec, and discard the supernatant.
Repeat step 1 using the same Eppendorf tube.
Add 150 μL of Buffer A1 (+ RNase A) and vortex.
Add 250 μL of Buffer A2, invert the tube 5 times to mix.
Let it stand for 2 min.
Add 350 μL of Buffer A3, invert to mix, and centrifuge at 12,000 g for 3 min at 25°C.
Transfer the supernatant to a spin column assembled with a collection tube.
Centrifuge at 2,000 g for 30 sec at 25°C, discard the flow-through.
Add 450 μL of Buffer AQ to the column.
Centrifuge at 12,000 g for 3 min at 25°C, discard the flow-through.
Repeat centrifugation, then add 50 μL of Buffer AE to the column.
Centrifuge at 12,000 g for 1 minute at 25°C to elute the plasmid.
Store at -20°C.
2. DNA Fragment Preparation (A)
2.1 Primer Dilution Preparation
Procedure
In an Eppendorf tube, add the following amounts of Milli-Q, forward primer, and reverse primer based on the table:
Primer 1
Fwd 1
Fwd 2
Fwd 1
Primer 2
Rev 4
Rev 4
Rev 2
Required
×4
×3
×2
Milli-Q
72 μL
54 μL
36 μL
Fwd
4 μL
3 μL
2 μL
Rev
4 μL
3 μL
2 μL
2.2 Master Mix Preparation
Procedure
Add 10 μL of Milli-Q water and 12.5 μL of High Fidelity 2× Master Mix to each Eppendorf tube.
2.3 PCR
Procedure
Add 22.5 μL of Master mix, 1.5 μL of Primer Dilution, and 1 μL of DNA solution to each of the 9 PCR tubes.
Perform PCR under the following conditions:
98°C for 30 sec
98°C for 10 sec, 60°C for 10 sec, 72°C for 30 sec (30 cycles)
72°C for 2 min
Hold at 4°C
Perform gel electrophoresis to confirm the bands (samples [1] to [9]).
Store the samples at -20°C.
3. Large-Scale Culture (A)
Procedure
Inoculate 2 pGEM-phaCReAB colonies into 2 flasks containing liquid LB medium with Ampicillin (100 mg/mL).
Incubate at 37°C overnight with shaking.
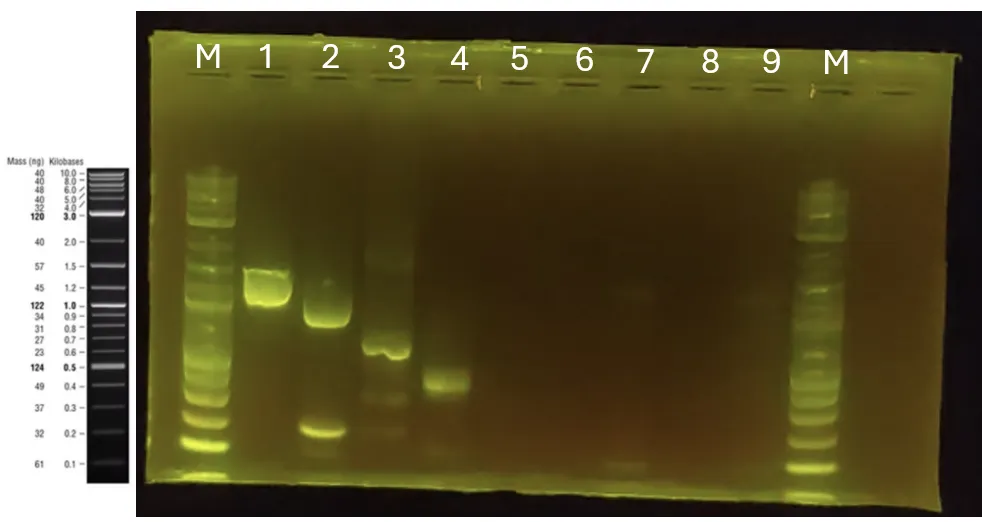
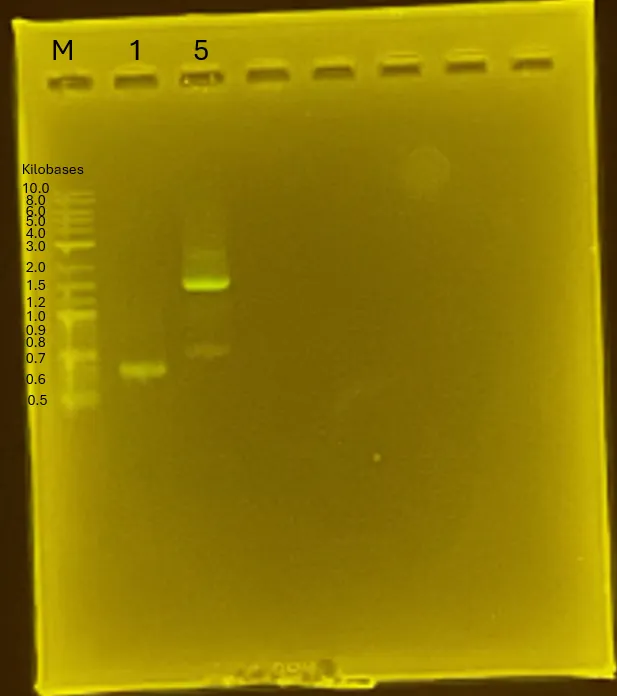
Results
Gel electrophoresis result. Only 1 and 4 have the correct band size. Fragment adjustment will be conducted again.
Figure 6.
Tuesday, 240716
Objectives
Plasmid extraction from the surface displayed protein DNA samples (A)
Large-scale culture of surface displayed protein DNA samples from 240711 (A)
Methods
1. Plasmid Extraction (A)
Procedure
Collect 1 mL of culture (samples 3-1, 3-2, 5-1, 5-2, 9-2) into an Eppendorf tube, centrifuge at 12,000 g for 30 sec, and discard the supernatant.
Repeat the step above using the same Eppendorf tube.
Add 150 μL of Buffer A1 (+ RNase A) and vortex briefly.
Add 250 μL of Buffer A2, mix by inverting the tube 5 times, and incubate for 2 min at room temperature.
Add 350 μL of Buffer A3, invert to mix, and centrifuge at 12,000 g for 3 min at 25°C.
Transfer the supernatant to a spin column assembled with a collection tube.
Centrifuge at 2,000 g for 30 sec at 25°C and discard the flow-through.
Wash the column by adding 450 μL of Buffer AQ.
Centrifuge at 12,000 g for 3 min at 25°C and discard the flow-through.
Add 50 μL of Buffer AE to the column and centrifuge at 12,000 g for 1 minute at 25°C to elute the plasmid.
Store the eluted plasmid at -20°C.
2. Large-Scale Culture (A)
Procedure
Inoculate 2 colonies from each of samples [1]~[9] into liquid LB medium with Ampicillin (100 mg/mL).
Incubate overnight at 37°C with shaking.
Wednesday, 240724
Objectives
Assembly of three surface display proteins (with two types of Chitinase: Chitinase C and GH19 Chitinase) into pBl and transformation into competent cells (A)
Methods
1. GGA (Golden Gate Assembly) (A)
Procedure
Add samples [1] and [2] to two separate PCR tubes.
Perform PCR under the following conditions and confirm results via gel electrophoresis:
42°C for 1 min, 16°C for 1 min (30 cycles)
60°C for 5 min
Hold on ice
2. Transformation (A)
Procedure
Add 50 μL of competent cells to each sample tube ([1] and [2]).
Incubate on ice for 30 min.
Transfer to an Eppendorf tube and add 400 μL of SOC medium.
Incubate at 37°C for 60 min.
Centrifuge at 5,000 g for 1 minute.
Remove 320 μL of the supernatant.
Plate the remaining solution onto LB Amp (50 μg/mL) plates and incubate overnight at 37°C.
Thursday, 240725
Objectives
Colony PCR of transformed three surface display proteins (A)
Methods
1. Colony PCR (A)
1.1 Colony Pick-up
Procedure
Add 20 μL of LB medium to each of the 2 PCR tubes.
Pick the 2 colonies from the specified plates and transfer each colony to a separate PCR tube.
1.2 Master Mix Preparation
Procedure
Combine the Primer, Mix, and Milli-Q to prepare 12 μL of Master Mix.
1.3 PCR
Procedure
Add 12 μL of Master mix and 0.5 μL of DNA solution to each PCR tube.
Spin down the contents and perform PCR under the following conditions:
98°C for 2 min
98°C for 10 sec, 60°C for 30 sec, 72°C for 3 min (30 cycles)
Hold at 4°C
Proceed to gel electrophoresis for band verification.
1.4 Gel Electrophoresis
Procedure
Prepare the agarose gel.
Load 3 μL of each PCR product and 2 μL of molecular weight marker into the wells of the gel.
Run the gel and confirm the presence of bands.
Results
No band was observed on Electrophoresis Gel thus GGA and Transformation of three surface display proteins failed.
Monday, 240729
Objectives
In-Fusion of scaffold proteins into pTf16 and transformation (A)[0]
Add 5.125 μL Milli-Q, 6.25 μL Mix, 0.625 μL diluted primer, and 0.5 μL pTf16 to a PCR tube.
Centrifuge the PCR tube and perform PCR.
Proceed to gel electrophoresis.
1.2 Gel Electrophoresis
Procedure
Prepare the agarose gel.
Load 3.0 μL of sample solution and 2.5 μL of molecular weight marker into the wells of the gel.
Run the gel and confirm the bands.
1.3 PCR Product Purification
Procedure
Add 25 μL Binding Buffer and 10 μL PCR product to an Eppendorf tube.
Transfer to a column and centrifuge at 3,000 rpm for 1 minute at 4°C, discard the flow-through.
Add 200 μL DNA Wash Buffer and centrifuge at 3,000 rpm for 1 minute at 4°C, discard the flow-through.
Repeat centrifugation, discard flow-through.
Set the column in a clean 1.5 mL tube.
Add 10 μL DNA Elution Buffer and centrifuge at 3,000 rpm for 1 minute at 4°C.
2. In-Fusion Assembly (A)[0]
Procedure
Add 1 μL Backbone (pTf16), 2 μL Milli-Q, and 1 μL 5× In-Fusion premix to each of the two Eppendorf tubes.
Add 1 μL ompA to the first tube.
Add 1 μL INP to the second tube.
Incubate at 50°C for 50 min.
The first tube should contain pTf16_ompA (5 μL), and the second tube should contain pTf16_INP (5 μL).
3. Transformation (A)[0]
3.1 Media Preparation
Procedure
Add 200 mL Milli-Q water to an Erlenmeyer flask.
Add 5 g LB powder.
Add 2 g agar.
Autoclave at 121°C for 15 min.
3.2 Transformation
Procedure
Add 5 μL pTf16_ompA to one tube and 5 μL pTf16_INP to another tube.
Add 50 μL competent cells (DH5α) to each tube.
Incubate on ice for 20 min.
Add 400 μL SOC to each tube.
Incubate at 37°C for 1 hour.
Plate on LB agar plates and incubate overnight at 37°C.
Results
In-Fusion Preparation Electrophoresis Gel is not shown.
In-Fusion Assembly and Transformation failed (no colonies observed on 240731)
Wednesday, 240731
Objectives
Preparation of competent cells
Methods
1. Competent Cell Preparation
Procedure
Using a 50 mL tube, pick DH5α colonies and culture in 10 mL × 2 tubes until the previous day.
Proceed with all operations on ice.
Centrifuge at 2,500 rpm for 15 min and discard the supernatant.
Add 25 mL of ice-cold 0.1 M MgCl₂ and resuspend the pellet.
Centrifuge at 2,500 rpm for 15 min.
Centrifuge again at 2,500 g for 5 min and discard the supernatant.
Add 30 mL of ice-cold 0.1 M CaCl₂ and resuspend the pellet.
Incubate on ice for 20 min.
Centrifuge at 2,500 rpm for 15 min.
Centrifuge at 2,500 g for 5 min and discard the supernatant.
In another 50 mL flask, add 17.8 mL of 0.1 M CaCl₂ and 3.14 mL of glycerol.
Add the solution from the flask to the 50 mL tube and resuspend the pellet.
Aliquot 100 μL per tube.
Store at -80°C.
Thursday, 240801
Objectives
Assembly of three surface display proteins (with two types of Chitinase: Chitinase C and GH19 Chitinase) into pBl and transformation into competent cells (A)
In-Fusion of scaffold proteins and transformation (A)[0] (retry due to In-Fusion of scaffold proteins conducted on 240729 failed)
Confirmation of competent cells
Methods
1. GGA (A)
Procedure
Add samples [1] and [2] to two PCR tubes.
Perform PCR and confirm using gel electrophoresis.
2. In-Fusion Assembly (A)[0]
Procedure
Prepare the solutions in three Eppendorf tubes ([1], [2], [3]) as shown in the table.
Incubate at 50°C for 50 min.
After incubation, you will have pTf16_ompA (5 μL), pTf16_INP (5 μL), and positive control (5 μL).
3. Transformation (A)[0]+GGA samples
Procedure
Transfer the 5 samples (2 GGA and 3 In-Fusion) to Eppendorf tubes, and add 50 μL of competent cells to each.
Incubate the GGA samples on ice for 30 min and the In-Fusion samples on ice for 20 min.
Add 400 μL of SOC to each sample.
Incubate at 37°C for 1 hour.
Centrifuge at 5,000 g for 1 minute.
Remove 350 μL of supernatant.
Plate pTf16_ompA and pTf16_INP on LB chloramphenicol 20 μg/mL plates and incubate overnight at 37°C.
Plate positive control, GGA samples [1] and [2] on LB Amp 50 μg/mL plates and incubate overnight at 37°C.
4. Competent Cell Confirmation
LB Plate (Competent Cells 20 μL)
Procedure
Add 20 μL of competent cells to an Eppendorf tube.
Add 150 μL of LB liquid medium.
Plate 70 μL onto an LB plate and incubate overnight at 37°C.
LB Liquid Medium (Competent Cells 10 μL)
Procedure
Add 3 mL of LB liquid medium to a 15 mL tube.
Add 10 μL of competent cells.
Incubate overnight at 37°C.
Results
Transformation of GGA failed due to no colonies were observed → GGA will be conducted per DNA fragment in future experiments.
Tuesday, 240806
Objectives
Preparation of scaffold proteins (ompA and INP) for In-Fusion (A)[0]
Methods
1. Fragment Preparation (A)[0]
1.1 PCR
Procedure
In two PCR tubes, add 12.5 μL of 2× KOD1, 10 μL of DEPC, 1.5 μL of primer mix, and 1 μL of each DNA.
Run PCR according to the following conditions:
98°C for 2 min
98°C for 10 sec, 60°C for 5 sec, 68°C for 15 sec (30 cycles)
68°C for 5 min
Hold at 4°C
Proceed to gel electrophoresis.
1.2 Gel Electrophoresis
Procedure
Prepare the agarose gel.
Load 3 μL of sample solution [1] and 3 μL of molecular weight marker into the wells.
Perform electrophoresis for about 20 min and check the bands (multiple bands appeared, so electrophoresis was repeated).
Load 24 μL of sample solution [2] and 3 μL of molecular weight marker into the wells.
Run electrophoresis and verify the bands.
Excise the desired gel sections and proceed to gel purification.
1.3 Gel Purification of PCR Products
Procedure
Place the excised gel into an Eppendorf tube.
Add 400 μL of Dissolve Buffer to dissolve the gel.
Heat the solution at 37°C.
Transfer to a column and centrifuge at 13,000 rpm for 1 minute at 4°C. Discard the flow-through.
Add 200 μL of DNA Wash Buffer, centrifuge at 13,000 rpm for 1 minute at 4°C. Discard the flow-through.
Centrifuge again at 13,000 rpm for 1 minute at 4°C.
Place the column into a clean 1.5 mL tube.
Add 20 μL of DNA Elution Buffer and centrifuge at 13,000 rpm for 1 minute at 4°C.
Wednesday, 240807
Objectives
Preparation of pTf16 for In-Fusion (A)[0]
In-Fusion of pTf16 with scaffold proteins (A)[0]
Preparation of DH5α competent cells
Methods
1. Gel Electrophoresis (A)[0]
Procedure
Prepare the agarose gel.
Load 3 μL of sample solution [1] and 3 μL of the molecular weight marker into the wells.
Run electrophoresis for about 20 min to confirm the bands.
Load 24 μL of sample solution [2] and 3 μL of the molecular weight marker into the wells.
Run electrophoresis and verify the bands.
Excise the desired gel sections and proceed to the gel purification of PCR products.
2. Gel Purification (A)[0]
Procedure
Place the excised gel in an Eppendorf tube.
Add 400 μL of Dissolve Buffer to dissolve the gel.
Heat at 37°C.
Transfer the solution to a column and centrifuge at 13,000 rpm for 1 minute at 4°C. Discard the flow-through.
Add 200 μL of DNA Wash Buffer and centrifuge again at 13,000 rpm for 1 minute at 4°C. Discard the flow-through.
Repeat the centrifugation at 13,000 rpm for 1 minute at 4°C.
Place the column in a clean 1.5 mL tube.
Add 20 μL of DNA Elution Buffer and centrifuge at 13,000 rpm for 1 minute at 4°C.
3. In-Fusion Assembly (A)[0]
Procedure
Prepare three Eppendorf tubes with the following compositions:
Tube
Mili-Q
5× In-Fusion premix
Backbone (pTf16)
Insert
[1]
2 μL
1 μL
1 μL
ompA 1 μL
[2]
2 μL
1 μL
1 μL
INP 1 μL
[3]
2 μL
1 μL
1 μL
pUC19 Control Vector 1 μL + 2.0 kb Control Insert 1 μL
Incubate at 50°C for 50 min.
After incubation, pTf16_ompA (5 μL), pTf16_INP (5 μL), and the positive control (5 μL) are obtained.
4. Preparation of Competent Cells (A)
Procedure
Add 300 μL of DH5α culture to a 15 mL tube.
Add 10 mL of LB medium.
Shake and incubate at 37°C for 4 hours.
Centrifuge at 10,000 rpm for 1 minute at 4°C and discard the supernatant.
Resuspend the pellet in 1 mL of 0.1 M CaCl2.
Centrifuge at 10,000 rpm for 1 minute at 4°C and discard the supernatant.
Resuspend the pellet in 0.3 mL of 0.1 M CaCl2 with 10% glycerol.
Store at -80°C.
Monday, 240819
Objectives
Transformation of pTf16_ompA and pTf16_INP (A)[0]
Methods
1. Transformation (A)[0]
1.1 Media Preparation
Procedure
Add 300 mL of mili-Q water to a 500 mL Erlenmeyer flask.
Add 7.5 g of LB powder.
Add 3 g of agar.
Autoclave at 121°C for 15 min.
1.2 Transformation
Procedure
Add 5 μL of pTf16_ompA, pTf16_INP, and positive control into three separate Eppendorf tubes.
Add 50 μL of competent cells (DH5α) to each of the 4 Eppendorf tubes.
Incubate on ice for 20 min.
Add 400 μL of SOC medium to each tube.
Incubate at 37°C for 1 hour.
Centrifuge at 5,000g for 1 minute.
Remove 350 μL of the supernatant.
Plate pTf16_ompA and pTf16_INP on LB plates containing chloramphenicol and incubate at 37°C overnight.
Plate the positive control on LB plates containing ampicillin and incubate at 37°C overnight.
Plate the competent cells only on LB medium and incubate at 37°C overnight.
Tuesday, 240820
Objectives
Colony PCR and large-scale culture of pTf16_ompA and pTf16_INP (A)[0]
Methods
1. Colony PCR (A)[0]
1.1 Colony Pick-up
Procedure
Add 20 μL of LB to 6 PCR tubes.
Pick 3 colonies each from the plates and transfer them to the respective PCR tubes.
Use the colony solution for the following steps.
1.2 Master Mix Preparation (3 + 1 samples)
Procedure
Add 20.5 μL of mili-Q, 25 μL KOD1, and 2.5 μL of each diluted primer to two Eppendorf tubes (final volume: 48 μL).
1.3 PCR
Procedure
Add 12 μL of the master mix and 5 μL of DNA solution to 6 PCR tubes.
Perform PCR with the following conditions:
98℃ for 2 min
98℃ for 10 sec, 60℃ for 5 sec, 68℃ for 15 sec (40 cycles)
68℃ for 5 min
Hold at 4℃
Proceed to electrophoresis.
1.4 Gel Electrophoresis
Procedure
Prepare the electrophoresis gel.
Add 3 μL of each sample to the wells along with 2 μL of the molecular weight marker.
Run the gel for ~30 min and check the bands.
2. Large-scale Culture (A)[0]
Procedure
Add 2 mL LB to two 15 mL tubes.
Add 2 μL each of pTf16_INP (samples [2] and [3]) to the tubes.
Incubate overnight at 37°C.
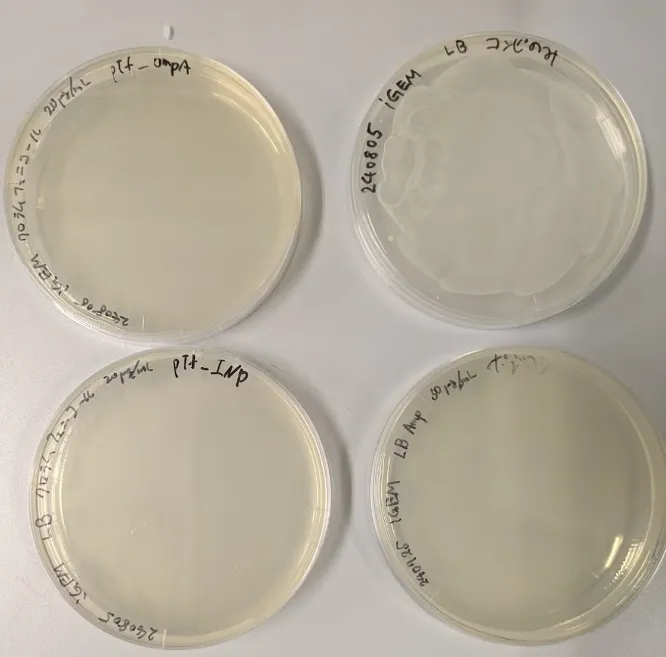
Results
Colony observed only on pTf16_INP plate.
Figure 7.
Gel Electrophoresis
Figure 8.
Since ompA band was not observed in the gel, only pTf16_INP samples were cultured overnight. Colony PCR of ompA will be reattempted the next day. Sample [2] of pTf16_INP is likely fine, while sample [3] showed some other band sizes.
Wednesday, 240821
Objectives
Reattempting colony PCR of pTf16_OmpA as the bands were not observed in the gel electrophoresis on 240820 and conducting transformation again if colony pcr result shows negative (A)[0]
Methods
1. Colony PCR (A)[0]
1.1. Colony Pick-up
Procedure
Add 20 μL of LB medium to 3 PCR tubes.
Pick 3 colonies from the plates and transfer them to the respective PCR tubes.
Add 12 μL of the master mix and 5 μL of DNA solution to 3 PCR tubes.
Perform PCR with the following conditions:
98℃ for 2 min
98℃ for 10 sec, 60℃ for 5 sec, 68℃ for 15 sec (40 cycles)
68℃ for 5 min
Hold at 4℃
Proceed to gel electrophoresis.
1.4. Gel Electrophoresis
Procedure
Prepare the electrophoresis gel.
Add 3 μL of each sample to the wells along with 2 μL of the molecular weight marker.
Run the gel for ~30 min and check the bands.
2. Plasmid Extraction (A)[0]
Procedure
Transfer 1 mL of culture media into 2 Eppendorf tubes and centrifuge at 12,000g for 30 sec to remove the supernatant.
Repeat the same process using the same Eppendorf tube.
Add 150 μL of Buffer A1 (+RNase A) to each tube.
Vortex until fully dissolved.
Add 250 μL of Buffer A2 and invert the tubes 5 times.
Let it stand for 2 min.
Add 350 μL of Buffer A3 and invert the tubes.
Centrifuge at 12,000g for 3 min.
Transfer the supernatant into the collection columns in the collection tubes.
Centrifuge at 2,000g for 30 sec.
Discard the flow-through and wash the columns with 450 μL of Buffer AQ.
Transfer the solution to a fresh Eppendorf tube and add 50 μL of Buffer AE.
Centrifuge at 12,000g for 1 minute.
Store the samples at -20°C.
3. Transformation (A)[0]
Procedure
Add 5 μL each of pTf16_ompA and the positive control into 2 Eppendorf tubes.
Add 50 μL of competent cells to each tube.
Incubate on ice for 20 min.
Add 400 μL of SOC medium to each tube.
Incubate at 37°C for 1 hour.
Plate the pTf16_OmpA mixture onto the LB Chloramphenicol plate and the positive control onto the LB Ampicillin plate for overnight incubation at 37°C.
Results
The pTf16_OmpA colony PCR gel electrophoresis showed no observable bands again, thus we performed the transformation once again.
Thursday, 240822
Objectives
Colony PCR and large-scale culture of re-transformed pTf16_ompA (A)[0]
Methods
1. Colony PCR (A)[0]
1.1 Colony Pick-up
Procedure
Add 20 μL of LB medium to 6 PCR tubes.
Pick 3 colonies from the plate and transfer them to the PCR tubes.
Prepare the colony solutions for PCR.
1.2 Diluted Primer Preparation
Procedure
Add 18 μL of mili-Q, 1 μL LLP-ompA_1, and 1 μL LLP-ompA_2 to an Eppendorf tube.
1.3 Master Mix Preparation (for 3 + 1 tubes)
Procedure
Add 20.5 μL mili-Q, 25 μL KOD1, and 2.5 μL of each diluted primer to two Eppendorf tubes (total: 48 μL).
1.4 PCR
Procedure
Add 12 μL of the master mix and 5 μL of the DNA solution to 6 PCR tubes.
Perform PCR with the following conditions:
98℃ for 2 min
98℃ for 10 sec, 60℃ for 5 sec, 68℃ for 15 sec (40 cycles)
68℃ for 5 min
Hold at 4℃
Proceed to gel electrophoresis.
1.5 Gel Electrophoresis
Procedure
Prepare the electrophoresis gel.
Add 3 μL of each sample to the wells along with 2 μL of the molecular weight marker.
Run the gel for ~30 min and check the bands.
2. Large-Scale Culture (A)[0]
Procedure
Prepare LB medium by mixing 500 mL of mili-Q and 12.5 g of LB powder in a conical flask. Sterilize by autoclaving at 121°C for 15 min.
Add 2 mL of LB medium to two 15 mL tubes.
Add 2 μL each of pTf16_ompA colonies 2a and 3a to the tubes.
Incubate at 37°C overnight.
Results
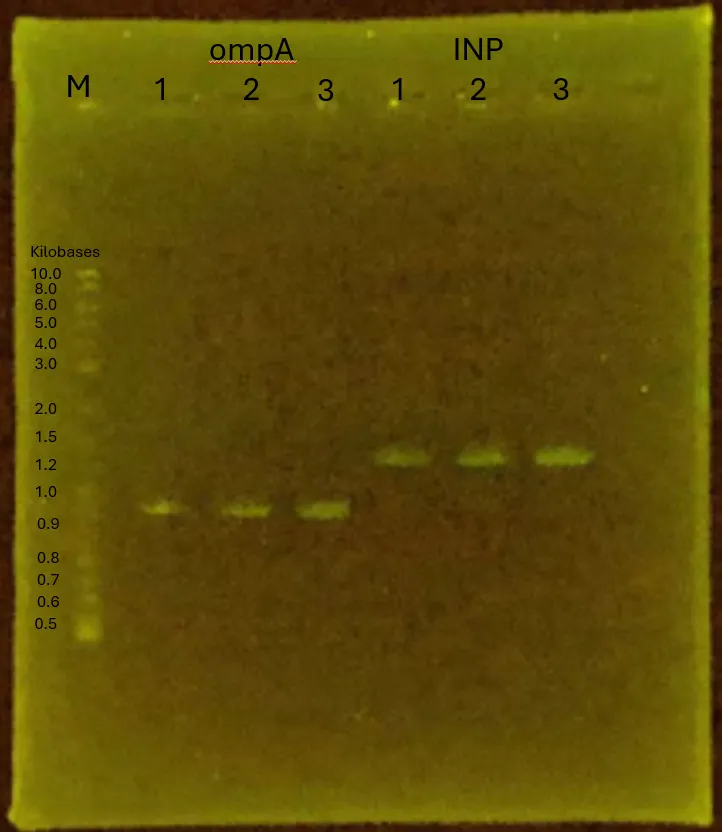
Gel electrophoresis results:
Figure 9.
All lanes show a single band, indicating that the colonies contain the ompA sequence.
Friday, 240823
Objectives
Plasmid extraction of pTf16_ompA from the large-scale culture performed on 240822. (A)[0]
Co-transformation of pBl plasmids containing surface display proteins and pTf16_ompA into the same competent cells. (A)[0][2][3][5][9]
Methods
1. Plasmid Extraction (A)[0]
Procedure
In two Eppendorf tubes, collect 1 mL of culture medium and centrifuge at 12,000g for 30 sec. Remove the supernatant.
Repeat the above step using the same Eppendorf tubes.
Add 150 μL of Buffer A1 (+ RNase A) to each tube.
Vortex until fully dissolved.
Add 250 μL of Buffer A2.
Invert mix five times.
Let it sit for 2 min.
Add 350 μL of Buffer A3.
Invert mix, then centrifuge at 12,000g for 3 min.
Transfer only the supernatant to the column and assemble the column in the collection tube.
Centrifuge at 2,000g for 30 sec.
Discard the flow-through.
Add 450 μL of Buffer AQ.
Centrifuge at 12,000g for 3 min at 25°C.
Discard the flow-through.
Elute the plasmid by adding 50 μL of Buffer AE to the column and centrifuging at 12,000g for 1 minute.
Store the plasmid at -20°C.
2. Co-transformation (A)[0][2][3][5][9]
Procedure
Add 1 μL of the culture medium (
pTf16_ompA
2a) to six Eppendorf tubes.
Add 1 μL of each of the 6 DNA samples to the respective tubes.
Incubate on ice for 20 min.
Add 400 μL of SOC medium to each tube.
Incubate at 37°C for 1 hour.
Centrifuge at 5,000g for 1 minute.
Remove 550 μL of the supernatant.
Plate the cells onto agar plates.
Incubate overnight at 37°C.
Results
No colonies observed on co-transformation plate the next day → Co-transformation failed possibly due to introduction of two plasmids simultaneously → Reattempt co-transformation using another scaffold protein (pTf16_INP)
Monday, 240826
Objectives
Amplification and gel purification of surface display proteins’ DNA fragments (A)
Co-transformation of scaffold protein (pTf16_INP) and surface display proteins (A)[0][2][3][5][8]
Methods
1. Fragment Preparation (A)
1.1 PCR
Procedure
Add 22.5 μL of Master Mix, 1 μL of DNA, and 1.5 μL of Primer to each of the 6 PCR tubes.
Perform PCR under the following conditions.
Proceed to the gel electrophoresis step.
1.2 Gel Electrophoresis
Procedure
Prepare the agarose gel.
Load 20 μL of each DNA sample and 10 μL of the molecular marker into the wells.
Run the gel, and check the bands.
Extract the desired gel fragments (bands were observed for fragments 2,3,4,6) and proceed to the gel purification step.
1.3 Gel Purification of PCR Products
Procedure
Place the gel fragments into Eppendorf tubes.
Add 400 μL of Dissolve Buffer to dissolve the gel.
Proceed with further steps the following day (240827).
2. Co-transformation (A)[0][2][3][5][8]
Procedure
Add 50 μL of competent cells to 4 Eppendorf tubes.
Add 1 μL of pTf16_INP to each tube.
Add 1 μL of each DNA to the respective tubes.
Incubate on ice for 30 min.
Add 400 μL of LB to each tube.
Incubate at 37°C for 1 hour.
Centrifuge at 5,000g for 1 minute.
Discard 350 μL of supernatant.
Plate the cells on LB plates.
Incubate overnight at 37°C.
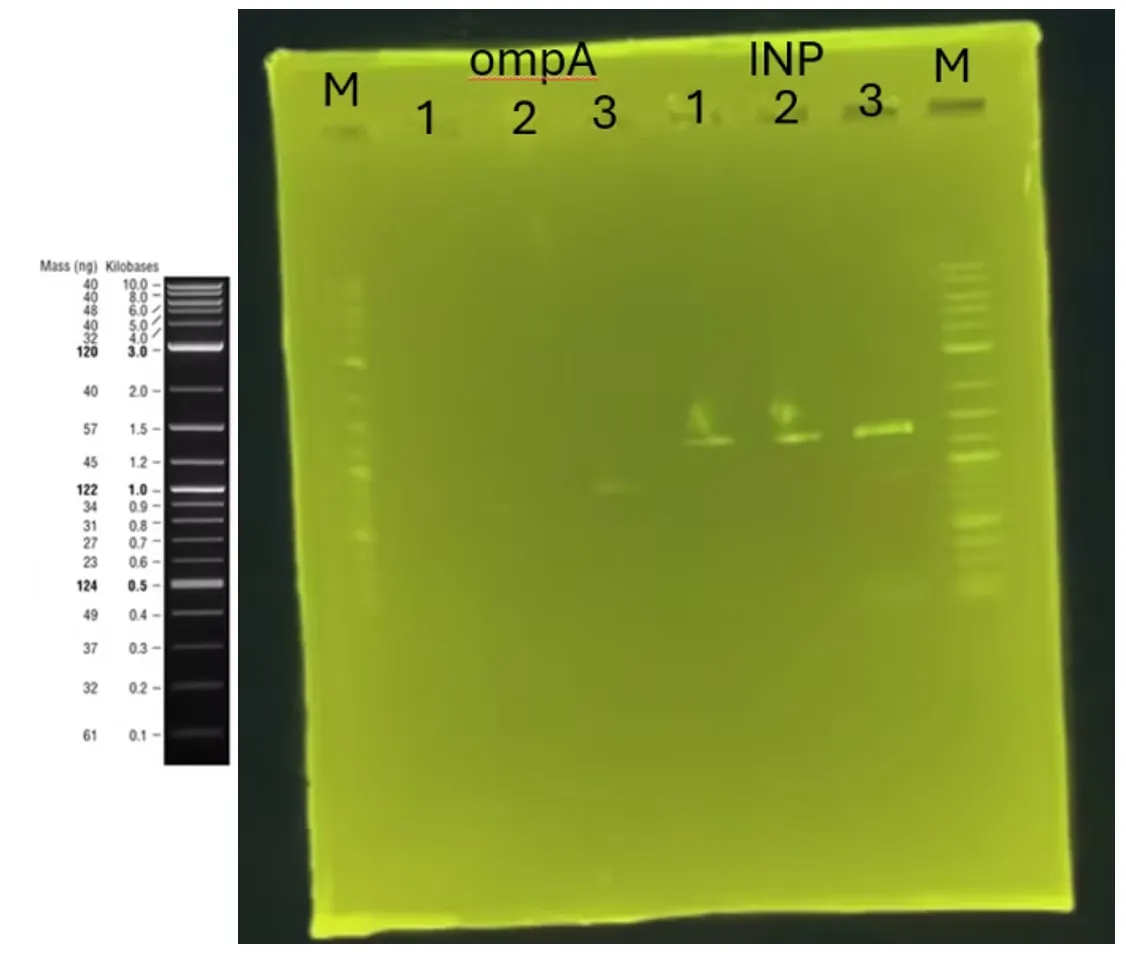
Results
Confirmation of gel electrophoresis.
Figure 10.
Once again, no colonies observed on co-transformation plate the next day.
Discussion
It was found that co-transformation of two plasmids is challenging. Therefore, plasmids will be introduced one at a time in future experiments.
Tuesday, 240827
Objectives
Continuing the amplification of fragments from 240826 and reamplifying the fragments that were not successfully confirmed (1-Mgfp5-2, 1-Glucanase-2) (A)
Methods
1. Gel Purification (continued from 240826) (A)
1.1 Purification Procedure
Procedure
Heat to 37°C.
Transfer to a column and centrifuge at 13,000 rpm for 1 minute at 4°C, discard flow-through.
Add 200 μL of DNA Wash Buffer and centrifuge at 13,000 rpm for 1 minute at 4°C, discard flow-through.
Repeat the centrifugation step.
Set the column into a 1.5 mL tube.
Add 20 μL of DNA Elution Buffer and centrifuge at 13,000 rpm for 1 minute at 4°C.
2. Fragment Preparation (Re-amplification of fragments 1 and 5 from 240826) (A)
2.1 PCR
Procedure
Add 22.5 μL of Master Mix, 1 μL of DNA, and 1.5 μL of Primer to 2 PCR tubes.
Perform PCR.
Proceed to gel electrophoresis.
2.2 Gel Electrophoresis
Procedure
Prepare the agarose gel.
Load 20 μL of each DNA sample and 10 μL of the molecular marker into the wells.
Run the gel and check the bands.
Extract the desired gel fragments and proceed to PCR product purification.
2.3 Gel Purification of PCR Products
Procedure
Place the gel fragments into Eppendorf tubes.
Add 400 μL of Dissolve Buffer to dissolve the gel.
Heat to 37°C.
Transfer to a column and centrifuge at 13,000 rpm for 1 minute at 4°C, discard flow-through.
Add 200 μL of DNA Wash Buffer and centrifuge at 13,000 rpm for 1 minute at 4°C, discard flow-through.
Repeat the centrifugation step.
Set the column into a 1.5 mL tube.
Add 20 μL of DNA Elution Buffer and centrifuge at 13,000 rpm for 1 minute at 4°C.
Results
Gel Electrophoresis result:
Figure 11.
DNA fragments 1 and 5 bands were observed.
Discussion
The re-amplification of fragments 1-Mgfp5-2 and 1-Glucanase-2 was successful. The gel purification process has been completed for all targeted fragments (1 to 6).
Wednesday, 240828
Objectives
Assembly of surface display proteins into the pBl vector (A)[1][4][6][8].
Preparation of
pTf16
,
INP
, and
ompA
for In-Fusion on 240829 (A)[0].
Performing large-scale culture from colonies of surface displayed protein DNA fragments (total 9 DNA fragments) (A).
Methods
1. GGA Assembly (A)[1][4][6][8]
1.1 Assembly Reaction
Procedure
Prepare reaction mixtures in 4 PCR tubes.
Add corresponding DNA fragments ([1]–[4]) to the PCR tubes.
Perform PCR using the following conditions:
42℃ for 1 min, 16℃ for 1 min (30 cycles)
60℃ for 5 min
Incubate on ice
2. In-Fusion Preparation (Fragment Preparation for 240829) (A)[0]
2.1 PCR
Procedure
In 3 PCR tubes, mix 22.5 μL Master Mix, 1 μL DNA, and 1.5 μL Primer.
Perform PCR under the following conditions:
98℃ for 2 min
98℃ for 10 sec, 60℃ for 5 sec, 68℃ for 15 sec (30 cycles)
68℃ for 5 min
4℃ hold
Proceed to gel electrophoresis.
2.2 Gel Electrophoresis
Procedure
Prepare the agarose gel.
Load 20 μL of each DNA sample and 10 μL molecular marker into wells.
Run the gel and observe the bands.
Excise the target bands and proceed to gel purification.
2.3 Gel Purification of PCR Products
Procedure
Place the gel slices in Eppendorf tubes.
Add 400 μL Dissolve Buffer to dissolve the gel.
Heat to 37℃.
Transfer to columns and centrifuge at 13,000 rpm for 1 min at 4℃, discard flow-through.
Add 200 μL DNA Wash Buffer and centrifuge at 13,000 rpm for 1 min at 4℃, discard flow-through.
Repeat centrifugation.
Set columns in 1.5 mL tubes and add 20 μL DNA Elution Buffer. Centrifuge at 13,000 rpm for 1 min at 4℃.
3. Large-Scale Culture (A)
Procedure
Add 3 mL of LB to each of the 18 tubes.
Pick colonies and incubate overnight at 37℃.
Thursday, 240829
Objectives
Construction of
pTf16-ompA
and
pTf16-INP
using the In-Fusion technique and transform them into competent cells (A)[0]
Plasmid Extraction from E. coli containing surface display proteins cultured on 240828 (A)
Methods
1. In-Fusion (A)[0]
Procedure
Add 3 μL of each purified PCR fragment (ompA, INP, positive control) into separate Eppendorf tubes.
Add 2 μL of 5x In-Fusion HD Enzyme Premix and 5 μL of linearized pTf16 vector to each tube, making the final volume 10 μL.
Incubate all three tubes at 50°C for 15 min.
2. Transformation (A)[0]
Procedure
Use three Eppendorf tubes and add 10 μL of pTf16-ompA, pTf16-INP, and the positive control to 50 μL of competent cells in each tube.
Incubate on ice for 30 min.
Add 400 μL of SOC medium to each tube.
Incubate at 37°C for 1 hour.
Centrifuge at 5,000g for 1 minute and remove 350 μL of supernatant.
Spread 100 μL of the transformation mix onto LB plates (Amp 50 μg/mL, Chloramphenicol 20 μg/mL).
Incubate the plates at 37°C overnight.
3. Plasmid Extraction (A)
Procedure
Use 18 Eppendorf tubes and collect 1.5 mL of culture in each. Centrifuge at 12,000g for 30 sec and discard the supernatant.
Repeat step 1 for each tube using the same Eppendorf.
Add 150 μL of Buffer A1 (+ RNase A) to each tube and vortex until dissolved.
Add 250 μL of Buffer A2 and mix by inversion 5 times.
Let sit for 2 min.
Add 350 μL of Buffer A3, mix by inversion, and centrifuge at 12,000g for 3 min.
Transfer the supernatant to columns assembled with collection tubes.
Centrifuge at 2,000g for 30 sec and discard the flow-through.
Add 450 μL of Buffer AQ to the columns and repeat the centrifugation.
Add 50 μL of Buffer AE to elute the DNA and centrifuge at 12,000g for 1 minute.
Friday, 240830
Objectives
Colony PCR and gel electrophoresis to confirm
pTf16-ompA
and
pTf16-INP
from the cultures grown on 240829 (A)[0].
Small-scale culture of confirmed colonies (A)[0].
Methods
1. Colony PCR (A)[0]
1.1 PCR
Procedure
Add pTf16-ompA or pTf16-INP (3 tubes each) into the PCR tubes.
Add 22.5 μL of PCR Mix to each tube.
Add 1.5 μL of forward and reverse primers to each tube.
Run PCR under the following conditions:
98°C for 2 min
98°C for 10 sec, 60°C for 5 sec, 68°C for 15 sec (40 cycles)
68°C for 5 min
Hold at 4°C.
1.2 Gel Electrophoresis
Procedure
Load 5 μL of each PCR product into the wells of the agarose gel.
Add 4 μL of ladder to the leftmost well.
Run gel electrophoresis and observe the bands.
2. Small-Scale Culture (A)[0]
Procedure
Prepare the following cultures:
6 mL LB for tubes 3 and 6.
2 mL LB for tubes 1, 2, 4, and 5.
Tubes
Culture
1–3
pTf16-ompA
4–6
pTf16-INP
Add chloramphenicol to each tube:
For 2 mL LB, add 0.8 μL (tubes 1, 2, 4, 5).
For 6 mL LB, add 2.4 μL (tubes 3, 6).
Pick colonies and inoculate the corresponding LB medium.
Incubate with shaking for 4 hours.
Store at 4°C.
Results
Construction of pTf16_ompA and pTf16_INP are successfully done, confirmed by the result of Gel Electrophoresis below.
Figure 12.
Monday, 240902
Objectives
Colony PCR, gel electrophoresis, large-scale culture (A)[3][5][8], and preparation of competent cells for scaffold protein plasmid-bearing E. coli (A)[0].
Preparation of DNA fragments (PCR to gel purification) for shRNA plasmid construction (B).
Methods
1. Colony PCR (A)[3][5][8]
1.1 Colony Pick-up
Procedure
Dispense 20 μL LB medium into 9 PCR tubes.
Pick 3 colonies from each plate and add them to the respective PCR tubes.
Prepare the DNA solutions.
1.2 Primer Dilution
Procedure
In an Eppendorf tube, mix 9 μL Mili-Q water, 0.5 μL fwd_1, and 0.5 μL rev_4 primers.
Materials
1.3 Master Mix Preparation
Procedure
In an Eppendorf tube, mix 51.25 μL Mili-Q, 62.5 μL KOD1, and 6.25 μL of diluted primers (total volume = 120 μL).
1.4 PCR
Procedure
Add 12 μL of Master Mix and 5 μL of DNA solution to each of the 9 PCR tubes.
Run the PCR with the following conditions:
98°C for 2 min
98°C for 10 sec, 60°C for 5 sec, 68°C for 15 sec (40 cycles)
68°C for 5 min
Hold at 4°C.
Proceed to gel electrophoresis.
2. Gel Electrophoresis (A)[3][5][8]
Procedure
Load 5 μL of PCR products into the wells of the agarose gel.
Add 4 μL of the ladder to both ends of the gel.
Perform gel electrophoresis and observe the bands.
3. Large-Scale Culture (A)[3][5][8]
Procedure
Add 3 mL of LB medium to three 15 mL tubes.
Inoculate each tube with 2 μL of the respective samples ([3], [5], [8]).
Incubate at 37°C with shaking overnight.
4. DNA Fragment Preparation for shRNA Plasmid (B)
4.1 PCR
Procedure
Add 12.5 μL KOD1, 10 μL DEPC, 1.5 μL diluted primers, and 1 μL of the shRNA DNA fragment to the PCR tube.
Run the PCR with the following conditions:
98°C for 2 min
98°C for 10 sec, 60°C for 5 sec, 68°C for 15 sec (40 cycles)
68°C for 5 min
Hold at 4°C.
Proceed to gel electrophoresis.
4.2 Gel Electrophoresis
Procedure
Prepare the agarose gel.
Load 25 μL of PCR product and 3 μL of the ladder into the gel.
Run electrophoresis for ~20 min to check the bands.
Excise the target band and proceed to PCR product purification.
4.3 Gel Purification
Procedure
Place the excised gel piece in an Eppendorf tube.
Add 400 μL of Dissolve Buffer to dissolve the gel.
Heat to 37°C.
Transfer to a column and centrifuge at 13,000 rpm for 1 minute at 4°C, discard flow-through.
Add 200 μL DNA Wash Buffer and centrifuge again at 13,000 rpm for 1 minute.
Perform a second centrifugation and discard the flow-through.
Set the column in a clean 1.5 mL tube, add 20 μL DNA Elution Buffer, and centrifuge at 13,000 rpm for 1 minute.
Store the purified DNA at -20°C.
5. Competent Cell Preparation (A)
Procedure
Centrifuge 1.5 mL of the small-scale cultures at 10,000 rpm for 1 minute at 4°C, discard the supernatant.
Add 1 mL of 0.1 M CaCl2 to the pellet and centrifuge again.
Discard the supernatant, then add 0.3 mL of 0.1 M CaCl2 (with 10% glycerol).
Store at -80°C.
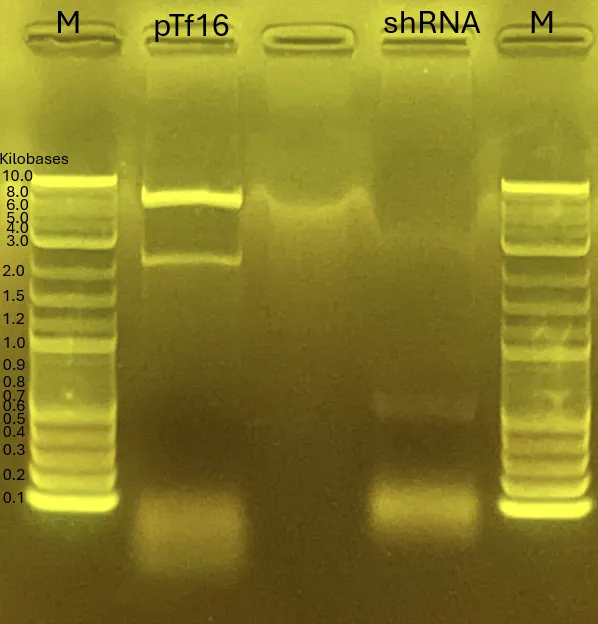
Results
Gel Electrophoresis for (A)[3][5][8]
The gel electrophoresis confirms the successful amplification of Chitinase C [3], Mgfp5-Glucanase [5], and Glucanase-Chitinase C [8].
The lanes (from left) contain:
Ladder, [3] Chitinase C, [5] Mgfp5-Glucanase, and [8] Glucanase-Chitinase C (3 lanes for each).
Figure 13.
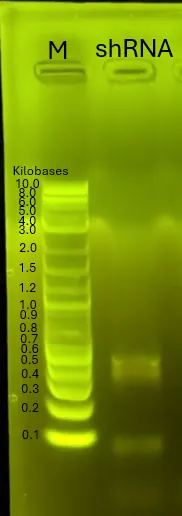
Gel Electrophoresis for 4.3
The shRNA fragment was successfully isolated for further applications.
The leftmost lane is the ladder, followed by the shRNA fragment.
Tuesday, 240903
Objectives
Plasmid extraction from strains for surface display construction (A)[3][5][8], and transformation (A) IO[1][2][3][5][6][7][8][9].
Fragment preparation (PCR to gel purification) for shRNA plasmid-producing strains (B).
Methods
1. Plasmid Extraction (A)[3][5][8]
Procedure
Harvest 1 mL of culture from each strain into 3 Eppendorf tubes. Centrifuge at 12,000g for 30 sec, discard the supernatant.
Repeat step 1 using the same Eppendorf tube.
Add 150 μL Buffer A1 (+ RNase A) to each pellet and vortex to resuspend.
Add 250 μL Buffer A2, mix by inversion 5 times, and centrifuge at 12,000g for 3 min.
Transfer the supernatant to a column placed in a collection tube.
Centrifuge at 2,000g for 30 sec.
Add 450 μL Buffer AQ, centrifuge at 12,000g for 1 minute at 25°C.
Transfer the flow-through to a clean Eppendorf tube and elute the DNA with 50 μL Buffer AE. Centrifuge at 12,000g for 1 minute.
Store the eluted DNA at -20°C.
2. DNA Fragment Preparation for shRNA Plasmid (B)
2.1 PCR
Procedure
In a PCR tube, add 12.5 μL KOD1, 10 μL Mili-Q, 1.5 μL diluted primers, and 1 μL pBluescript II SK (-) DNA fragment.
Run the PCR with the following conditions:
98°C for 2 min
98°C for 10 sec, 60°C for 5 sec, 68°C for 15 sec (30 cycles)
68°C for 5 min
Hold at 4°C.
Proceed to gel electrophoresis.
2.2 Gel Electrophoresis
Procedure
Prepare two agarose gels.
Load 5 μL of the PCR product into the wells of the first gel, adding 4 μL of the ladder to the left side.
Run electrophoresis and check the bands.
Load 20 μL of the PCR product into the second gel along with 4 μL of the ladder.
Run electrophoresis and excise the target bands for purification.
2.3 Gel Purification
Procedure
Place the excised gel pieces into Eppendorf tubes.
Add 400 μL Dissolve Buffer to dissolve the gel.
Heat at 37°C.
Transfer to a column and centrifuge at 13,000g for 1 minute at 4°C, discard the flow-through.
Add 200 μL DNA Wash Buffer, centrifuge again at 13,000rpm for 1 minute.
Perform a second centrifugation and discard the flow-through.
Place the column in a clean 1.5 mL tube, add 20 μL DNA Elution Buffer, and centrifuge at 13,000rpm for 1 minute.
Store the purified DNA at -20°C.
3. Transformation (A) IO[1][2][3][5][6][7][8][9]
Procedure
Prepare 16 Eppendorf tubes and add 100 μL of competent cells into each.
Add 5 μL of each DNA ([1]–[3], [5]–[9]) into 8 tubes containing pTf16_ompA and 8 tubes containing pTf16_INP.
Incubate on ice for 30 min.
Add 400 μL LB medium to each tube.
Incubate at 37°C for 1 hour.
Centrifuge at 5,000g for 1 minute and discard 400 μL of the supernatant.
Colony PCR, Gel Electrophoresis, Gel Purification, and preparation of competent cells containing scaffold protein plasmids for surface display strain construction (A) I[2][7] O[2][3].
In-Fusion assembly for the creation of shRNA plasmid-producing strains (B).
Methods
1. Colony PCR (A)[2][3][7]
1.1 PCR
Procedure
In each PCR tube, add 22.5 μL of PCR Mix, 1.5 μL of primer, and a colony.
Run the PCR with the following conditions:
98°C for 2 min
98°C for 10 sec, 60°C for 5 sec, 68°C for 15 sec (30 cycles)
68°C for 5 min
Hold at 4°C
Proceed to gel electrophoresis.
1.2 Gel Electrophoresis
Procedure
Prepare two agarose gels.
Load 5 μL of the PCR product into the wells of one gel and 4 μL of the ladder at both ends.
Run electrophoresis to visualize the bands.
Load 20 μL of the PCR product and 4 μL of the ladder onto the second gel.
Run electrophoresis, excise the target bands, and proceed to gel purification.
1.3 Gel Purification
Procedure
Place the excised gel pieces into Eppendorf tubes.
Add 400 μL of Dissolve Buffer to dissolve the gel.
Heat at 37°C until fully dissolved.
Transfer the dissolved solution to a column and centrifuge at 13,000rpm for 1 minute at 4°C, discarding the flow-through.
Add 200 μL of DNA Wash Buffer and centrifuge again at 13,000rpm for 1 minute, discarding the flow-through.
Repeat the wash step, centrifuge, and discard the flow-through.
Place the column into a clean 1.5 mL tube and elute the DNA with 20 μL of DNA Elution Buffer. Centrifuge at 13,000rpm for 1 minute.
Measure the concentration using a Nanodrop and proceed with the In-Fusion assembly.
2. In-Fusion Assembly (B)
Procedure
Prepare 3 Eppendorf tubes:
Tube
5x In-Fusion Premix
Linearized Vector
Fragment
[1]
2 μL
5 μL
3 μL Purified shRNA Fragment
[2]
2 μL
5 μL
3 μL Positive Control Liner
Incubate the tubes at 50°C for 15 min.
The reaction will produce pBlue_shRNA (10 μL) in tube [1] and the positive control in tube [2].
Store the products at -20°C.
3. Competent Cell Preparation (A)
Procedure
Add 6 mL of LB medium to each of 6 tubes.
Add 120 μL of the corresponding culture to each tube.
Incubate overnight at 37°C with shaking.
Results
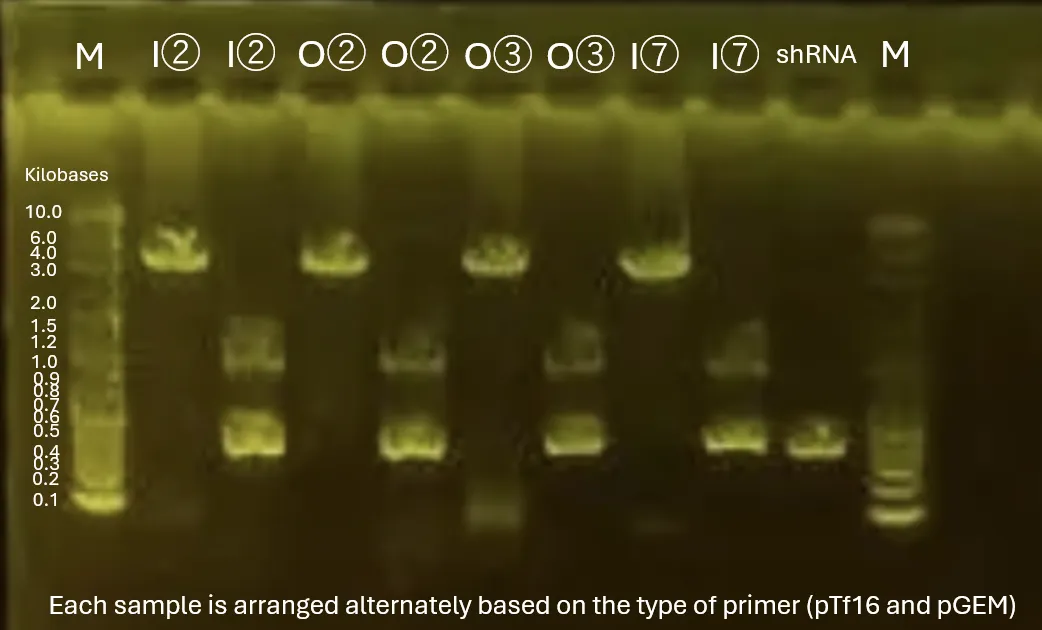
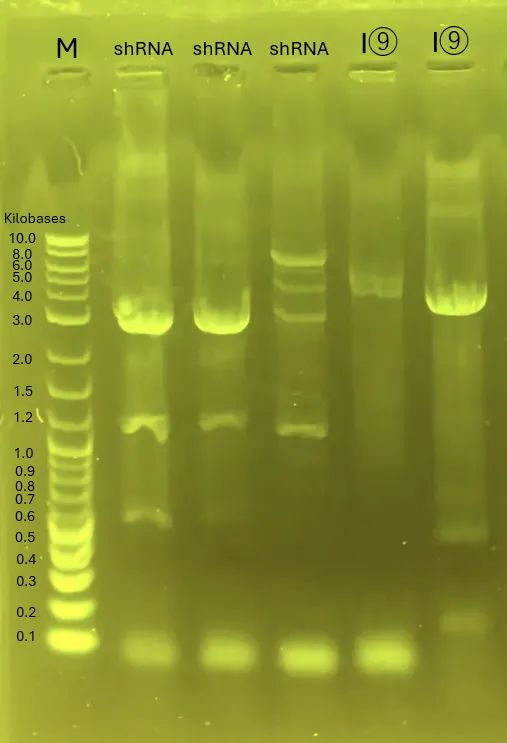
1.2 Gel Electrophoresis
Both ends contain the ladder.
From left to right:
INP_Glucanase with Primer for pTf16
INP_Glucanase with Primer for pBluescript
ompA_Glucanase with Primer for pTf16
ompA_Glucanase with Primer for pBluescript
ompA_Chitinase C with Primer for pTf16
ompA_Chitinase C with Primer for pBluescript
INP_Mgfp5_GH19 Chitinase with Primer for pTf16
INP_Mgfp5_GH19 Chitinase with Primer for pBluescript
The rightmost lane contains the shRNA fragment.
Figure 14.
Thursday, 240905
Objectives
Colony PCR, electrophoresis, and large-scale culture for the construction of surface-displayed strains (A)I[1][3][5][6][8][9] O[1][5][6][7][8][9].
Transformation for shRNA plasmid production strain construction using the plasmids made on 240904 (B).
Methods
1. Colony PCR (A)
1.1 PCR
Procedure
Add 12.5 μL of KOD1 and 10 μL of Mili-Q to 24 PCR tubes.
Add 1 μL of the DNA solution (12 types in total) to two tubes for each type.
Add 1.5 μL of pBlue primer to 12 tubes and 1.5 μL of pTf16 primer to the remaining 12 tubes.
Perform PCR.
98°C 2 min
98°C 10 sec, 60°C 5 sec, 68°C 15 sec (40 cycles)
68°C 5 min
4°C hold
Proceed to electrophoresis.
2. Electrophoresis
Procedure
Prepare agarose gel.
Load 5 μL of each PCR product and 4 μL of ladder at both ends.
Run electrophoresis and check for bands.
2. Large-scale culture (A)
Procedure
Add 3 mL LB to 4 separate 15 mL tubes.
Inoculate colonies into each tube.
Incubate overnight at 37°C with shaking.
3. Transformation (B)
Procedure
Add 50 μL competent cells to 2 Eppendorf tubes.
Add 1 μL pBl_shRNA to one tube and 1 μL of positive control to the other.
Incubate on ice for 30 min.
Add 400 μL SOC to each tube.
Incubate at 37°C for 1 hour.
Centrifuge at 5,000g for 1 minute at 4°C and discard 400 μL supernatant.
Plate the remaining volume onto LB plates with Amp 50 μg/mL.
Incubate overnight at 37°C.
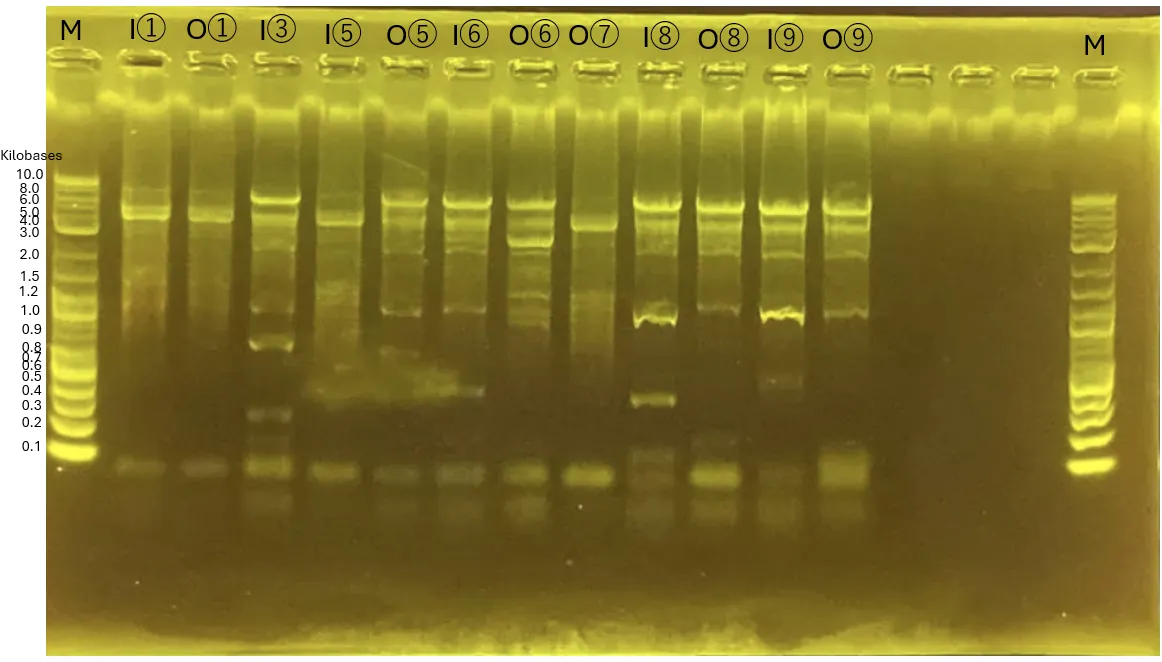
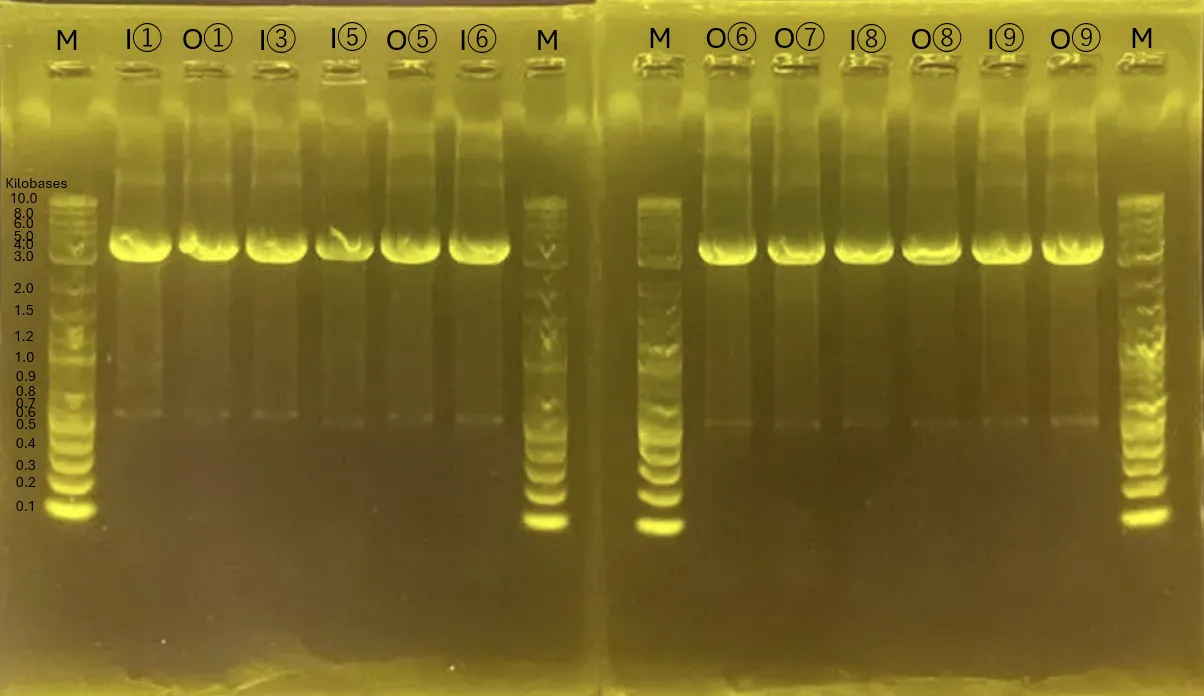
Results
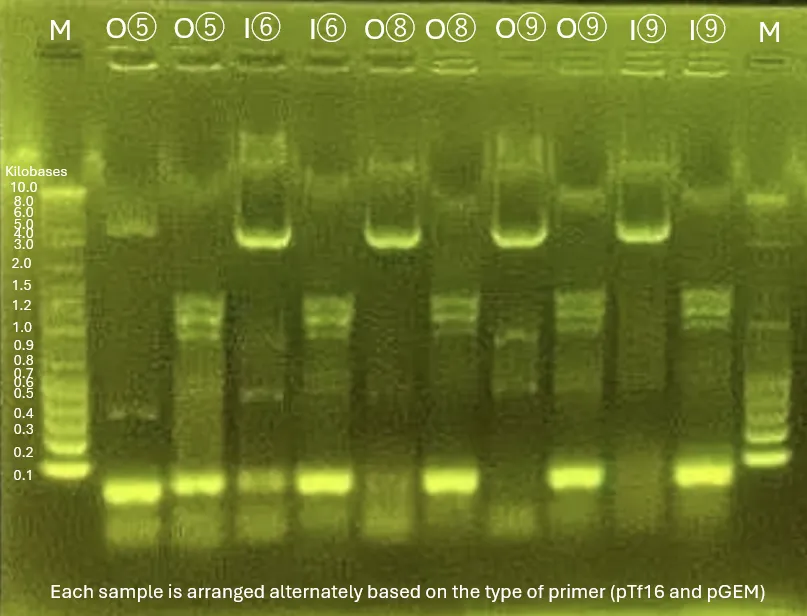
1-b Electrophoresis Results
The upper row shows the results using pBluescript primers.
The lower row shows the results using pTf16 primers.
Ladders are placed at both ends, and samples are arranged in numerical order:
INP_Mgfp5 [1]
ompA_Mgfp5_Chitinase C [6]
ompA_Mgfp5 [1]
ompA_Mgfp5_GH19 Chitinase [7]
INP_Chitinase C [3]
INP_Glucanase_Chitinase C [8]
INP_Mgfp5_Glucanase [5]
ompA_Glucanase_Chitinase C [8]
ompA_Mgfp5_Glucanase [5]
INP_Glucanase_GH19 Chitinase [9]
INP_Mgfp5_Chitinase C [6]
ompA_Glucanase_GH19 Chitinase [9]
Figure 15.
Figure 16.
Discussion
Strains for INP_Mgfp5 [1], ompA_Mgfp5 [1], INP_Chitinase C [3], INP_Mgfp5_Glucanase [5], INP_Mgfp5_GH19 Chitinase [7] and ompA_Mgfp5_GH19 Chitinase [7] were successfully obtained.
INP_Glucanase_GH19 Chitinase [9] band confirmation will be conducted again from Colony PCR the next day.
The unobtained surface displayed protein strains will be reconducted from transformation.
Friday, 240906
Objectives
Colony PCR, electrophoresis, and gel extraction for the surface display strain construction (A) I[9].
Creation of a master plate for the confirmed surface display strains (A) I[1][2][5][7] O[1][2][3][7].
Preparation of competent cells harboring scaffold protein plasmids for surface display strain construction (A)[0].
Large-scale culture of the confirmed shRNA plasmid-producing strain (B).
Methods
1. Colony PCR (A)[9], (B)
1.1 PCR
Procedure:
Prepare 5 PCR tubes with the following composition:
PCR Tube No.
DNA Solution
Dilute Primer
KOD1
Mili-Q
[1]
shRNA 5 μL
pBluescript 1.5 μL
12.5 μL
10 μL
[2]
shRNA 5 μL
pBluescript 1.5 μL
12.5 μL
10 μL
[3]
shRNA 5 μL
pBluescript 1.5 μL
12.5 μL
10 μL
[4]
INP 5 μL
pBluescript 1.5 μL
12.5 μL
10 μL
[5]
INP 5 μL
pTf16 1.5 μL
12.5 μL
10 μL
Perform PCR under the following conditions:
98°C for 2 min.
98°C for 10 sec, 60°C for 5 sec, 68°C for 15 sec (40 cycles).
68°C for 5 min.
Hold at 4°C.
Proceed with electrophoresis.
1.2 Electrophoresis
Procedure:
Prepare an agarose gel.
Load 5 μL of each PCR product and 3 μL of ladder into the wells.
Perform electrophoresis and observe the bands.
2. Large-Scale Culture (B)
Procedure:
Add 3 mL of LB with Ampicillin (100 μg/mL) to a 15 mL tube.
Add 2 μL of the DNA solution.
Incubate overnight at 37°C (temporarily store at -4°C on Friday).
Add 200 mL Milli-Q, 5 g LB, and 2 g agar to a 500 mL flask.
Autoclave at 121°C for 15 min.
Add 100 mL Ampicillin (100 mg/mL) and 80 μL of Chloramphenicol ethanol solution (50 mg/mL).
Pour into plates.
3.2 Master Plate Creation
Procedure:
Add 100 μL of each large-scale culture (8 types) to the Ampicillin/Chloramphenicol plates.
Incubate at 37°C (temporarily store at -4°C on Friday).
4. Competent Cell Preparation (A)[0]
Procedure:
Add 6 mL LB to each of the 6 tubes.
Add 120 μL of each large-scale culture.
Incubate at 37°C for 4 hours with shaking.
For each culture, transfer 1.5 mL into an Eppendorf tube, centrifuge at 10,000 rpm for 1 minute at 4°C, and remove the supernatant. Repeat 4 times.
Add 1 mL of 0.1 M MgCl2.
Centrifuge at 10,000 rpm for 1 minute at 4°C and remove the supernatant.
Add 1 mL of 0.1 M CaCl2.
Incubate on ice for 20 min.
Centrifuge at 10,000 rpm for 1 minute at 4°C and remove the supernatant.
Add 0.5 mL of 0.1 M CaCl2 with 10% glycerol.
Aliquot 100 μL into 5 Eppendorf tubes each and store at -80°C.
Results
1.2 Gel Electrophoresis:
The first 3 samples are from the shRNA-producing strain, while the last two are from the INP_Glucanase_GH19 Chitinase samples tested with the pBluescript and pTf16 primers.
Figure 17.
Discussion
The band for INP_Glucanase_GH19 Chitinase was faint in the pBluescript primer reaction, so large-scale culture was not performed. Only the second shRNA colony was selected for large-scale culture.
Monday, 240909
Objectives
Transformation for the construction of surface display strains for which master plates have not been created (A)[4][6][8][9].
PCR preparation for the construction of additional plasmids (C).
Methods
1. Transformation (A)
1.1 Media Preparation
Procedure:
Add 200 mL of Milli-Q water, 5 g LB, and 2 g Agar to a 500 mL flask.
Autoclave at 121°C for 15 min.
Add 100 μL of 100 mg/mL Ampicillin and 80 μL of 50 mg/mL Chloramphenicol ethanol solution.
Dispense the media into plates.
Note:
Since the media solidified before dispensing, reheat in the microwave. To account for potential Ampicillin inactivation, add an additional 70 μL of 100 mg/mL Ampicillin.
1.2 Transformation
Procedure:
Prepare 10 Eppendorf tubes with 50 μL of pTf16 competent cells (5 for INP and 5 for ompA).
Add 2.5 μL of each DNA to the respective tubes.
Incubate on ice for 30 min.
Add 400 μL of LB to each tube.
Incubate at 37°C for 1 hour.
Centrifuge at 5,000g for 1 minute at 4°C.
Remove 350 μL of the supernatant.
Plate the remaining solution on LB plates containing Ampicillin (50 μg/mL) and Chloramphenicol (20 μg/mL).
Incubate overnight at 37°C.
2. Fragment Preparation (C)
2.1 PCR Preparation
Procedure:
Prepare six PCR tubes, adding 22.5 μL of Master Mix, 1.5 μL of diluted primers, and 1 μL of each DNA solution.
Store at -30°C (for future PCR use after thawing).
Tuesday, 240910
Objectives
PCR and gel electrophoresis for additional plasmid construction (C).
Plasmid extraction and backup large-scale culture for shRNA plasmid production strain from 240906 (B).
Methods
1. Fragment Preparation (C)
1.1. PCR
Procedure:
Thaw the PCR solution from 240909 and perform PCR.
98°C for 2 min.
98°C for 10 sec, 60°C for 5 sec, 68°C for 15 sec (40 cycles).
68°C for 5 min.
4°C hold.
Proceed to gel electrophoresis.
1.2. Gel Electrophoresis
Procedure:
Prepare two gel electrophoresis gels.
Load 5 μL of PCR product into each well along with 4 μL of the ladder on both ends.
Run electrophoresis and verify the bands.
Perform a second round of electrophoresis for confirmation.
2. Plasmid Extraction (B)
Procedure:
Using an Eppendorf tube, collect 1 mL of culture and centrifuge at 12,000g for 30 sec. Remove the supernatant.
Repeat step 1.
Add 150 μL Buffer A1 (+ RNase A).
Vortex, then add 250 μL Buffer A2 and mix by inversion five times. Let it sit for 2 min.
Add 350 μL Buffer A3, mix by inversion, and centrifuge at 12,000g for 3 min.
Transfer the supernatant to the column and set up the collection tube.
Centrifuge at 2000g for 30 sec.
Add 450 μL Buffer AQ and centrifuge at 12,000g for 3 min.
Remove the remaining liquid and elute the plasmid by adding 50 μL Buffer AE to the column.
Centrifuge at 12,000g for 1 min.
Store at -20°C.
3. Large-Scale Culture (B)
Procedure:
Add 3 mL of LB media with 100 μg/mL Amp to a 15 mL tube.
Inoculate with 2 μL of the DNA solution.
Incubate overnight at 37°C.
Results
The presence of the desired fragments is uncertain based on the results.
Thursday, 240912
Objectives
Plasmid extraction from shRNA plasmid-producing strains (240910) following large-scale culture (B).
Large-scale culture of selected strains from master plates for SDS-PAGE (A) I[1][2][5][7] O[1][2][3][7].
PCR and gel purification for additional plasmid production (gel purification for fragments 1, 3, 4, 6 only) (C).
Methods
1. Plasmid Extraction (B)
Procedure:
Collect 1 mL of culture into an Eppendorf tube and centrifuge at 12,000 g for 30 sec to remove the supernatant.
Repeat step 1 with the same Eppendorf tube.
Add 150 μL of Buffer A1 (with RNase A) to the pellet.
Vortex, then add 250 μL of Buffer A2.
Invert five times, let stand for 2 min.
Add 350 μL of Buffer A3 and invert to mix.
Centrifuge at 12,000 g for 3 min.
Transfer the supernatant to a column placed in a collection tube.
Centrifuge at 2,000 g for 30 sec.
Discard the flow-through.
Add 450 μL of Buffer AQ to the column.
Centrifuge at 12,000 g for 3 min.
Discard the flow-through.
Elute the DNA with 50 μL of Buffer AE by centrifuging at 12,000 g for 1 min.
Measure plasmid concentration using Nanodrop.
Store at -20°C.
2. Fragment Preparation (C)
2.1 PCR
Procedure:
Prepare 6 PCR tubes by adding 1 μL of each DNA solution, 1.5 μL of each diluted primer, and 22.5 μL of Master Mix to each.
Perform PCR under the following conditions:
98°C for 2 min.
98°C for 10 sec, 60°C for 5 sec, 68°C for 60 sec (40 cycles).
68°C for 5 min.
Hold at 4°C.
Proceed to gel electrophoresis.
2.2 Gel Electrophoresis
Procedure:
Prepare the agarose gel.
Load 20 μL of each PCR product and 10 μL of the DNA ladder into the wells.
Run the gel to visualize the bands.
Excise the bands of interest (1, 3, 4, 6) for gel purification.
2.3 Gel Purification
Procedure:
Place the excised gel pieces into Eppendorf tubes.
Add 400 μL of Dissolve Buffer to each and heat at 37°C.
Transfer the dissolved gel to a column and centrifuge at 13,000 g for 1 min.
Wash with 200 μL of DNA Wash Buffer and centrifuge at 13,000 g for 1 min.
Repeat step 4.
Elute the purified DNA with 20 μL of DNA Elution Buffer and centrifuge at 13,000 g for 1 min.
Competent cell preparation and transformation for surface display strains lacking master plates, using scaffold protein plasmids (A) I[3][4][6][8][9] O[4][5][6][8][9].
PCR and gel purification of missing fragments 2 and 5 (C).
Methods
1. Fragment Preparation (C)
1.1 PCR
Procedure:
Thaw the PCR solution prepared on 240912 and run the PCR cycle.
98°C for 2 min.
98°C for 10 sec, 60°C for 5 sec, 68°C for 30 sec (40 cycles).
68°C for 5 min.
4°C hold.
Proceed to gel electrophoresis.
1.2 Gel Electrophoresis
Procedure:
Prepare the agarose gel.
Load 20 μL of each PCR product and 2 μL of ladder into the wells.
Perform gel electrophoresis and observe the bands.
Cut out the desired bands (fragments 2 and 5) for gel purification.
1.3 Gel Purification of PCR Products
Procedure:
Place the cut-out gel pieces into two Eppendorf tubes.
Add 400 μL of Dissolve Buffer to each tube and dissolve the gel.
Heat the tubes at 37°C.
Transfer the solution to a column and centrifuge at 13,000 rpm for 1 minute at 4°C, then discard the flow-through.
Add 200 μL of DNA Wash Buffer and centrifuge at 13,000 rpm for 1 minute at 4°C, then discard the flow-through.
Place the column in a new 1.5 mL tube.
Add 20 μL of DNA Elution Buffer and centrifuge at 13,000 rpm for 1 minute at 4°C.
Store at -20°C.
2. Competent Cell Preparation (A)[0]
Procedure:
Add 6 mL of LB medium to two 15 mL tubes.
Add 20 μL of large culture to each tube.
Shake at 37°C for 2 hours.
Centrifuge at 10,000 rpm for 2 min at 4°C and discard the supernatant.
Add 1 mL of 0.1 M CaCl2 and repeat the centrifugation, discarding the supernatant.
Add 0.5 mL of 0.1 M CaCl2 with 10% glycerol.
Aliquot 100 μL into Eppendorf tubes and store at -80°C.
3. Transformation (A) I[3][6][8][9] O[5][6][8][9]
3.1 Media Preparation
Procedure:
Add 300 mL of mili-Q, 7.5 g of LB, and 3 g of agar to Flask 1.
Add 100 mL of mili-Q and 2.5 g of LB to Flask 2.
Autoclave at 121°C for 15 min.
Add 150 μL of ampicillin and 120 μL of chloramphenicol solution to Flask 1.
Pour Flask 1 onto plates.
3.2 Transformation
Procedure:
Add 50 μL of competent cells to 10 Eppendorf tubes (INP x5 and ompA x5).
Add 1 μL of DNA to each tube.
Incubate on ice for 20 min.
Add 400 μL of LB to each tube.
Incubate at 37°C for 1 hour.
Centrifuge at 10,000 g for 1 minute at 4°C, discarding the supernatant (originally 5,000 g).
Spread the remaining pellet on LB plates (Amp 50 μg/mL + chloramphenicol 20 μg/mL).
Incubate overnight at 37°C.
Results
The next day, no colonies were observed on plate I③ and O⑥⑧ thus transformation will be reattempted.
Tuesday, 240917
Objectives
Colony PCR of (A) I[6][8][9] O[5][9], large-scale culture of (A) I[8][9], and transformation to generate surface-display strains that have not yet been included in the master plate(A) I[3][6] O[5][6][8][9].
PCR and gel purification for missing fragments 2 and 5 (C).
Golden Gate Assembly with shRNA containing pBl and 3 types of surface display proteins (A)(B).
Methods
1. Colony PCR (A) I[6][8][9] O[5][9]
1.1 PCR
Procedure:
Add 12.5 μL KOD1 and 10 μL mili-Q to 10 PCR tubes.
Add 1.5 μL of either pTf16 or pBlue diluted primer to 5 tubes each.
Add 1 μL of DNA solution from each colony to the respective tubes.
Perform PCR under the following conditions:
98°C for 2 min.
98°C for 10 sec, 60°C for 5 sec, 68°C for 15 sec (40 cycles).
68°C for 5 min.
Hold at 4°C.
Proceed to gel electrophoresis.
1.2 Gel Electrophoresis
Procedure:
Prepare the agarose gel.
Load 5 μL of each PCR product and 3 μL of the DNA ladder into wells.
Run the gel and check for bands.
2. Large-scale Culture (A)
Procedure:
Add 3 mL LB (with antibiotics) to two 15 mL tubes.
Inoculate 2 μL DNA solution into each tube.
Incubate overnight at 37°C.
3. Fragment Preparation (Redo for Fragments 2 and 5) (C)
3.1 PCR
Procedure:
In two PCR tubes, mix 2 μL of DNA solution, 3 μL of diluted primers, and 45 μL of Master Mix (2x volume).
Perform PCR with the following conditions:
98°C for 2 min.
98°C for 10 sec, 60°C for 5 sec, 68°C for 30 sec (40 cycles).
68°C for 5 min.
Hold at 4°C.
Proceed to gel electrophoresis.
3.2 Gel Electrophoresis
Procedure:
Prepare the agarose gel.
Load 30 μL of each PCR product and DNA ladder into wells.
Run the gel and visualize the bands.
Excise the desired bands (fragments 2 and 5) for gel purification.
3.3 Gel Purification
Procedure:
Place the gel slices into two Eppendorf tubes.
Add 400 μL of Dissolve Buffer to each and heat at 37°C until dissolved.
Transfer the solution to columns and centrifuge at 13,000 rpm for 1 min.
Add 200 μL of DNA Wash Buffer and centrifuge at 13,000 rpm for 1 min.
Repeat step 4.
Elute DNA with 20 μL of Elution Buffer and centrifuge for 1 min at 13,000 rpm.
Measure concentration with Nanodrop.
Store at -20°C.
4. Transformation (A) I[3][6] O[5][6][8][9]
Procedure:
In 7 Eppendorf tubes, add 50 μL competent cells.
Add 1 μL of each DNA sample.
Incubate on ice for 20 min.
Add 400 μL LB to each tube.
Incubate at 37°C for 1 hour.
Centrifuge at 5,000 g for 1 min at 4°C.
Remove 350 μL of the supernatant.
Plate the remaining solution onto LB plates with antibiotics.
Incubate overnight at 37°C.
5. GGA Assembly (A)(B)
Procedure:
Add Sample 1 to one PCR tube and Sample 2 to another.
Add additional reagents to both tubes.
Perform PCR under the following conditions:
42°C for 1 min, 16°C for 1 min (30 cycles).
60°C for 5 min.
Store on ice.
Results
1. Colony PCR
Figure 18.
2. Gel Purification Concentrations (Nanodrop Measurements)
Fragment 2:
6.3 ng/μL.
Fragment 5:
2.7 ng/μL.
Discussion
The bands for
INP_Glucanase_Chitinase C (I[8])
and
INP_Glucanase_GH19 Chitinase (I[9])
were clean and distinct. These strains will proceed to large-scale culture for further experiments. Other strains I[6] O[5][9] were retransformed on the same day along with plate I[3] and O[6][8].
The next day, no colonies were observed on plate I[3] and O[6][8] thus transformation will be reattempted.
Wednesday, 240918
Objectives
PCR and gel purification using the PCR products of fragments 2 and 5 prepared on 240917 (C).
Colony PCR for surface display strain construction (A) I[6] O[5][9].
Methods
1. Colony PCR (A) I[6] O[5][9]
(7 and 8 involve regular PCR (C))
1.1 PCR
Procedure
Add 12.5 μL of KOD1, 10 μL of Mili-Q water, 1.5 μL of diluted primer solution, and 1 μL of each DNA solution to 8 PCR tubes.
Perform the PCR.
98℃ for 2 min
98℃ for 10 sec, 60℃ for 5 sec, 68℃ for 15 sec (40 cycles)
68℃ for 5 min
Hold at 4℃
Proceed to electrophoresis.
1.2 Electrophoresis
Procedure
Prepare the agarose gel.
Load 25 μL of each PCR product and 3 μL of ladder into the wells.
Perform electrophoresis to confirm the presence of bands.
Excise the desired bands from the gel and proceed to gel purification.
1.3 Gel Purification of PCR Products
Procedure
Place the excised gel fragments into Eppendorf tubes.
Add 400 μL of Dissolve Buffer to each tube and heat at 37℃ until completely dissolved.
Transfer the solution to a column and centrifuge at 13,000 rpm for 1 min at 4℃. Discard the flow-through.
Add 200 μL of DNA Wash Buffer and centrifuge again at 13,000 rpm for 1 min at 4℃. Discard the flow-through.
Repeat step 4 one more time.
Place the column in a 1.5 mL tube and add 20 μL of DNA Elution Buffer. Centrifuge at 13,000 rpm for 1 min at 4℃.
ompA_Glucanase_GH19 Chitinase (scaffold protein primers)
Figure 19.
Despite the presence of some bands, the results did not appear satisfactory thus transformation of will be reconducted the next day.
I[3][6] O[5][6][8][9]
Thursday, 240919
Objectives
PCR and gel extraction of DNA fragments 2 and 5 for In-Fusion cloning (now all fragments are ready).
Colony PCR for surface display strain creation (for strains that are not in master plate (A) I[3] O[5][6][8][9]), and large-scale culture of presumably successful strains (A) O[5][6][8][9].
Master plate preparation for strains confirmed by colony PCR and those under large-scale culture (A) I[8][9].
Methods
1. Fragment Preparation for In-Fusion Cloning (C)
1.1 PCR
Procedure
Add 1 μL of each DNA solution, 1.5 μL of diluted primer mix, and 22.5 μL of Master Mix to the PCR tubes.
Run the PCR with the following conditions:
98°C for 2 min
98°C for 10 sec, 60°C for 5 sec, 68°C for 30 sec (40 cycles)
68°C for 5 min
Hold at 4°C
Proceed to gel electrophoresis for further analysis.
1.2 Gel Electrophoresis
Procedure
Prepare the agarose gel.
Load 20 μL of PCR product and 4 μL of DNA ladder into the wells.
Perform electrophoresis and verify the band patterns.
Excise the bands corresponding to fragments 2 and 5 for gel extraction.
1.3 Gel Extraction of PCR Products
Procedure
Place the excised gels in Eppendorf tubes.
Add 400 μL Dissolve Buffer to each tube and dissolve the gels at 37°C.
Transfer the solution to a column and centrifuge at 13,000 rpm for 1 min at 4°C, discarding the flow-through.
Add 200 μL DNA Wash Buffer and centrifuge again for 1 min at 13,000 rpm.
Centrifuge once more without adding any liquid.
Elute the DNA by adding 20 μL DNA Elution Buffer and centrifuge at 13,000 rpm for 1 min.
Measure the DNA concentration using a Nanodrop and store at -20°C.
2. Colony PCR (A) I[3] O[5][6][8][9]
2.1 PCR
Procedure
Add 12.5 μL KOD1, 10 μL mili-Q, 1.5 μL diluted primer mix, and 1 μL DNA solution into 10 PCR tubes.
Perform the PCR under the following conditions:
98°C for 2 min
98°C for 10 sec, 60°C for 5 sec, 68°C for 15 sec (40 cycles)
68°C for 5 min
Hold at 4°C
Proceed to gel electrophoresis for analysis.
2.2 Gel Electrophoresis
Procedure
Prepare the agarose gel.
Load 5 μL PCR product and 3 μL DNA ladder into the wells.
Perform electrophoresis and verify the band patterns.
3. Large-Scale Culture (A) O[5][6][8][9]
Procedure
Add 3 mL LB (with Amp and chloramphenicol) to two 15 mL tubes.
Add 2 μL DNA solution from each colony into the tubes.
Incubate overnight at 37°C.
4. Master Plate Preparation (A) I[8][9]
4.1 Media Preparation
Procedure
Add 200 mL mili-Q water, 5 g LB, and 2 g agar to a flask.
Autoclave at 121°C for 15 min.
Add 100 μL Amp and 80 μL chloramphenicol ethanol solution.
Pour into plates.
4.2 Master Plate Preparation
Procedure
Add 100 μL of each large-scale culture liquid onto the plates.
Incubate at 37°C.
5. In-Fusion Assembly (C)
Procedure
Prepare three Eppendorf tubes (a, b, c) with the following mixtures:
No.
Name
Enzyme
Insert1
Insert2
Backbone
Mili-Q
a
pTf16_INP_phaCReAB
1 μL
INP-phaCReAB-pTf16
pTf16-INP-phaCReAB
liner pTf16
1 μL
b
pGEM-phaCReAB-VNPs
1 μL
pGEM-phaCReAB-VNPs-pGEM-phaCReAB
liner pGEM-phaCReAB
1 μL
c
pGEM-phaCReAB_phaCReAB_VNPs
1 μL
pGEM-phaCReAB-VNPs-pGEM-phaCReAB
liner pGEM-phaCReAB_phaCReAB
1 μL
Incubate at 50°C for 15 min.
Store at -20°C.
Results
2-b Result:
The left gel shows surface display primers, and the right gel shows scaffold protein primers.
From left to right: INP_Chitinase C, ompA_Mgfp-5_Glucanase, ompA_Mgfp-5_Chitinase C, ompA_Glucanase_Chitinase C, ompA_Gly
Figure 20.
Friday, 240920
Objectives
Retry of colony PCR from 240919 with corrected primers, followed by gel electrophoresis, and prepare master plates for four ompA strains (A) O[5][6][8][9].
Transformation of the shRNA-expressing plasmid and three additional plasmids from 240919’s In-Fusion reaction (B)(C).
Methods
1. Colony PCR (A) I[3] O[5][6][8][9]
Procedure
Add KOD1 12.5 μL, Mili-Q 10 μL, diluted primer solution 1.5 μL, and DNA solution 1 μL to each of the five PCR tubes.
Perform PCR.
98℃ 2 min
98℃ 10 sec, 60℃ 5 sec, 68℃ 15 sec (40 cycles)
68℃ 15 min
4℃ hold
Proceed to gel electrophoresis.
2. Gel Electrophoresis
Procedure
Prepare agarose gel.
Add 5 μL of each PCR product and 3 μL of the ladder to the wells.
Run electrophoresis and check for bands.
3. Master Plate Preparation (A) O[5][6][8][9]
Procedure
Add 100 μL of each cultured strain to separate LB plates.
Incubate at 37℃.
4. Transformation (B)(C)
Procedure
Add 40 μL of competent cells to four Eppendorf tubes.
Add 1 μL of each DNA solution to the respective tubes.
Incubate on ice for 20 min.
Add 400 μL of LB to each tube.
Incubate at 37℃ for 1 hour.
Centrifuge at 5,000g for 1 minute at 4℃, then remove 400 μL of supernatant.
Master plates will be made using the strains that were cultured overnight.
Figure 21.
O[5][6][8][9] showed correct band size but not I[3], thus only ompA samples that will be inoculated into master plate.
Tuesday, 240924
Objectives
Fragment preparation for the creation of new plasmids.
Colony PCR and large-scale culture for the new plasmid construction.
Preparation for SDS-PAGE and Western blot (WB) of surface display strains.
Methods
1. Fragment Preparation
1.1 PCR
Procedure
Add 1 μL of each DNA solution, 1.5 μL of diluted primers, 12.5 μL of KOD1, and 10 μL of mili-Q into two PCR tubes.
Perform the PCR under the following conditions:
98°C for 2 minutes
98°C for 10 seconds, 60°C for 5 seconds, 68°C for 15 seconds (40 cycles)
68°C for 15 minutes
4°C hold
Proceed with the electrophoresis step.
1.2 Electrophoresis
Procedure
Prepare the agarose gel.
Load 20 μL of PCR product and 4 μL of the ladder into the wells.
Run electrophoresis and check the bands.
Since the desired bands were overrun, the gel extraction couldn’t be performed. PCR will be redone on 240925.
2. Colony PCR
2.1 PCR
Procedure
Add 11.375 μL of the mastermix, 0.625 μL of the diluted primer solution, and 5 μL of DNA solution to 9 PCR tubes.
Perform the PCR under the following conditions:
98°C for 2 minutes
98°C for 10 seconds, 60°C for 5 seconds, 68°C for 15 seconds (40 cycles)
68°C for 15 minutes
4°C hold
Proceed with the electrophoresis step.
2.2 Electrophoresis
Procedure
Prepare the agarose gel.
Load 5 μL of PCR product and 3 μL of the ladder into the wells.
Run electrophoresis and check the bands.
3. Large-Scale Culture
Procedure
Add 3 mL of LB containing Amp (100 μg/mL) to three 15 mL tubes.
Add 2 μL of each DNA solution.
Incubate overnight at 37°C.
4. His-Tag Sample Preparation
4.1 Media Preparation
Procedure
Add 600 mL of mili-Q water and 15 g of LB to a 1000 mL flask.
Sterilize, then add 300 μL of Amp and 240 μL of chloramphenicol.
4.2 Sample Preparation
Procedure
Add 200 mL of LB containing Amp (50 μg/mL) and chloramphenicol (20 μg/mL) to two 300 mL flasks.
Add 1 mL of the large-scale culture for INP_Mgfp5 and ompA_Mgfp5 to each flask.
Incubate at 37°C for 3 hours.
Add 160 μL of 1M IPTG.
Add 2 mL of 2% L-Arabinose.
Incubate overnight at 37°C.
Add 20 mL of LB containing Amp (50 μg/mL) and chloramphenicol (20 μg/mL) to 10 tubes.
Add 1 mL of the remaining 10 cultures to the tubes.
Incubate at 37°C for 3 hours.
Add 16 μL of 1M IPTG.
Add 200 μL of 2% L-Arabinose.
Incubate overnight at 37°C.
Results
Fragment Preparation PCR
The PCR overran and was unsuccessful.
Colony PCR for the strains transformed on 240920
Figure 22.
Wednesday, 240925
Objectives
SDS-PAGE preparation for surface display strains.
Methods
1. SDS-PAGE Preparation
1.1 Sample Preparation
Procedure
Centrifuge eight 50 mL tubes containing the culture solutions at 4000 rpm for 5 minutes at 4°C. Discard the supernatant.
Repeat the centrifugation until all supernatant is removed.
Add 5 mL of PBS to each tube.
Centrifuge again at 4000 rpm for 1 minute at 4°C, and discard the supernatant.
Add 1 mL of 20% sucrose, 5 mM EDTA, and 10 mM HEPES to each tube.
Transfer the samples to Eppendorf tubes and incubate them on ice for 10 minutes.
Centrifuge at 5,000g for 10 minutes, and remove the supernatant.
Add 5 mM MgSO4 and incubate at 4°C for 15 minutes.
Centrifuge at 5,000g for 10 minutes, and collect the supernatant.
Thursday, 240926
Objectives
Fragment preparation, Infusion, and transformation for creating new plasmids.
Large-scale culture for new plasmid preparation.
Methods
1. Fragment Preparation
1.1 PCR
Procedure
In two PCR tubes, add 1 μL of each DNA solution, 1.5 μL of each diluted primer solution, 12.5 μL of KOD1, and 10 μL of mili-Q.
Perform PCR.
PCR conditions:
98℃ for 2 minutes
98℃ for 10 seconds, 60℃ for 5 seconds, 68℃ for 15 seconds (40 cycles)
68℃ for 15 minutes
Hold at 4℃
Proceed to gel electrophoresis.
1.2 Gel Electrophoresis
Procedure
Prepare agarose gel.
Load 20 μL of each PCR product and 10 μL of ladder into the gel wells.
Perform electrophoresis and check the bands.
Excise the desired bands for gel purification.
1.3 Gel Purification
Procedure
Place the excised gels into two Eppendorf tubes.
Add 400 μL of Dissolve Buffer to each tube to dissolve the gel.
Heat at 37℃.
Transfer the solution to a column, and centrifuge at 13,000 rpm for 1 minute at 4℃. Discard the flow-through.
Add 200 μL of DNA Wash Buffer, centrifuge again, and discard the flow-through.
Repeat the centrifugation step.
Add 20 μL of DNA Elution Buffer to the column and centrifuge at 13,000 rpm for 1 minute.
Measure the DNA concentration using Nanodrop.
Store the purified DNA at -20℃.
2. Infusion Assembly
Procedure
In an Eppendorf tube, mix 3 μL of mili-Q, 1 μL of 5x In-Fusion HD Enzyme Premix, 1 μL of pTf16 backbone, and 1 μL of the purified shRNA fragment.
Incubate at 50℃ for 50 minutes.
The resulting pTf16_shRNA solution (5 μL) is ready.
3. Transformation
Procedure
Add 5 μL of pTf_shRNA to 50 μL of competent DH5α cells in an Eppendorf tube.
Incubate on ice for 20 minutes.
Add 400 μL of SOC and incubate at 37℃ for 1 hour.
Centrifuge at 5,000g for 1 minute and discard 400 μL of the supernatant.
Spread the remaining solution on LB plates containing Amp and chloramphenicol.
Incubate overnight at 37℃.
4. Large-Scale Culture
Procedure
Add 3 mL of LB and 3 μL of each culture into three 15 mL tubes.
Perform pre-culturing at 37℃ for 1 hour.
Add 1.5 μL of Amp to each tube.
Incubate overnight at 37℃.
Results
Gel Electrophoresis
Both fragments were successfully prepared, and purification and Infusion steps proceeded.
Figure 23.
Plasmid concentrations (high 260/280 ratios):
shRNA = 35.9 ng/μL
pTf16 = 47.8 ng/μL
Friday, 240927
Objectives
Infusion and transformation for creating new plasmids.
Colony PCR, electrophoresis, and large-scale culture for shRNA-producing plasmid (3 protein types).
SDS-PAGE and Western Blot preparation for surface display strains.
Methods
1. Infusion Assembly
Procedure
In four Eppendorf tubes, add 2 μL of mili-Q, 1 μL of 5x In-Fusion HD Enzyme Premix, 1 μL of pTf16 Backbone, and 1 μL of Purified shRNA Fragment.
Incubate at 50℃ for 50 minutes.
The final solution will contain 5 μL of pTf_shRNA.
2. Transformation
Procedure
In four Eppendorf tubes, add 5 μL of pTf_shRNA to 50 μL of DH5α competent cells.
Incubate on ice for 20 minutes.
Add 400 μL of SOC to each tube.
Incubate at 37℃ for 1 hour.
Centrifuge at 5,000g for 1 minute and discard 400 μL of the supernatant.
Spread the remaining solution on LB plates containing Amp (50 μg/mL).
Incubate overnight at 37℃.
3. Colony PCR
3.1 PCR
Procedure
In three PCR tubes, add 12.5 μL of KOD1, 10 μL of mili-Q, 1.5 μL of diluted primer solution, and 1 μL of DNA solution.
Perform PCR.
PCR conditions:
98℃ for 2 minutes
98℃ for 10 seconds, 60℃ for 5 seconds, 68℃ for 15 seconds (40 cycles)
68℃ for 5 minutes
Hold at 4℃
Proceed to gel electrophoresis.
3.2 Gel Electrophoresis
Procedure
Prepare agarose gel.
Load 5 μL of each PCR product and 3 μL of the ladder into the gel wells.
Perform electrophoresis and verify the bands.
4. Large-Scale Culture
Procedure
In three 15 mL tubes, add 3 mL of LB (with Amp) and 3 μL of DNA solution.
Incubate overnight at 37℃.
Results
Monday, 240930
Objectives
Quantification of shRNA using RT-qPCR and RNA extraction.
Methods
1. RNA Extraction
Procedure
Transfer 3 mL of each cultured sample into a 1.5 mL Eppendorf tube. Centrifuge at 3,000g for 1 minute and discard the supernatant.
Repeat step 1.
Add 1 mL PBS and centrifuge at 300g for 5 minutes, discarding the supernatant.
Add 200 μL of LBA+TG Buffer and disperse using pipetting and vortexing.
Add 130 μL of RDB and vortex for 10 seconds.
Centrifuge at 12,000g for 2 minutes.
Transfer the supernatant to a new 1.5 mL tube, add 400 μL isopropanol, and vortex.
Transfer the solution to a column and centrifuge at 12,000g for 30 seconds, discarding the supernatant.
Repeat step 8.
Add 500 μL of RNA Wash Solution and centrifuge at 12,000g for 2 minutes.
Set the column into a 1.5 mL elution tube.
Add 40 μL of Nuclease-Free Water and centrifuge at 12,000g for 1 minute.
Add 5 μL DNase I and 5 μL DNase 10x Buffer to the eluate, incubating at room temperature for 5 minutes.
Add 150 μL of LBA+TG Buffer and 300 μL of 95% ethanol, vortexing to mix.
Transfer 500 μL of the solution to a new column, centrifuge at 12,000g for 30 seconds, and discard the flow-through.
Add 500 μL of RNA Wash Solution, centrifuge at 12,000g for 30 seconds, and discard the flow-through.
Repeat step 16.
Set the column in a new 1.5 mL elution tube and add 30 μL of Nuclease-Free Water. Centrifuge at 12,000g for 1 minute.
Measure the RNA concentration using Nanodrop.
2. RT-qPCR
2.1 cDNA Preparation
Procedure
Add 8 μL of RNA template and 2 μL of diluted primer solution to two 1.5 mL tubes.
Heat at 70°C for 5 minutes, then cool on ice for 10 minutes.
Add 4 μL of GoScript 5X reaction buffer, 2 μL of MgCl2, 1 μL of PCR nucleotide mix, 0.5 μL of RNAsin ribonuclease inhibitor, 1 μL of GoScript Reverse Transcriptase, and 1.5 μL of Nuclease-Free Water.
Incubate at 25°C for 5 minutes.
Perform reverse transcription at 42°C for 1 hour.
Inactivate the reaction by heating at 70°C for 15 minutes.
2.2 Standard Curve Template Preparation
Procedure
Add 12.5 μL KOD1, 10 μL mili-Q, 1.5 μL diluted primer solution, and 1 μL pBluescript_shRNA plasmid to a PCR tube.
Perform PCR under the following conditions:
98°C for 2 minutes
98°C for 10 seconds, 60°C for 5 seconds, 68°C for 15 seconds (25 cycles)
68°C for 5 minutes
Hold at 4°C
Measure concentration using Nanodrop.
Prepare a dilution series (10x to 100,000x) and measure concentrations using Nanodrop.
2.3 qPCR
Procedure
In seven PCR tubes, add 10 μL GoTaq qPCR Master Mix, 1 μL diluted primers, 0.2 μL CXR Dye, 4.8 μL Nuclease-Free Water, and 4 μL DNA template.
Perform qPCR under the following conditions:
98°C for 2 minutes
98°C for 15 seconds, 60°C for 60 seconds (40 cycles)
Acquire data using the SYBR Green I settings (Excitation: 493 nm, Emission: 529 nm).
Results
Extracted RNA Concentrations:
Sample 1: 13.1 ng/μL
Sample 3: 70.9 ng/μL
Diluted PCR Product Concentrations for qPCR:
10x: 9.9 ng/μL
100x: 6.0 ng/μL
1000x: 0.1 ng/μL
10,000x and 100,000x: undetectable
qPCR results were not satisfactory.
The results of the Western Blotting were unclear, so a more reliable method, bead purification, was attempted on 241001.
Tuesday, 241001
Objectives
Preparation for quantification of shRNA using RT-qPCR. B
HisTag Purification Using Magnetic Beads and SDS-PAGE. A
Methods
1. PCR B
1.1 PCR
Procedure
Add 22.5 μL Master Mix, 1.5 μL diluted primer solution, and 1 μL of each DNA solution to five PCR tubes.
Perform PCR with the following conditions:
98°C for 2 minutes
98°C for 10 seconds, 60°C for 5 seconds, 68°C for 15 seconds (25 cycles)
68°C for 5 minutes
Hold at 4°C
Measure the concentration using Nanodrop.
1.2 Gel Electrophoresis
Procedure
Prepare the electrophoresis gel.
Load 5 μL of each PCR product and 3 μL ladder (in both end wells) into the wells of the agarose gel.
Run the electrophoresis and confirm the bands.
2. Preparation for RT-qPCR B
2.1 Standard Curve Template Preparation
Procedure
Prepare five PCR tubes with the following compositions and measure their concentrations using Nanodrop:
Dilution Factor
PCR Product Volume
Nuclease-Free Water
10X
1 μL
9 μL
100X
0.1 μL
9.9 μL
1000X
0.01 μL
9.99 μL
10000X
0.001 μL
9.999 μL
100000X
0.0001 μL
9.9999 μL
2.2 Sample Preparation
Procedure
Add 16 μL qPCR Master Mix (2x) and 4 μL DNA solution into eight Eppendorf tubes.
Transfer to a plate and store at -20°C.
Note: Plate positions A1-A8 correspond to the above DNA solutions.
3. Nef Purification (Magnetic Beads) A
Procedure
Transfer 10 µL of Dynabeads into individual 1.5 mL tubes, then place on a magnetic stand for 2 minutes to allow separation.
After removing the supernatant, add 500 µL of Binding Buffer and an appropriate volume of membrane fraction sample, then incubate on a rotator at room temperature (RT) for 10 minutes.
Add 300 µL of Binding Buffer, mix by gentle inversion, and place on the magnetic stand for 2 minutes to wash the beads.
Repeat step 3 for a total of three washes.
Add 100 µL of His-Elution Buffer and incubate at RT for 5 minutes.
Collect the supernatant and perform desalination treatment to it.
4.
SDS-PAGE A
4.1 Gel Preparation
Procedure
Wash the gel glass with ethanol, insert the Teflon tubing, and secure it with clips.
Pour the separating gel, prepared as per the table, into the gel without creating bubbles (add APS and TEMED just before pouring). The recommended height is about 80%. To prevent the gel from drying out, add water on top.
Once the gel has solidified after about 15 minutes, remove the water, layer the stacking gel as prepared according to the table, and quickly insert the comb.
After the gel has solidified, wrap the gel plate in Kimwipes, moisten with water to prevent drying, and wrap it in plastic wrap.
Store it in the refrigerator.
4.2
Electrophoresis
Procedure
Take out the two prepared gels from the refrigerator, and remove the clips and Teflon tubing.
Fill the electrophoresis tank with buffer up to about 5 cm from the bottom and place the gels inside (ensure no bubbles are formed).
After filling the buffer to the top, carefully remove the comb and clean the wells with a pipette.
Mix the sample with an appropriate amount of Sample Buffer (SB) using a vortex, then heat it at 95°C for 3 minutes using a heat block. For solid samples, suspend in 1x SB based on the apply volume. For liquid samples, add 5x SB at 1/5 the sample volume.
After heating, vortex the samples and spin down using a mini centrifuge.
Apply the samples (max 25 µL) and the Precision Plus Protein WesternC Standard marker (5 µL) to the wells.
Close the lid on the electrophoresis tank and run at 30 mA per gel for 60 minutes.
After electrophoresis, use a spatula to cut off the stacking gel and make a notch in the gel (for marking).
Soak the gel in fixative solution for 10 minutes → MQ water for 10 minutes → CBB-R for 60 minutes → MQ water (overnight) while shaking.
Results
A target band around 300 bp was detected for the shRNA fragment.
Figure 24.
SDS-PAGE Results
Lane 1 and Lane 2 represent the purified and supernatant fractions of O_3, respectively, while Lane 3 and Lane 4 correspond to the purified and supernatant fractions of I_3.